


Outboard Dies Under Load? Troubleshooting Power Loss & Bogging on the Water
- 5 Quick Checks to Try On the Water
- Spun Propeller Hub: When RPMs Climb But Speed Doesn't
- Propeller Debris and Entanglement
- Fuel Delivery Problems: Fixing Hesitation, Bogging, and Stalling
- Ignition: Spark Plugs, Wires, and Primer Solenoid
- Exhaust Restrictions and Carbon Buildup
- Engine Temperature Sensors and Limp Mode
- JLM Marine Diagnostic Flowchart for Bogging Under Load
- DIY vs. Mechanic: Which Bogging Repairs Require Professional Tools?
- Parts & Tools You Might Need (With Expected Diagnostic Times)
- JLM Marine's Top Customer FAQs on Outboard Power Loss
- Maintaining Your Outboard to Prevent Power Loss

If your outboard idles fine but bogs, hesitates, or dies when you throttle up, the engine can't get enough fuel, air, or spark under load. I've fixed this hundreds of times over the last 20 years. Start with the quick checks on the water, then move to the more involved diagnostics.
5 Quick Checks to Try On the Water
Check Prop for Debris/Entanglement: Fishing line, weeds, or plastic bags wrapped around the prop blades or shaft create massive drag. I've seen a single strand of monofilament cut top speed in half. Kill the engine, pull the lanyard, and use pliers or a knife to cut away anything wrapped around the hub or blades.
Inspect Prop Hub for Spinning: If the rubber bushing inside the hub has failed, the prop spins on the shaft while RPMs climb but boat speed stays flat. With the engine off, try to rotate the prop by hand—if it slips against the shaft with a rubbery feel, the hub is spun. You can also paint a straight reference line across the inner hub barrel and outer prop with a paint pen. Run the boat hard, then check if the line has broken. If it has, the hub slipped. This is a classic issue discussed in detail in our Propeller Slip or Engine Issue? When Your Boat Can’t Reach Speed guide.
Verify Fuel Tank Vent is Open: A closed or clogged vent creates a vacuum as the engine pulls fuel. At idle, flow is low enough to work. Under load, the tank can't breathe and starves the engine. Open the vent. If the engine suddenly runs better after you crack the fuel cap, the vent line is blocked—possibly by mud dauber nests or debris. Remove the vent fitting and blow it clear with low-pressure compressed air or run a small wire through it.
Check Spark Plugs and Wiring Visually: Pull the plug wires one at a time (mark them so you don't mix up the firing order) and inspect the plugs. Heavy carbon fouling, oil coating, or a gap worn wider than spec will cause weak spark under the higher cylinder pressure at throttle. Check the wire boots for corrosion or cracks. For detailed guidance on spark plugs, see High-Performance Spark Plugs: Do They Make a Difference?.
Listen and Observe RPM Fluctuation Under Throttle: A deep, muffled bog with black smoke indicates a rich fuel condition—too much fuel, not enough air. A hollow, gasping sound with the engine struggling to rev points to a lean condition—not enough fuel. Note which one you're hearing; it narrows the diagnosis.
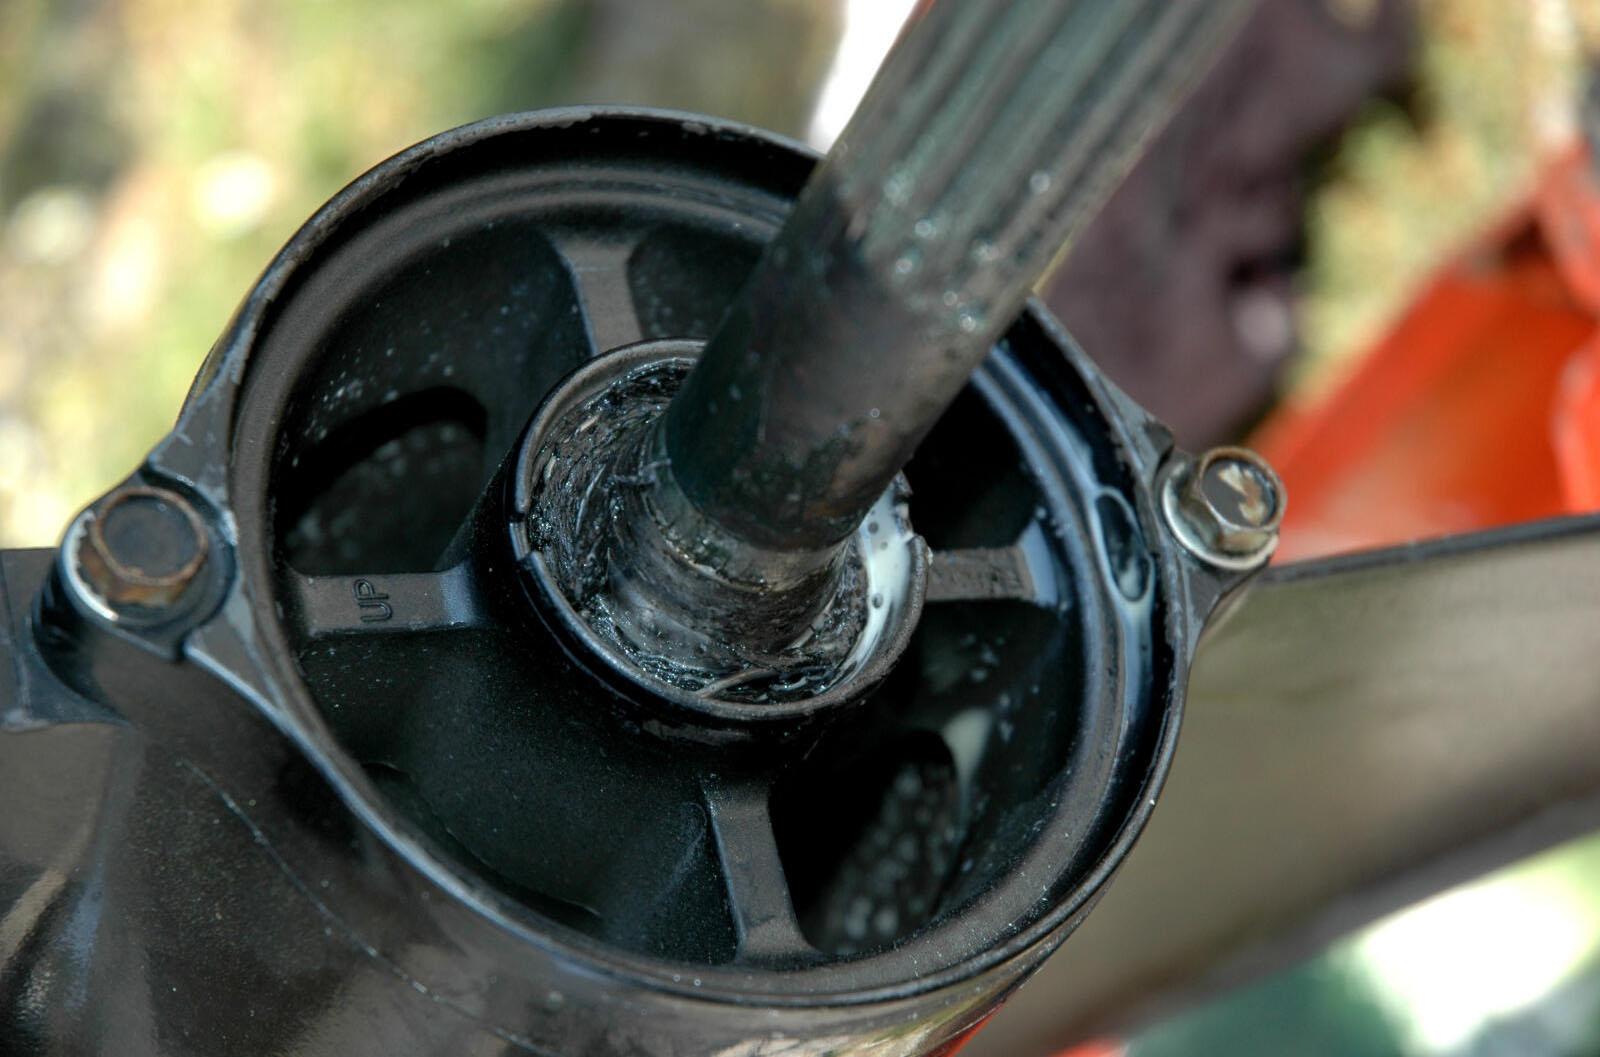
Spun Propeller Hub: When RPMs Climb But Speed Doesn't
A spun hub is the classic "engine revs but boat won't plane" problem. The rubber bushing between the prop and shaft overheats from sustained high load or impact, then starts slipping. You'll hear the engine scream but speed barely increases.
Rock the propeller back and forth by hand with the engine off. If it moves independently of the shaft with a spongy slip, or if you see melted rubber or scuff marks around the inner hub, it's spun. The paint-pen test I mentioned earlier confirms it under real load.
Mercury Flo-Torq hubs seem to spin more often than Yamaha's pressed rubber hubs in my experience, especially on boats that tow heavy loads or hit debris at speed. Replacing just the hub is possible, but I usually recommend a full prop swap. A new prop with a factory hub costs about the same as the labor to press out and replace the bushing, and you eliminate the risk of a second failure mid-season.
Propeller Debris and Entanglement
Fishing line is the biggest offender in coastal areas and heavy vegetation lakes like the South. A tightly wound coil of 50-pound braid around the prop shaft acts like a brake. I had a customer who lost 15 knots off his top speed because a long piece of line had wrapped tight behind the prop blades, completely invisible unless you got underneath and looked.
If you fish in thick kelp beds off the coast or heavy hydrilla in southern lakes, check the prop every few trips. Pull the boat, tilt the engine, and inspect the entire hub and shaft. Use a sharp knife or side cutters to remove line—don't try to unwind it by hand or you'll spend an hour doing it. For emergency fixes and tools to carry, our Emergency Tools & Spares to Carry on Every Boat Trip blog is invaluable.
Fuel Delivery Problems: Fixing Hesitation, Bogging, and Stalling

Fuel starvation is the number one cause of power loss under load. The engine idles fine because fuel demand is low, but when you slam the throttle and the cylinders need more fuel, a clogged filter, kinked line, or air leak can't deliver. The engine bogs, surges, or refuses to rev past 3000 RPM.
Fuel Filter, Pump & Carburetor Causes
Clogged Fuel Filter: A partially blocked filter is the most common issue. At idle, even a restricted filter passes enough fuel. Under load, it chokes the engine. Contaminated fuel contributes to nearly 40% of outboard failures, especially in humid US coastal areas where water infiltrates tanks. When you pull a degraded filter, you'll often see a jelly-like residue inside or smell a strong varnish odor from old ethanol fuel breaking down. Replace both the primary and secondary filters—they're cheap insurance. Find quality parts like Fuel Filters directly from us at JLM Marine.
Testing Mechanical Fuel Pump Diaphragms: Use a handheld vacuum/pressure gauge (available at any auto parts store for about $30). Disconnect the fuel line from the carburetor side of the pump. Connect the gauge to the pump outlet. Crank the engine. You should see 3-5 PSI of steady pressure on most carbureted outboards. If pressure fluctuates wildly or won't build past 1-2 PSI, the diaphragm inside the pump is cracked or the check valves are stuck. Rebuild kits run about $25, and the job takes 30 minutes with basic hand tools. For parts, check out our Fuel Pump Kits.
Air Leaks in Fuel Lines: Years of sun, salt, and vibration crack fuel lines and allow air into the system. Air in fuel is just as bad as no fuel—it creates vapor lock and inconsistent flow. Squeeze the primer bulb. If it won't firm up, or if it slowly deflates even after pumping, you have an air leak. A shop trick: splice a 12-inch section of clear vinyl tubing into the fuel line between the tank and the filter using two hose clamps. Run the engine at idle and watch for microscopic air bubbles streaming through the clear section. Even tiny bubbles indicate a leak upstream—usually at a barbed fitting, a cracked hose, or a failing anti-siphon valve. An anti-siphon valve that's stuck partially closed will also create a vacuum. To test it, bypass the valve temporarily with a straight fuel line. If the engine runs perfectly, replace the valve.
Carburetor Clogs: Clogged jets or a dirty fuel bowl restrict flow just like a bad filter. Ethanol fuel left sitting for months turns to varnish and plugs the tiny main jet. Standard service manuals tell you to remove the carb, disassemble it, and soak it in cleaner. That works, but here's the shop trick those manuals skip: before you pull the carb, run a can of SeaFoam or Yamaha Ring Free through a full tank of fresh fuel and operate the engine under load for 20 minutes. About half the time, the detergents will dissolve light varnish buildup and save you the teardown. If that doesn't work, pull the carb. Use a proper carburetor rebuild kit with new gaskets, needle valve, and float. Don't reuse old gaskets—they leak and you'll be doing the job twice. For parts, see our Carburetor Repair Kit.
Fuel-Injected Outboards: VST and High-Pressure Fuel Pump
Modern fuel-injected engines (most 4-strokes built after 2005) use a Vapor Separator Tank (VST) and a high-pressure fuel pump (HPFP) instead of a carburetor. The VST has its own internal filter that traps debris. When that filter clogs, the high-pressure pump can't supply the injectors. You'll get hesitation, bogging, or complete power loss under load. The engine's ECU may throw a fuel pressure fault code.
To check the VST filter, you need to remove the VST cover (usually 4-6 bolts) and pull the filter screen. If it's brown, clogged, or coated in slime, replace it. Yamaha and Mercury both sell OEM VST filters, but they're often $40-60. Quality aftermarket versions from suppliers like Sierra run $15-20 and filter just as well—we use them in the shop constantly with zero comebacks.
Testing fuel pressure on an EFI engine requires a fuel pressure gauge with the correct Schrader valve adapter for your model. Most Yamaha 4-strokes should show 30-40 PSI at the rail. Mercury Verado engines run closer to 50 PSI. If pressure is low, suspect the HPFP. These pumps fail more often than people think, especially if the boat sits for months or if the owner runs the tank down to fumes repeatedly, which overheats the pump.
Ignition: Spark Plugs, Wires, and Primer Solenoid

Weak spark kills power under load. At idle, cylinder pressure is low and a marginal plug can still fire. At wide-open throttle, pressure spikes and a fouled or worn plug won't jump the gap. You get misfires, hesitation, and bogging.
How to Inspect and Replace Spark Plugs Safely
Pull one plug wire at a time and immediately replace that plug before moving to the next cylinder. This prevents mixing up the firing order. Inspect the electrode. Heavy carbon coating, oil residue, or a gap worn past spec (usually 0.028-0.032 inches) means replace it. Cleaning a plug with a wire brush can get you back on the water temporarily, but plugs are cheap—$4-8 each. Just replace them.
When you install new plugs, hand-thread them first. If you feel any resistance in the first two turns, stop. You're cross-threading. Back it out and start over. I've seen customers force a cross-threaded plug and strip the aluminum cylinder head threads, which requires a $300 Helicoil tap repair. Once the plug is hand-tight, use a torque wrench set to the spec in your service manual—usually 18-25 ft-lbs for most outboards. Over-torquing crushes the washer and can crack the porcelain insulator, causing a misfire you just paid to create.
For tools and parts, check out our Spark Plugs collection.
Testing Spark Strength Under Load
Visual inspection only tells you if the plug is fouled. To check actual spark strength, use an adjustable inline spark tester. These cost about $15 at any auto parts store. Remove a plug wire, connect the tester inline between the wire and the plug, and crank the engine. The tester has a dial you can widen to increase the gap. A healthy ignition system should jump a 7-10mm gap with a bright blue spark. If the spark is weak, orange, or intermittent, you have an ignition coil, CDI box, or stator problem.
For a multi-cylinder engine, test each cylinder individually. If only one or two cylinders show weak spark, suspect a bad coil or plug wire. If all cylinders are weak, the stator or CDI is failing.
Primer Solenoid and Rich Bogging
A sticking primer solenoid can flood the engine with fuel and cause a rich bog, especially during the hole shot. The solenoid's job is to deliver extra fuel for cold starts and initial acceleration. If it sticks in the "primed" position, the engine gets too much fuel, runs rough, and bogs hard when you throttle up. Most primer solenoids have a red manual override lever. With the engine off, flip the lever back and forth. It should move smoothly and return to the center position with spring tension. If it's sticky or stays in one position, replace the solenoid. They're about $30-50 depending on the brand.
Exhaust Restrictions and Carbon Buildup
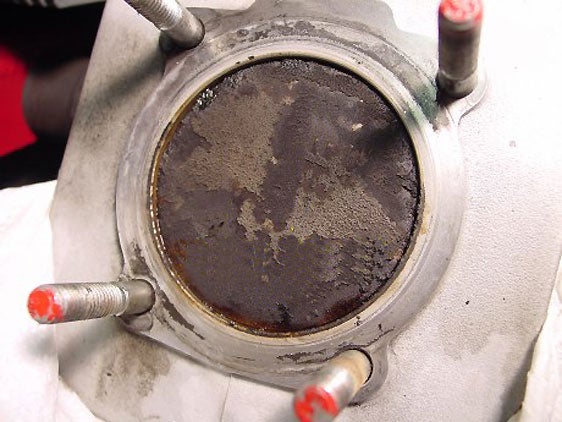
Severe carbon buildup or a restricted exhaust tuner can choke engine power under load. This is common on older 2-strokes that burn oil, especially if the owner has been running too much oil in the fuel mix or using cheap TCW3 oil.
Carbon deposits build up in the exhaust passages, the tuner chamber, and around the powerhead exhaust ports. At idle, the engine doesn't flow much exhaust, so a partial restriction doesn't matter. Under load, the engine can't expel exhaust fast enough, and cylinder pressure backs up, killing power.
To check for exhaust restriction, pull the engine cover and look for heavy black carbon crust around the exhaust manifold or tuner. If you see it, the exhaust needs cleaning. You can try a top-end carbon cleaner like Yamaha's Power Tune or Sea Foam Deep Creep sprayed directly into the carb while the engine is running at 2000 RPM. Run it for 10 minutes, shut it down, let it soak for an hour, then run it hard. Heavy buildup requires manual scraping—remove the tuner cover and use a scraper and wire brush. Wear a mask; carbon dust is nasty.
Engine Temperature Sensors and Limp Mode
Modern outboards with ECUs monitor dozens of sensors. If the ECU detects low oil pressure, high engine temperature, or a failed MAP sensor, it puts the engine into "limp mode"—limiting RPM to 2000-3000 to prevent damage. The engine will idle fine but refuse to rev past the limit under load.
Check the dashboard for warning lights or alarms. If you see an overheat light, the engine is either actually overheating (bad impeller, clogged intake) or the temperature sensor is faulty. Test the sensor with a multimeter—most should read around 2000-3000 ohms at room temperature. Consult your service manual for exact specs.
A failed MAP (Manifold Absolute Pressure) sensor can also cause limp mode. The ECU uses the MAP sensor to calculate engine load. If the sensor fails, the ECU assumes the worst and cuts power. Replacing a MAP sensor is simple—usually one bolt and a wire connector—and costs $50-100.
For cooling system parts related to sensors and impellers, visit our Cooling System collection.
JLM Marine Diagnostic Flowchart for Bogging Under Load
Here's the exact troubleshooting order we follow in the shop when a customer brings in an engine that dies or bogs under load. Start at the top and work down until you find the problem.
Step 1: Confirm Symptoms (5 minutes)
Run the engine in a test tank or on the water. Note exactly when power loss occurs—idle, mid-throttle, or full throttle. Check for smoke color. Black smoke = rich fuel condition. No smoke = fuel starvation or ignition.
Step 2: Visual and On-Water Checks (10 minutes)
- Check prop for debris or spun hub (paint-pen test if needed).
- Verify fuel tank vent is open and clear.
- Squeeze primer bulb—should firm up and hold pressure.
- Inspect spark plug wires for cracks or corrosion.
Step 3: Fuel System Inspection (20 minutes)
- Replace primary and secondary fuel filters.
- Splice in clear tubing to check for air bubbles.
- Test fuel pump pressure with gauge (should be 3-5 PSI on carb engines, 30-50 PSI on EFI).
- If EFI, pull and inspect VST filter.
Step 4: Spark and Ignition Test (15 minutes)
- Remove and inspect all spark plugs. Replace if fouled or worn.
- Test spark strength with inline tester (7-10mm gap, bright blue spark).
- Check primer solenoid operation with manual lever test.
Step 5: Air Intake and Exhaust (20 minutes)
- Remove and inspect air filter. Replace if dirty or oil-soaked.
- Check for carbon buildup in exhaust ports or tuner.
- If turbo-equipped, verify turbo spins freely with no shaft play.
Step 6: Compression and Load Test (30 minutes)
- Run compression test on all cylinders (should be 300-500 PSI, even across cylinders).
- Check throttle linkage reaches full open position.
- Scan ECU for fault codes if equipped.
Step 7: Propeller and Load Verification (10 minutes)
- Confirm prop pitch and diameter match engine specs.
- Check for overloading—boat should reach rated WOT RPM under full throttle.
If you've completed this entire flow and the engine still bogs, you're likely looking at internal engine damage (scored cylinder, bad piston rings) or a failed ECU. At that point, bring it to a mechanic with diagnostic tools.
For more details on troubleshooting power loss in outboards, see Why Is My Outboard Losing Power? Top 5 Causes.
DIY vs. Mechanic: Which Bogging Repairs Require Professional Tools?

Most of the fixes in this guide are DIY-friendly. Replacing spark plugs, fuel filters, fuel lines, and inspecting the prop are straightforward jobs with basic hand tools—sockets, wrenches, screwdrivers, and pliers. You can handle these in your driveway or at the dock.
What You Can DIY:
- Spark plug replacement (10 minutes, $20-40 in parts)
- Fuel filter replacement (15 minutes, $15-30)
- Fuel line inspection and replacement (30 minutes, $20-50)
- Prop debris removal (5 minutes, free)
- Primer bulb and vent line clearing (10 minutes, free to $10)
- Air filter replacement (5 minutes, $15-25)
- Visual VST filter check on EFI engines (20 minutes, $15-60)
When to Call a Mechanic:
- Carburetor rebuild (requires sync tools, specialty jets, experience)
- Spun prop hub replacement (requires a hydraulic press or heat tools)
- Compression test interpretation and internal engine work
- ECU diagnostics and reprogramming
- High-pressure fuel pump replacement on EFI engines (requires fuel system bleed tools)
If you're ever unsure or the repair requires specialized tools, contact a qualified marine mechanic. Forcing a repair you're not equipped for often creates more damage. Your engine's service manual has torque specs, wiring diagrams, and clearances—refer to it.
Parts & Tools You Might Need (With Expected Diagnostic Times)

On-Water Emergency Kit (pack these in your boat):
- Spare spark plugs (3-6 depending on engine size)
- Inline spark tester ($15)
- Fuel line repair kit (hose, clamps)
- Basic socket set (8mm-19mm)
- Adjustable wrench and pliers
- Knife or wire cutters (for line removal)
- Time to use on water: 10-20 minutes per check
At-Home Diagnostic Tools:
- Compression tester ($30-60)
- Fuel pressure gauge with Schrader adapter ($40-80)
- Multimeter for sensor testing ($20-50)
- Timing light (for ignition timing check, $30-70)
- Propane torch (for seized bolt removal, $20)
- Time for full diagnosis: 1-2 hours
Replacement Parts (JLM Marine Stock):
- Fuel filters and water separators – Carbureted engines: $8-15; EFI VST filters: $15-40
- Spark plugs – $4-10 each; buy a full set
- Fuel line (per foot) – $2-5 depending on diameter
- Primer bulbs – $10-20
- Impeller kits – $20-50
- Propellers and hubs – $80-300 depending on size and pitch
We stock all of these at JLM Marine with direct-from-factory pricing and ship worldwide. A typical dealer charges $25 for an OEM fuel filter; we sell the same spec filter for $12. OEM spark plugs run $12-15 at the dealer; quality aftermarket plugs that meet the same NGK or Champion specs are $5-7 here. You're not paying for a logo on the box—you're getting the same fitment, materials, and performance. If you're unsure which part fits your engine, email us your model and serial number and we'll confirm the exact match before you order.
JLM Marine's Top Customer FAQs on Outboard Power Loss
Will a spun prop make my engine rev but not accelerate?
Yes. The engine RPMs climb normally because the crankshaft is spinning, but the propeller hub is slipping on the shaft, so the blades aren't biting the water. Boat speed stays flat or climbs very slowly. Use the paint-pen test: draw a line across the hub and prop, run the boat hard, and check if the line has shifted. If it has, the hub spun.
Can fishing line wrapped in the prop cause my outboard to bog at full throttle?
Absolutely. Even a single strand of heavy braid wrapped tight around the prop shaft creates enough drag to cut top speed by 30-50%. It's like dragging an anchor. Check the prop every few trips, especially if you fish in weedy areas or near structure where line snags are common.
How can I tell if I have a fuel line air leak?
Squeeze the primer bulb. A healthy fuel system firms up the bulb in 3-5 squeezes and holds pressure. If the bulb won't firm up, or if it slowly deflates over a few minutes, you have an air leak. The clear-tubing test is the fastest way to confirm: splice a section of clear vinyl hose into the fuel line and watch for air bubbles while the engine runs. Even tiny bubbles mean there's a leak at a fitting, cracked hose, or failed anti-siphon valve.
Can a sticking primer solenoid cause hole-shot failure?
Yes. If the primer solenoid sticks in the "on" position, it floods the engine with extra fuel during acceleration. This creates an overly rich mixture that bogs the engine hard, especially during the hole shot when you need clean combustion. Test the solenoid by moving the red manual override lever—it should snap back to center with spring tension. If it's sticky or stays in one position, replace it.
When should I replace spark plugs vs. clean them?
Replace plugs if the electrode is heavily fouled, if the gap is worn past 0.035 inches, if the porcelain is cracked, or if the plug is older than 100 hours of use. Cleaning is only a temporary fix for light carbon buildup. For diagnosing power loss, always start with fresh plugs—they're $5 each and eliminate spark as a variable immediately. If the problem persists after new plugs, you know to look elsewhere.
Maintaining Your Outboard to Prevent Power Loss


After every single use, flush your outboard with fresh water for at least 10 minutes using muffs or a flush port. This is especially critical in saltwater, where salt crystals build up in the cooling passages, exhaust ports, and around the thermostat. Over time, those deposits restrict water flow, cause overheating, and lead to power loss under load. I've pulled thermostats from engines that were never flushed—they're encased in a solid block of white salt crust and completely stuck open or closed. A $12 thermostat becomes a $400 repair when it seizes and overheats the powerhead.
Flush the engine, and you'll avoid most of the cooling-related bogging issues covered in this guide. For flushing tips, see our Daily Engine Flush for Saltwater Boats: A Good Habit.
Explore more about trusted marine parts and expert advice at the JLM Marine home hub.