


Installing Performance Reeds in a 2-Stroke Outboard
- Why Reed Valves Fail and What Happens
- Carbon Fiber vs. Composite Reeds
- Matching Reeds to Your Engine
- Performance Gains You'll Notice
- 6-Step DIY Installation Guide
- Post-Installation Checklist and Troubleshooting
- Inspection and Maintenance Schedule
- OEM vs. Non-OEM Performance Reeds
- When Reed Failure Becomes Engine Damage
If your two-stroke is hard to start, bogs when you crack the throttle, or just doesn't pull like it used to, worn reeds are a common culprit. I've seen this hundreds of times—folks run their engines for years without checking reeds, then wonder why performance drops off. Replacing stock reeds with a performance set is one of the easiest ways to get your engine running right again.
Here's what we're covering:
- Why reeds fail and what it costs you
- Carbon fiber vs. composite: which fits your use
- How to match reeds to your specific engine
- The 6-step installation process
- What to inspect and when
Why Reed Valves Fail and What Happens

Reed valves control the fuel-air charge entering your crankcase. They open under vacuum, snap shut under pressure. When they seal poorly—cracked, chipped, bent—you lose compression in the intake tract. The engine struggles to pull in a full charge.
Specific symptoms we see:
- Hard cold starting, especially below 50°F
- Rough idle that smooths out above 2000 RPM
- Hesitation or a "lean sneeze" when you punch the throttle from idle
- Loss of mid-range snap when pulling a skier
- Excessive fuel smell at the transom (charge blowing back into the intake)
Stock reeds are usually stainless steel or basic fiberglass. They work fine new, but fatigue over time. High RPM operation accelerates this—reeds flutter instead of closing cleanly. That's when you start losing power and burning more fuel.
Carbon Fiber vs. Composite Reeds
Carbon Fiber
Carbon is extremely stiff and light. It snaps shut faster than any other material, which means better sealing at high RPM. You'll feel this as crisper throttle response and stronger pull above 4500 RPM.
Best for: Racing, high-RPM trolling (5000+ RPM), engines that see sustained WOT (wide-open throttle). If you run your engine hard and want every bit of top-end, carbon is the choice. The downside is durability—carbon can chip if a backfire sends debris through the intake, though this is rare with proper tuning.
Composite Fiber
Composite (fiberglass-based) reeds blend performance and toughness. They're not quite as lightning-fast as carbon, but they're far more forgiving. We've seen composite reeds last 500+ hours in demanding saltwater conditions with no degradation.
Best for: Recreational boating, guides who run all day at varying RPM, anglers who idle and troll frequently. Composite reeds smooth out the low-to-mid range (2000-4500 RPM) and improve idle quality. For most users, composite delivers the best balance—you get a noticeable performance bump without the fragility concerns of carbon.
On dyno tests, carbon reeds on a 183 cu in OMC engine averaged 352.8 HP from 6000-7500 RPM vs. 338.8 HP stock—a 14 HP gain in the power band. Composite reeds typically show smaller peak gains (4-8 HP) but improve driveability across the entire RPM range, which matters more for real-world use.
Matching Reeds to Your Engine

You can't use the same reed set across different brands. Mercury, Yamaha, Johnson/Evinrude, and Tohatsu all use different intake manifold bolt patterns, cage dimensions, and petal counts.
The easiest way to get the right fit: use a parts lookup tool that filters by your engine's make, model, and year. On our site, you input your engine specs, and the system shows only compatible reed sets. This eliminates the guesswork and prevents ordering the wrong part. For help with engine specs, consult the Yamaha Outboard Serial Number Guide (2025).
Example: A 1990 Yamaha 90HP 2-stroke uses a completely different reed cage than a 2002 Mercury 150HP 2.5L V6. Even within the same brand, early vs. late model years can have different intake designs.
If you're running a performance application—like a modified porting job or aftermarket carbs—you may also need to consider single-stage vs. dual-stage reeds. Single-stage is one layer, optimized for peak RPM response. Dual-stage uses two layers with different stiffness, giving you better low-end torque without sacrificing top-end. For most stock or lightly modified engines, single-stage composite reeds are the go-to.
Performance Gains You'll Notice
Starting and Idle
Fresh reeds seal the intake properly, so the engine builds compression faster on the pull rope or electric start. Cold starts improve immediately. At idle, the engine runs smoother because each cylinder is drawing a consistent charge. Jason Johnson, a boat performance tester from Louisiana, noted a "smoother idle" and "REAL good" acceleration after installing Chris Carson reeds on a 1990 Yamaha 90HP. His white composite reeds hit 6900 RPM at 70.4 mph vs. 6600 RPM with TDR stock replacements—a 300 RPM gain.
Throttle Response
Performance reeds open and close faster than stock. When you snap the throttle, the engine responds immediately instead of hesitating or bogging. This is especially noticeable in the 2500-4000 RPM range, where stock reeds often flutter. The improved sealing means less fuel-air mixture escapes back into the intake, so combustion is more efficient. For related fuel and throttle system maintenance, see our Carburetor collection.
Mid-Range and Top-End
You'll feel stronger pull in the mid-range (3000-5000 RPM), which is where most boating happens—getting on plane, pulling tubes, running in chop. Top-end gains vary by setup, but expect 2-5 mph increases and 100-300 RPM higher peak. One user reported smoother top-end and better low-end holeshot on a Yamaha 90HP after installing Boyesen reeds, with idle dropping to a steady 1.8 mph GPS (smooth enough for precision trolling).
Fuel Economy
Efficient reed sealing means the engine burns the charge it pulls in, instead of pushing some back out the intake. You'll see slightly better fuel economy at cruise RPM, though the difference is modest—maybe 5-10% in real-world conditions. For maximizing fuel economy, check out our tips on 10 Ways to Improve Outboard Fuel Efficiency.
6-Step DIY Installation Guide

Difficulty: Moderate
Time: 1-2 hours
Tools Needed:
- 3/16" Allen wrench set
- Phillips and flathead screwdrivers
- Gasket scraper (plastic, not metal, to avoid gouging aluminum)
- 400-800 grit wet/dry sandpaper
- Flat surface (piece of glass, 12" x 12" minimum)
- Blue Loctite
- Kerosene or light machine oil (for lapping lubricant)
- Shop rags
- New reed set with gaskets and intake stuffers (if included)
When NOT to DIY:
- If your intake manifold uses welded or integrated reed cages (some modern DI engines)
- If your engine is under factory warranty and you're unsure about aftermarket parts voiding coverage
- If you've never removed an intake manifold before and aren't comfortable identifying vacuum lines, throttle linkages, or oil injection lines
Step 1: Access the Reed Blocks
Remove the intake manifold. On most engines, this involves:
- Disconnecting fuel lines (use a rag to catch residual fuel)
- Unbolting the carburetor(s) or throttle body
- Removing 3/16" Allen bolts that secure the manifold to the block (usually 4-6 bolts)
Common obstructions by brand:
- Mercury: Watch for oil injection lines on the manifold back side; disconnect carefully to avoid kinking
- Yamaha: Throttle linkage often runs alongside the manifold; you may need to unhook a return spring
- Johnson/Evinrude: Primer bulb hose can be tight; use a pick to release the clamp without tearing the rubber
- Tohatsu/Nissan: Starter motor sometimes blocks access to the lower manifold bolts; you may need to remove it (2 bolts, 10mm)
Critical: Before you remove the manifold completely, stuff clean shop rags into the intake ports on the block. A dropped screw or Allen bolt into the crankcase means pulling the powerhead to retrieve it. This step is non-negotiable.
Step 2: Remove Old Reeds
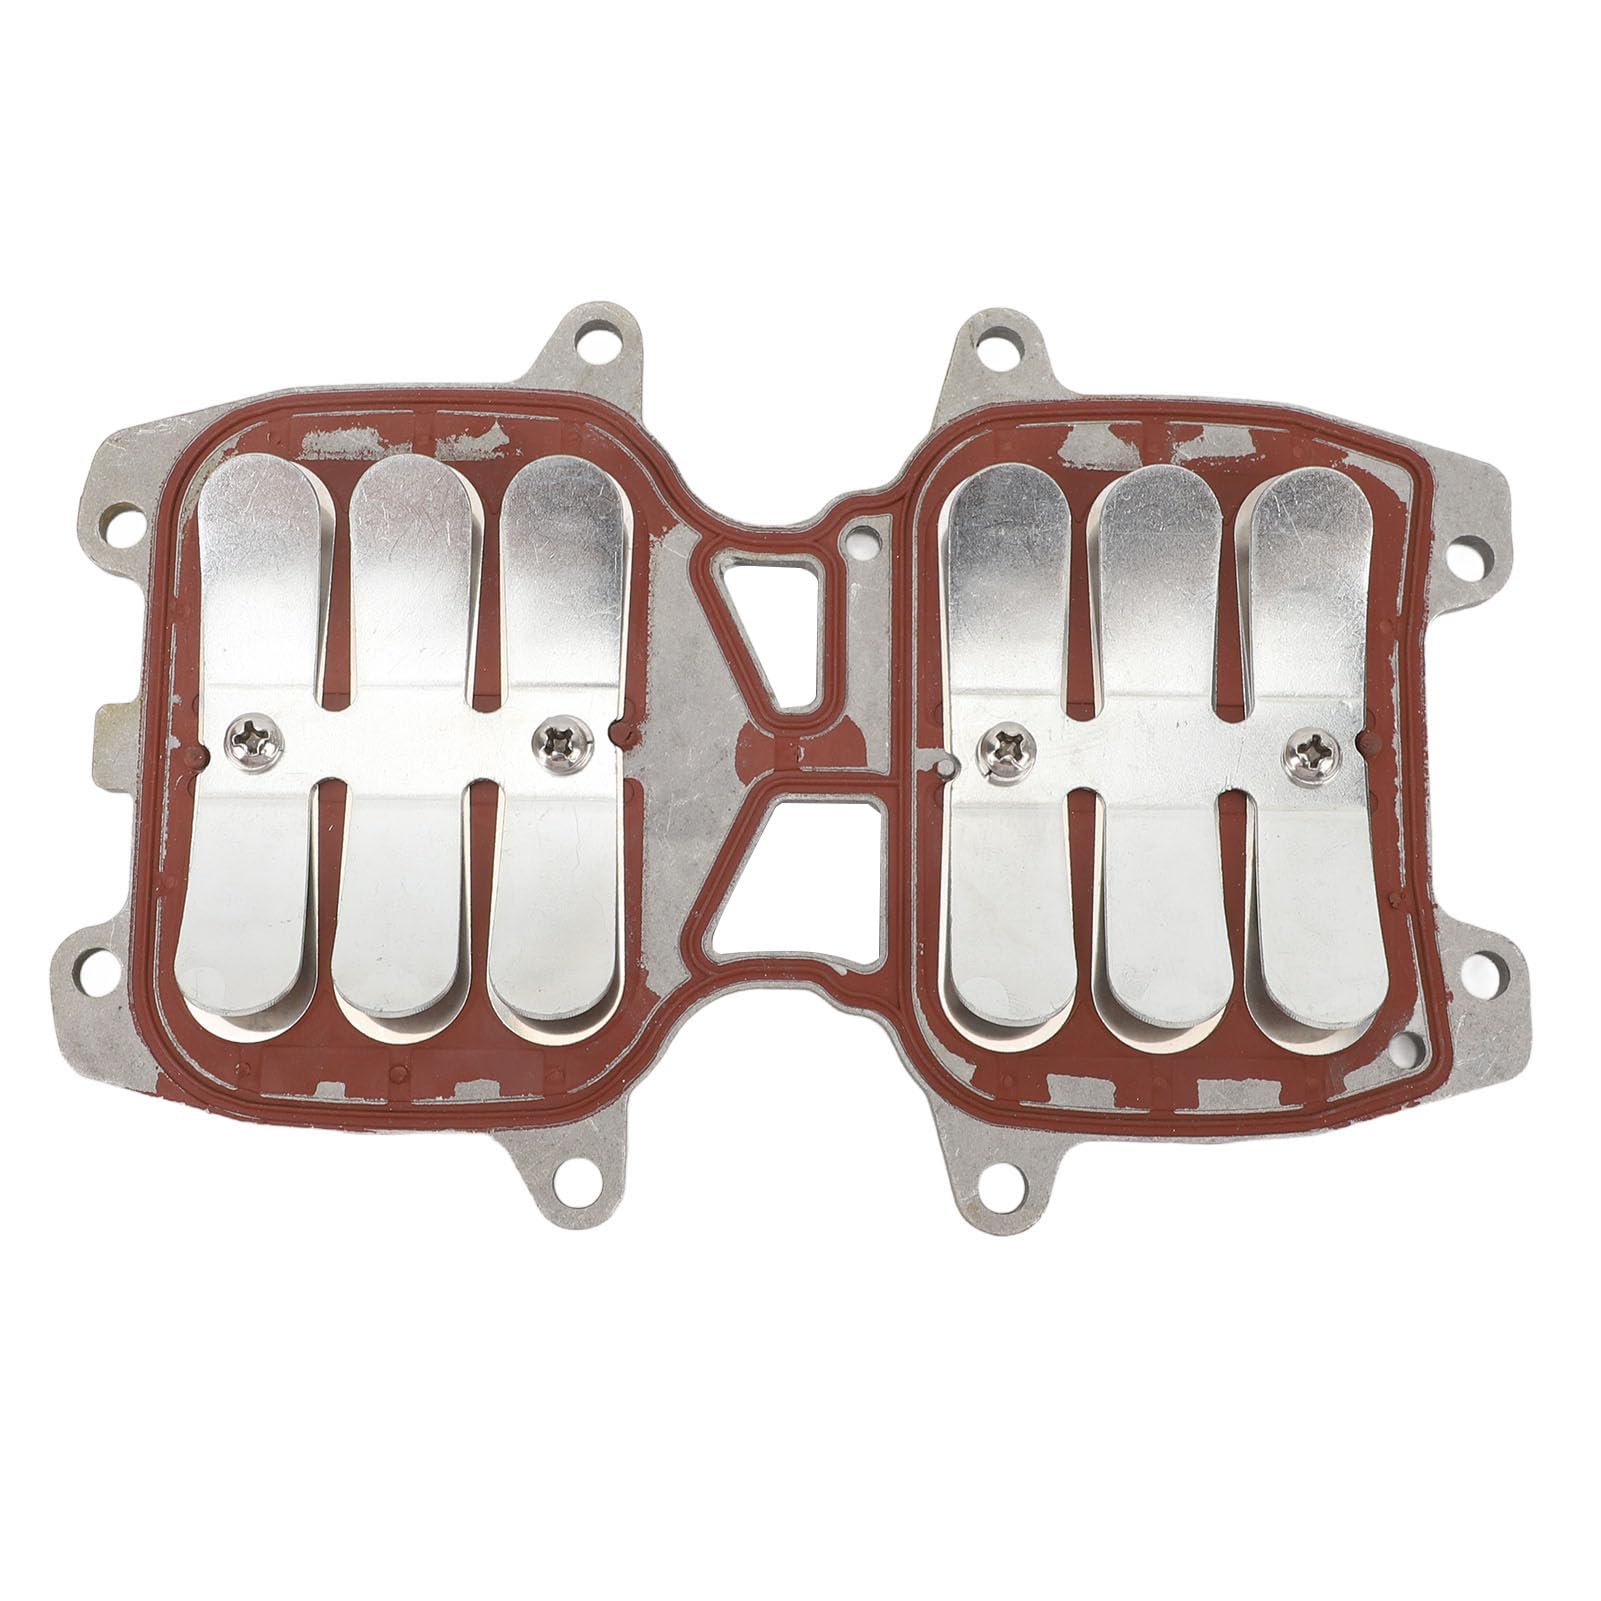
Carefully separate the reed blocks from the intake manifold. You'll see the reed cages—flat metal or plastic frames with the reed petals bolted or clipped in place.
Remove the reed stop screws (small Phillips or Allen, usually 4-6 per cage). Lift out the old reeds. Inspect them closely:
- Cracks or chips: Immediate replacement
- Bent petals: They won't seal; replace
- Scoring on the sealing surface: Indicates the cage itself may need lapping (next step)
If you see a broken petal, check the intake tract and crankcase for fragments. A piece of reed petal bouncing around can score cylinder walls. For more on troubleshooting engine power loss possibly caused by intake issues, see Outboard Bogging Down? Troubleshooting Low Power, RPM Fluctuations & Fuel Issues.
Step 3: Prepare the Reed Cages
This is where a lot of DIYers skip a step and pay for it later. The reed cage sealing surface must be perfectly flat. Even a 0.005" warp will cause air leaks.
Lapping procedure:
- Lay a piece of 600-grit wet/dry sandpaper on a flat piece of glass (not wood, not a workbench—glass is dead flat).
- Add a few drops of kerosene or light machine oil to the sandpaper.
- Place the reed cage sealing surface down on the paper.
- Using light, even pressure, move the cage in a figure-eight pattern for 20-30 strokes.
- Check the surface. You should see a uniform dull finish with no shiny low spots. If shiny spots remain, continue lapping.
Warning: Don't over-sand. You're removing thousandths of an inch, not hundredths. Over-lapping reduces the cage's designed tolerance and can cause the reeds to sit too close to the intake port.
Clean the cages thoroughly with carburetor cleaner or brake cleaner after lapping. Any grit left behind will prevent a good seal.
Step 4: Install New Reeds
If your performance reed set includes intake stuffers (plastic or aluminum spacers that sit under the reed cage to reduce port volume), install those first. They bolt into the intake ports using the same holes as the reed cage.
Place the new reed petals onto the cages. Alignment is critical. The petals should sit flush with the cage's sealing surface, with no gaps at the edges. If you see light between the petal and the cage when held up to a strong light, the petal is warped or the cage needs more lapping.
Some performance reeds (like certain Chris Carson models) are designed to install without reed stop screws for faster swaps. If yours use screws, install them as follows:
- Apply a small dab of blue Loctite to each screw thread.
- Start all screws by hand.
- Tighten in a cross pattern (like lug nuts on a wheel), working from the center of the cage outward.
- Torque spec: Consult your service manual. Typical range is 6-12 inch-pounds. If you don't have a torque wrench, tighten until snug, then add 1/8 turn. The screw should hold the reed stop firmly but not deform the petal.
Visual check: Hold the assembled cage up to a light. The reed petal should close completely against the cage with no light visible around the edges. If you see gaps, the petal isn't sealing.
Step 5: Reassemble the Intake Manifold
Install new intake manifold gaskets (often included with the reed set; if not, order them separately—do not reuse old gaskets).
Bolt the reed cages back into the intake manifold. Torque the cage bolts to spec (usually 8-15 ft-lbs; again, check your manual). Over-torquing can warp the aluminum manifold.
Before you bolt the manifold back onto the engine, remove the shop rags from the intake ports. (Yes, I've seen guys forget this.)
Reinstall the manifold onto the block. Reconnect:
- Fuel lines (check for leaks before starting)
- Carburetor(s) or throttle body
- Oil injection lines (if applicable)
- Throttle linkage and return springs
Torque the manifold bolts to spec (typically 10-18 ft-lbs, depending on engine size).
For replacement gaskets and compatible parts, visit our Inboard & Outboard Motor Parts collection.
Step 6: Test Run
Fire up the engine. You should notice immediately:
- Easier starting (especially cold)
- Smoother idle with less vibration
- Crisper throttle response when you blip the throttle in neutral
Take the boat out for a test run. Run through the RPM range. You'll feel the difference most in the 2500-4500 RPM range—stronger pull, less hesitation. If the engine idles rough or misfires, double-check for vacuum leaks at the manifold gaskets or a reed petal installed backward (the reeds should seal against the intake side of the cage, not the engine side).
Post-Installation Checklist and Troubleshooting

If the engine won't start after installation:
- Check that reeds are installed in the correct orientation (petals seal toward the intake, not the engine)
- Verify all vacuum lines and fuel lines are reconnected
- Confirm the intake manifold is torqued down with no air leaks (spray carburetor cleaner around the gasket while the engine is running; if RPM changes, you have a leak)
If idle is rough or RPM hunts:
- Re-check reed petal sealing; even one poorly seated petal will cause uneven cylinder charging
- Inspect for debris trapped under a reed petal
Break-in: None required. Performance reeds are ready to run immediately. Some composite reeds may "bed in" over the first few hours, smoothing out even more, but you can run full throttle right away.
Re-torque: After the first heat cycle (one full run), let the engine cool, then re-check the manifold bolt torque. Aluminum expands and contracts, and bolts can loosen slightly.
Inspection and Maintenance Schedule
Check your reeds every 15-20 hours of operation, or at least once per season. Pull the intake manifold and visually inspect:
- Cracks or chips: Replace immediately
- Petal gap: Use a flashlight to check the seal; any light visible through the gap means poor sealing
- Scoring on cage surface: If the cage is scored, lap it again
Performance reeds last longer than stock, but they're not immortal. Carbon reeds may last 300-500 hours in recreational use; composite reeds often hit 500-800 hours. When they fail, they fail gradually—you'll notice a slow drop in throttle response and starting quality.
Fuel quality matters. Ethanol-blend fuel can leave deposits on reeds, reducing petal flexibility. If you run E10, add a fuel stabilizer and run the engine dry before storage. Stale fuel gumming up reeds is a common cause of premature failure. Learn more about protecting your engine in our article on Fuel Quality Matters: Choosing the Right Octane for Your Outboard.
OEM vs. Non-OEM Performance Reeds
OEM reeds (Mercury, Yamaha, etc.) are reliable, but you're paying for the logo on the box. Expect to pay 50-100% more for OEM vs. aftermarket performance reeds with similar specs.
Non-OEM quality varies widely. Cheap aftermarket reeds (the $15 eBay specials) are often made from inferior materials—too stiff or too soft, poor fitment, inconsistent petal thickness. We've seen them crack in under 50 hours.
However, high-quality non-OEM manufacturers like Boyesen and Chris Carson Marine Services use the same materials and tolerances as OEM suppliers. In some cases, these factories produce parts for OEM brands during off-peak capacity, then sell the same parts under their own label. You get factory-spec quality without the dealership markup.
For example, Boyesen reeds are widely used in racing applications and have a proven track record. Chris Carson composite reeds have been tested extensively by guides and performance boaters, with reports of excellent durability and real-world gains. When you buy from a reputable supplier like JLM Marine, you're getting parts that meet or exceed OEM standards, shipped factory-direct from JLM Marine.
When Reed Failure Becomes Engine Damage
A cracked reed petal doesn't always stay in the cage. If a piece breaks off, it can travel through the intake tract into the crankcase. From there, it can:
- Wedge between the piston and cylinder wall, scoring the bore
- Jam in the exhaust port, causing a lean condition and seizure
- Bounce around the crankcase and damage bearings
Replacing reeds isn't just about performance—it's about preventing catastrophic engine damage. A $60 reed set vs. a $2000 powerhead rebuild is an easy calculation.
Pro tip: Keep a spare set of reeds in your toolbox. If you're 20 miles offshore and notice a sudden loss of power or rough idle, a quick reed swap can get you back to the dock under your own power. For a comprehensive guide on maintaining your engine’s critical components to avoid damage, see Maintaining Your Outboard’s Gearcase: Mercury vs. Yamaha.
For more quality boat parts and marine engine components, visit our JLM Marine HUB.
Hi—I’m Jim Walker
I grew up in a Florida boatyard, earning pocket money (and a few scars) by rebuilding outboard carbs before I could drive. That hands-on habit carried me through a Ph.D. in mechanical engineering, where I studied how salt water quietly murders metal.
I spent ten years designing cooling systems for high-horsepower outboards, then joined JLM Marine as CTO. We bench-test every new part in the lab, but I still bolt early prototypes onto my own 23-foot skiff for a weekend shake-down— nothing beats real wake and spray for finding weak spots.
Here on the blog I share the fixes and shortcuts I’ve learned so your engine—and your day on the water—run smooth.

For Boat Owners:
To assist you in maintaining and repairing your marine engines, we hope the following resources may be of use:
- Mercury Serial Number Guide
- Owner's Manuals from Mercury
- Official Model Number Reference Guide PDF from BRP
- Johnson Serial Number Guide
-
Boat Accessories from JLM Marine
About JLM Marine
Founded in 2002, JLM Marine has established itself as a dedicated manufacturer of high-quality marine parts, based in China. Our commitment to excellence in manufacturing has earned us the trust of top marine brands globally.
As a direct supplier, we bypass intermediaries, which allows us to offer competitive prices without compromising on quality. This approach not only supports cost-efficiency but also ensures that our customers receive the best value directly from the source.
We are excited to expand our reach through retail channels, bringing our expertise and commitment to quality directly to boat owners and enthusiasts worldwide.
Boat Accessories on Sale
- $54.00
- $54.00
- Unit price
- per
- $38.50
- $38.50
- Unit price
- per
- From $39.13
$45.50- From $39.13
- Unit price
- per


- $53.50
- $53.50
- Unit price
- per
- From $54.00
- From $54.00
- Unit price
- per

- $34.50
- $34.50
- Unit price
- per
- $45.00
- $45.00
- Unit price
- per
- $23.50
- $23.50
- Unit price
- per
-
Red
-
Blue


- $34.50
- $34.50
- Unit price
- per


- $54.00
- $54.00
- Unit price
- per


- $54.00
- $54.00
- Unit price
- per
- $32.00
- $32.00
- Unit price
- per
- $40.00
- $40.00
- Unit price
- per
- $22.80
- $22.80
- Unit price
- per
-
Red
-
Blue

- $22.80
$27.00- $22.80
- Unit price
- per


- $31.50
- $31.50
- Unit price
- per
- $22.80
- $22.80
- Unit price
- per
-
Red
-
Blue


- $54.00
- $54.00
- Unit price
- per


- $59.00
- $59.00
- Unit price
- per

- $32.00
- $32.00
- Unit price
- per