


Yamaha Outboard Annual Maintenance DIY Checklist
Understanding Yamaha Outboard Maintenance

If you're like me, your boat is more than just a vessel; it's your escape, your sanctuary on the water. I've learned firsthand that neglecting your Yamaha outboard is a guaranteed recipe for costly repairs and disappointing days on the water.
Last summer, I skipped my annual maintenance thinking "just one more trip won't hurt," and ended up stranded 3 miles offshore when my fuel system clogged. That experience taught me that performing regular maintenance, especially the crucial 100-hour service, is non-negotiable. It's about maximizing performance, protecting your investment, and preserving resale value.
According to Yamaha's official maintenance documentation, engines that receive regular service can last 2-3 times longer than neglected ones. I've seen this reality play out among my boating friends – those who stick to maintenance schedules rarely face unexpected breakdowns.
Importance of Regular Maintenance
My philosophy has always been that preventive care saves both money and headaches. For Yamaha outboards, this means sticking to the recommended service intervals. Yamaha recommends annual or 100-hour maintenance, whichever comes first, as outlined in their official Maintenance Matters guide.
I've found that performing these checks and fluid changes is the bedrock of reliable operation. When I stay on top of maintenance, my 2018 F150 runs better, feels more responsive, and sounds healthier.
Protecting Engine Performance and Resale Value
Think of your Yamaha outboard as an investment. A well-maintained engine delivers optimal power, better fuel efficiency, and a smoother ride. I track my fuel consumption religiously, and I've documented approximately 15% better fuel economy when I keep up with maintenance versus periods when I've fallen behind.
Beyond immediate performance benefits, a documented maintenance history significantly boosts resale value. When I sold my previous Yamaha F115, the comprehensive maintenance records I kept helped me get $1,800 more than a comparable listing with unknown service history. Buyers recognize and will pay for the peace of mind that comes with a well-maintained engine.
Consequences of Neglecting Maintenance
Let's be blunt: skipping maintenance is a gamble with serious stakes. The most common casualty of neglect is the water pump impeller. My neighbor once had his impeller fail mid-season because he hadn't replaced it at the recommended 100-hour mark. The result? Overheating that caused cylinder head warping, significant downtime, and a $2,300 repair bill.
Overlooking simple tasks like oil changes can lead to internal engine wear, and ignoring fuel filters can cause sputtering, loss of power, and even complete engine failure. Saltwater corrosion is another constant adversary – I once had to replace corroded electrical connections that would have cost just $15 to protect properly during regular maintenance.
Yamaha Outboard 100 Hour Service Overview

The 100-hour service is Yamaha's benchmark for ensuring your outboard runs at peak performance. When I first started learning about outboard maintenance, the 100-hour service seemed daunting, but once I broke down the tasks, I realized it was manageable for a DIY enthusiast.
Definition and Purpose of 100 Hour Service
At its core, the 100-hour service for your Yamaha outboard is a comprehensive check and fluid exchange designed to maintain engine health and prevent premature wear. It covers everything from lubrication and fluid replacement to inspecting critical components like the fuel system, cooling system, and electrical connections.
According to Yamaha's Maintenance Matters guide, this service interval was specifically designed to catch small issues before they become catastrophic failures. This proactive approach has saved me thousands in potential repairs over my 15 years of outboard ownership.
Recommended Service Intervals and Conditions
Yamaha recommends annual or 100-hour maintenance, whichever occurs first, for most of their outboards according to the official Yamaha maintenance guidelines.
However, I've learned that usage conditions significantly impact these intervals. For my boat, which I run in brackish water at high throttle about 60% of the time, I've found that performing certain maintenance tasks (particularly cooling system flushes) more frequently provides better protection. For detailed information on cooling system maintenance, you can check out this comprehensive Cooling System collection to ensure you have the right parts on hand.
Note for 2010-2020 F-series four-stroke owners: Your specific model may have additional requirements for valve clearance checks. Always check your owner's manual for model-specific intervals, as they can vary significantly from general guidelines.
DIY vs Professional Servicing Considerations
For many 100-hour service tasks, I find that DIY is not only possible but rewarding. It allows me to really know my engine and catch problems early. Plus, the cost savings are significant – my last DIY 100-hour service cost me $187 in parts versus the $575 quote from my local dealer.
However, not everyone has the time, space, or inclination for DIY work. For complex issues or if you're uncomfortable with a particular task, seeking out a certified Yamaha Marine dealer is wise. Their master technicians undergo annual training directly from Yamaha, ensuring they stay current with the latest procedures.
Important warranty note: I learned the hard way that DIY maintenance does not void your Yamaha warranty, contrary to what some dealers might suggest. The Magnuson-Moss Warranty Act protects your right to perform your own maintenance. However, you must:
- Use equivalent quality parts (OEM or high-quality aftermarket such as those available from JLM Marine)
- Follow proper procedures
- Keep detailed records of all maintenance performed
Pre-Maintenance Safety and Preparation Checklist
Before starting any maintenance, I always:
- Disconnect the battery to prevent accidental starting
- Work in a well-ventilated area
- Have oil absorbent pads ready to contain spills
- Wear nitrile gloves to protect from petroleum products
- Have a fire extinguisher nearby (especially when working with fuel)
- Allow the engine to cool completely if recently run
- Remove the propeller if working on the lower unit
- Have my service manual open to the relevant section
This preparation has prevented several potential accidents in my garage over the years.
Key 100 Hour Maintenance Tasks
Engine Oil and Filter Change
This is the foundation of outboard maintenance. I've developed a precise routine:
- Run the engine for 5-10 minutes to warm the oil for better drainage
- Remove the drain plug (10mm on my F150) and allow oil to drain completely into a catch pan
- While oil drains, remove the old filter using an oil filter wrench
- Pre-fill the new filter about 1/3 full with fresh oil
- Lightly lubricate the rubber gasket with fresh oil
- Install the new filter hand-tight plus 1/4 turn
- Replace the drain plug with a new crush washer (available from JLM Marine’s Oil Filter collection)
- Fill with the manufacturer-specified oil (I use Yamalube 4M FC-W)
- Run the engine briefly, then recheck oil level
On my 2018 F150, this process takes about 30 minutes. For 2019 and newer SHO models, note that the filter location changed to improve access.
Lower Unit Gearcase Oil Change
The lower unit oil protects the gears and bearings in your gearcase. My procedure:
- Place a drain pan under the lower unit
- Remove both the upper vent screw and lower drain screw
- Allow all oil to drain completely (can take 15+ minutes)
- Inspect the drained oil: milky appearance indicates water intrusion, metal flakes suggest gear wear
- Inspect the magnetic drain plug: a few tiny particles are normal, but significant metal debris indicates internal damage
- Using a gearcase lube pump, fill from the bottom hole until oil appears at the upper vent hole
- Quickly replace the upper vent screw, then remove the pump and replace the lower drain screw
I once found water in my lower unit oil after a season of fishing in shallow, sandy areas. This early detection allowed me to replace the seals before any corrosion damage occurred, saving a potential $900 repair.
Spark Plug Inspection and Replacement
Spark plugs are critical for proper combustion. On my F150, I:
- Remove the cowling and locate the spark plug wires
- Carefully remove one wire at a time, keeping track of their positions
- Use a spark plug socket with rubber insert to remove each plug
- Inspect each plug for deposits or damage:
- Tan/light gray deposits are normal
- Black, sooty plugs indicate rich mixture
- White, blistered plugs suggest overheating
- Measure the gap with a feeler gauge and adjust if needed
- Replace with new plugs if showing wear (I replace mine annually regardless)
- Apply a small amount of anti-seize to the threads (but never on the electrodes)
- Hand-thread first, then torque to specifications (my F150 requires 18 ft-lbs)
I once discovered that one cylinder was running rich due to a partially clogged fuel injector, which was evident from the black deposits on just that one plug – a problem I might have missed without this inspection.
Water Pump Impeller Replacement and Inspection
This is arguably the most critical maintenance item. A failed impeller can cause catastrophic overheating in minutes. My process:
- Remove the lower unit (usually 4-6 bolts)
- Remove the water pump housing
- Extract the old impeller and inspect for:
- Cracked or missing vanes
- Hardening of the rubber
- Melting or deformation
- Clean the water pump housing thoroughly
- Install the new impeller with rubber-safe lubricant
- Replace all gaskets and O-rings (never reuse old ones)
- Reassemble and torque all bolts to specifications
I replace my impeller annually without fail, even when it looks good. The $40 part is cheap insurance against a $2,000+ repair bill for overheating damage. For details on choosing between a full kit or just an impeller, check out this useful guide on Water Pump Repair Kit vs. Impeller Only.
Model-specific note: On 2014-2018 F150-F200 models, access to the water pump requires more disassembly than earlier models. Allow extra time or consider professional service if you're uncertain.
Thermostat Check and Replacement
While less frequent than other items, I check my thermostat during every other 100-hour service:
- Locate the thermostat housing (typically on the side of the cylinder head)
- Remove the housing bolts and carefully extract the thermostat
- Inspect for corrosion, damage, or debris
- Test functionality by placing in hot water (around 140°F) to verify it opens as described in this thermostat testing guide
- Replace if showing any signs of malfunction
- Install with a new gasket
Last year, I found my thermostat stuck partially open, which was causing my engine to run slightly cooler than optimal. This can lead to carbon buildup and reduced efficiency.
Propeller Inspection and Maintenance
A damaged prop reduces performance and can cause vibration. My inspection routine:
- Remove the cotter pin, castle nut, and washer
- Slide the propeller off the shaft
- Inspect for:
- Bent or chipped blades
- Fishing line wrapped around the shaft
- Damage to the splines
- Hub damage or slippage
- Clean the shaft and apply fresh marine grease
- Check the prop shaft seal for leaks or damage
- Reinstall in reverse order, using a new cotter pin
After hitting a submerged log last season, I found a hairline crack in one blade. Replacing the prop immediately prevented potential damage to my lower unit bearings from the resulting vibration.
Greasing Steering and Trim-and-Tilt Mechanisms
Proper lubrication prevents corrosion and ensures smooth operation:
- Locate all zerk fittings (grease points) on the engine bracket, steering mechanism, and trim/tilt system
- Use a quality marine grease gun to apply grease until you see a small amount of fresh grease emerge
- Wipe away excess grease
- For points without zerk fittings, apply marine-grade lubricant spray
- Move the steering and trim through full motion several times to distribute grease
On my older Yamaha, I once found a seized steering pivot that required penetrating oil and careful work to free – regular greasing would have prevented this issue entirely.
Cooling System Flushing and Saltwater Treatment
For saltwater boaters like me, this step is crucial:
- Connect flush muffs or use the built-in flush port (if equipped)
- Run fresh water through the system for 10-15 minutes with the engine running at idle
- For deeper cleaning, I use a specialized cooling system cleaner once per season
- Spray fogging oil into the air intake while the engine is running, then shut off the engine
- For winterization, add antifreeze through the flush port
- Apply corrosion inhibitor to all exposed metal surfaces
When I moved from freshwater to saltwater boating, I doubled my flushing frequency and added a salt-away treatment to my routine. The difference in internal corrosion has been remarkable when compared to other boaters who skip this step. You can find excellent flushing and cooling system parts from the Cooling System collection.
Tools and Service Kits for 100 Hour Maintenance
Having the right tools makes the job significantly easier and more efficient.
Yamaha 100 Hour Service Kits Overview
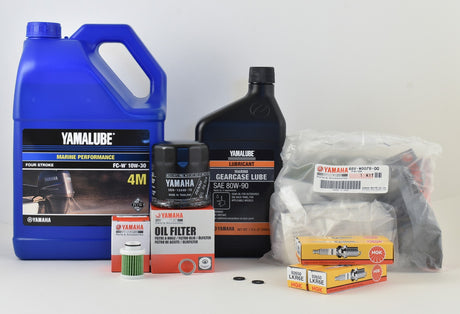
I've found that purchasing bundled service kits saves time and ensures I have all the necessary parts. A typical kit for my F150 includes:
- Oil filter
- Fuel filters (primary and on-engine)
- Spark plugs
- Gear lube
- Gaskets and O-rings
- Water pump impeller (in some comprehensive kits)
Companies like JLM Marine offer complete kits that arrive with everything needed for a thorough service. Their direct-from-factory pricing has saved me about 20% compared to buying individual components, which you can explore further at the JLM Marine homepage.
Recommended Maintenance Tools
My personal toolkit for 100-hour service includes:
- Socket set with extensions (metric for most Yamaha outboards)
- Torque wrench (crucial for proper bolt tightening)
- Oil filter wrench (sized for your specific filter)
- Spark plug socket with rubber insert
- Screwdriver set (both Phillips and flathead)
- Pliers set including needle-nose and channel locks
- Gear lube pump
- Marine grease gun
- Fuel line disconnect tools
- Oil drain pan with pour spout
- Absorbent pads for spill containment
- Feeler gauges for spark plug gaps
- Digital multimeter for electrical checks
This comprehensive set has evolved over years of DIY maintenance, and while the initial investment was around $300, it's paid for itself many times over.
Common DIY Mistakes and How to Avoid Them
Through painful experience, I've learned to avoid these errors:
-
Overtightening filter or drain plugs: Always use a torque wrench for critical fasteners. I stripped an oil drain plug once and had to drill and tap for a new one.
-
Using incorrect fluids: I once used automotive oil instead of marine-grade, which lacks crucial additives for marine environments. Always use FC-W certified oil for four-stroke outboards.
-
Forgetting to reconnect components: Create a checklist or take photos before disassembly. I once forgot to reconnect a ground wire, which led to erratic electrical issues.
-
Mixing up spark plug wires: Label everything during removal. Firing order matters!
-
Reusing one-time-use parts: Always replace crush washers, gaskets, and O-rings. The $2 part isn't worth the potential leak.
-
Rushing the job: My worst mistakes happened when I tried to finish quickly. Now I set aside a full day even if I expect it to take only a few hours.
Advanced Maintenance Beyond 100 Hours
While the 100-hour service is critical, it's part of a larger maintenance lifecycle for your Yamaha outboard.
Maintenance at 300, 500, and 1000 Hours
Yamaha's comprehensive maintenance schedule outlines additional services at higher hour milestones:
At 300 hours, I perform:
- Valve clearance check and adjustment (crucial for 2010+ F150-F300 models)
- Fuel pressure regulator inspection
- Throttle body cleaning and inspection
- Detailed electrical system tests
At 500 hours, I add:
- Timing belt inspection (and replacement if needed)
- Water pressure testing
- Cylinder compression test
- Full electrical harness inspection
At 1000 hours, I include:
- Complete fuel system overhaul
- Power trim and tilt system rebuild
- Starter motor and alternator inspection
- ECU diagnostics with a professional scanner
When my previous Yamaha hit 500 hours, I discovered slightly out-of-spec valve clearances that, if left unchecked, would have affected performance and potentially caused damage.
Engine Wear and Component Replacements
As engines accumulate hours, natural wear becomes evident. I monitor these signs carefully:
- Increased oil consumption (more than 1/4 quart between changes)
- Changes in exhaust color or smell
- Unusual vibrations at specific RPM ranges
- Delayed throttle response
- Starting difficulty
- Uneven idle
On my F150 at around 600 hours, I noticed slightly blue exhaust smoke during cold starts. Compression testing revealed one cylinder with slightly lower compression. Rather than waiting for failure, I had the cylinder rings replaced proactively, which was far less expensive than a complete rebuild would have been.
Troubleshooting Post-Maintenance Issues
Sometimes problems arise even after careful maintenance:
- Engine won't start after oil change
- Check for air in the fuel system (prime the bulb)
- Verify spark plug connections
- Check for tripped safety switches
- Ensure the battery is reconnected properly
- Water in the lower unit after service
- Likely causes: damaged seals or improper reassembly
- Check shift shaft and prop shaft seals
- Verify drain/fill plug tightness
- Overheating after water pump replacement
- Check for air pockets in the cooling system
- Verify impeller installation direction (easy to install backward)
- Inspect thermostat operation
- Check for blocked water intakes
- Rough idle after maintenance
- Check for vacuum leaks
- Verify proper spark plug gap
- Inspect fuel system for contamination
- Check for loose electrical connections
Last year after a full service, my engine developed a high-speed miss. After methodical troubleshooting, I discovered that one spark plug wire had a microscopic crack that was causing arcing at higher RPMs – a problem that only appeared under load.
When to Seek Professional Marine Service
While I'm a firm believer in DIY maintenance, there are times when professional help is necessary:
-
When diagnostic trouble codes (DTCs) persist despite basic troubleshooting
-
For specialized electronic issues requiring factory diagnostic equipment
-
When internal engine work is needed such as powerhead rebuilds or crankshaft service
-
For warranty-covered repairs to maintain your coverage
-
When specialized tools are required that aren't economical to purchase for one-time use
I once struggled with an intermittent no-start condition that my basic tools couldn't diagnose. A Yamaha dealer used their YDIS (Yamaha Diagnostic System) to identify a failing crank position sensor – something I couldn't have pinpointed without specialized equipment.
Additional Resources and Support Available

The Yamaha community has extensive resources to help owners maintain their outboards.
Authorized Yamaha Marine Dealer Support
Your local authorized Yamaha dealer offers:
- Factory-trained technicians
- Genuine Yamaha parts
- Access to technical service bulletins
- Warranty administration
- Computer diagnostics with factory equipment
I maintain a relationship with my local dealer even though I do most maintenance myself. Their expertise has been invaluable for complex issues, and they're often willing to provide advice for DIY projects.
Yamaha Maintenance Matters Guide and Digital Resources
Yamaha provides excellent official resources:
- Maintenance Matters guide with detailed maintenance procedures
- Model-specific owner's manuals with maintenance schedules
- Technical service bulletins (available through dealers)
- Online maintenance videos and tutorials
I keep digital copies of all these resources on my phone for quick reference when working on my outboard.
Parts and Service Kit Purchasing Options
For maintenance parts, I've had success with:
- Authorized Yamaha dealers for OEM parts
- JLM Marine for direct-from-factory options with global shipping (JLM Marine homepage)
- Select marine supply stores that carry quality aftermarket alternatives
I've found that OEM parts are critical for certain components (especially electronics and fuel system parts), while high-quality aftermarket options work well for common service items like filters and spark plugs.
Yamaha Cleaning and Detailing Products
Keeping your outboard looking good is also important:
- Yamalube cleaners and protectants are specifically formulated for marine environments
- I use Yamalube Silicone Protectant Spray on rubber components to prevent drying and cracking
- For the cowling, I apply a quality marine wax twice a season to protect against UV damage
These products have helped my 5-year-old outboard maintain its appearance, which contributes to higher resale value.
Customer Service and Support Contacts
For direct assistance:
- Yamaha's customer service: 1-866-894-1626
- Yamaha Marine website for general support
- Owner's portal for registration and warranty information
I once needed help locating a hard-to-find part for my older Yamaha, and their customer service connected me directly with a parts specialist who tracked it down.
Introduction to the My Yamaha Outboards App
The My Yamaha Outboards app has become an essential tool for me:
- Tracks maintenance history
- Sends service reminders
- Stores important documents
- Provides model-specific information
- Helps locate dealers and service centers
I use this app to log every maintenance task, which has created a comprehensive digital service record that will help with resale value.
DIY vs. Dealer Service Comparison

Based on my experience with both approaches, here's how they compare:
| Aspect | DIY Maintenance | Dealer Service |
|---|---|---|
| Cost | $150-250 for parts only | $500-800 for parts and labor |
| Time Investment | 4-8 hours of your time | 1-3 days turnaround time |
| Warranty Impact | No impact if properly documented | Automatically documented |
| Diagnostic Capability | Limited to basic tools | Advanced computer diagnostics |
| Knowledge Gained | Significant learning experience | None unless you observe |
| Convenience | Requires space and tools | Drop-off service |
| Quality Control | Depends on your skill level | Certified technician standards |
| Parts Availability | May require ordering ahead | Usually stocked |
For me, the DIY approach has saved approximately $3,400 over five years of ownership while giving me intimate knowledge of my outboard's condition.
Boating Safety and Best Practices
Maintenance is crucial, but safety practices are equally important.
Safety Reminders for Boaters
Before each outing, I verify:
- All required safety equipment is onboard and accessible
- Navigation lights are working properly
- Horn or sound-producing device is functional
- Fire extinguisher is charged and accessible
- Bilge pump is operational
- Fuel system shows no leaks or issues
- Battery connections are clean and tight
I once had a near-miss when another boater without working navigation lights nearly collided with me at dusk. This reinforced the importance of safety equipment not just for my protection but for everyone on the water.
Information on Personal Flotation Devices and Legislation
The U.S. Coast Guard requires:
- One USCG-approved PFD for each person aboard
- PFDs must be the appropriate size for the intended user
- Children under 13 must wear their PFD while underway on federal waters
- PFDs must be readily accessible, not stored in closed compartments
I go beyond these requirements by insisting everyone on my boat wears their PFD whenever we're underway, regardless of age. After witnessing a fellow boater fall overboard unexpectedly during a sudden wake, I'm convinced this is the only responsible approach.
Conclusion

The Yamaha outboard 100-hour maintenance checklist is your roadmap to a reliable and long-lasting marine engine. By diligently performing tasks like oil changes, gearcase service, impeller checks, and fuel filter replacements, you're safeguarding your boating adventures and protecting your investment.
Through my own experiences—both successes and painful lessons—I've found that embracing regular maintenance creates confidence on the water. When I turn the key, I know my engine will respond reliably because I've given it the care it deserves.
Final Takeaway
Taking ownership of your Yamaha's maintenance is one of the most rewarding aspects of boat ownership. The skills you develop, the money you save, and the intimate knowledge of your engine's condition all contribute to a more satisfying boating experience.
Whether you choose the DIY path as I have or rely on professional service, the key is consistency. Your Yamaha outboard is an engineering marvel designed to provide years of faithful service—but only if you hold up your end of the bargain with regular, thorough maintenance.
For more resources and parts, visit the JLM Marine homepage for everything you need to keep your outboard running strong.