


DIY Outboard Engine Tune-Up Guide
Introduction to Boat Motor Tune-Ups

There's nothing quite like the feeling of the open water, the sun on your face, and the steady hum of a well-functioning outboard motor propelling you forward. But to ensure those memorable days on the water aren't cut short by a sputtering engine, a regular tune-up is absolutely essential. I learned this the hard way after a particularly frustrating weekend. My trusty outboard, which I hadn't given much attention to beyond the occasional oil check, decided to throw a fit miles from the nearest dock. That experience hammered home the incredible importance of boat motor maintenance benefits. A well-tuned outboard motor means better performance, significantly improved fuel efficiency, and, perhaps most crucially, enhanced safety for everyone aboard. Don't let a neglected engine ruin your adventure; taking care of your outboard is as important as any other maintenance you do on your boat.
Many people assume that a tune-up is a complex, dealer-exclusive job. However, I've found that with the right guidance, tools, and a little bit of elbow grease, a DIY boat engine tune-up is not only achievable but also incredibly rewarding. The satisfaction of knowing you've kept your engine in prime condition yourself is immense, and the cost savings are notable. While professional service has its place, especially for complex issues, mastering the basics of outboard maintenance can save you a significant amount of money over time. In fact, shop rates often exceed $150 per hour, making DIY tune-ups a very cost-effective choice (outboard maintenance guide). This guide is designed to empower recreational boat owners, those preparing for seasonal use, first-time owners, and even seasoned boaters with the detailed knowledge to confidently perform their own outboard motor tune-ups, ensuring their vessel is always ready for the water.
We'll walk through each critical step, from understanding your engine's core components to the nitty-gritty of spark plug replacement and fuel system checks. We'll cover everything you need to know about boat motor maintenance benefits, making sure you're prepared for a successful DIY tune-up.
Understanding Your Outboard Motor Components

Before we dive into the actual tune-up procedures, it's crucial to have a basic understanding of the main outboard motor parts names and how they work together. Think of your outboard as the heart of your boat; each part plays a vital role in its overall performance. Typically, an outboard is divided into three main sections: the powerhead, the midsection, and the lower unit, all topped off with a propeller.
The powerhead is where the magic happens – it houses the engine itself, including the cylinders, pistons, and ignition system. This is where fuel is mixed with air, ignited, and converted into the power that drives your boat. The midsection connects the powerhead to the lower unit and contains the drive shaft and cooling water passages. The lower unit, often called the gearcase, contains the gearbox that transfers the engine's rotational power to the propeller shaft and houses the water pump and usually the anti-ventilation plate above the propeller. The final, and often overlooked, component is the propeller itself, which translates the engine's power into thrust, moving your boat through the water. Understanding the function of each component helps in diagnosing potential issues and performing maintenance correctly. For instance, knowing how your ignition system is supposed to fire is key to troubleshooting starting problems.
Spark Plugs: Inspection and Replacement
Let's start with one of the most common and straightforward tune-up items: spark plugs. These little components are vital for igniting the fuel-air mixture in your engine's cylinders. Over time, they wear down, get fouled with carbon, or accumulate deposits, leading to misfires, rough running, and poor performance. I remember the first time I replaced spark plugs on my own outboard; it felt like unlocking a secret level of boat ownership.
To access them, you'll typically need to remove the engine cover. Your owner's manual will show their exact location. Using a dedicated spark plug socket with a socket extension, carefully removing the spark plugs is usually the first step. Once out, take a look at them. Are they a healthy tan color? Or are they black and sooty, oily, or showing signs of heavy wear on the electrodes? This visual inspection can tell you a lot about the health of your engine's combustion. If they look worn or fouled, it's time for replacements.
Now, before installing new ones, it's essential to gap spark plugs correctly for your outboard motor. This isn't something you can eyeball. You'll need a feeler gauge, a thin piece of metal with precise thicknesses. Your engine's manual will specify the correct gap measurement – typically measured in thousandths of an inch. Gently bend the gauge to slide between the spark plug's center and side electrodes. If it's too tight or too loose, you adjust the gap by carefully bending the side electrode (never the center one). Stu Davies, an expert marine writer for Practical Boat Owner, emphasizes being careful not to strip the threads when properly installing spark plugs. He also correctly points out that a spark plug socket with a rubber insert is ideal for protecting the ceramic insulator. Once gapped, screw the new plugs in by hand initially to avoid cross-threading, then tighten them with your socket wrench. Don't overtighten; check your manual for specific torque recommendations. Proper torque ensures a good seal without damaging the cylinder head. And don't forget to recycle old plugs at an auto parts store or hazardous waste facility.
Fuel System Maintenance
A clean and properly functioning fuel system is the lifeblood of any engine. For outboards, this means ensuring a steady, clean supply of fuel from the tank to the cylinders. I've learned that issues with the fuel system are responsible for a huge percentage of engine problems, so I take this step very seriously.
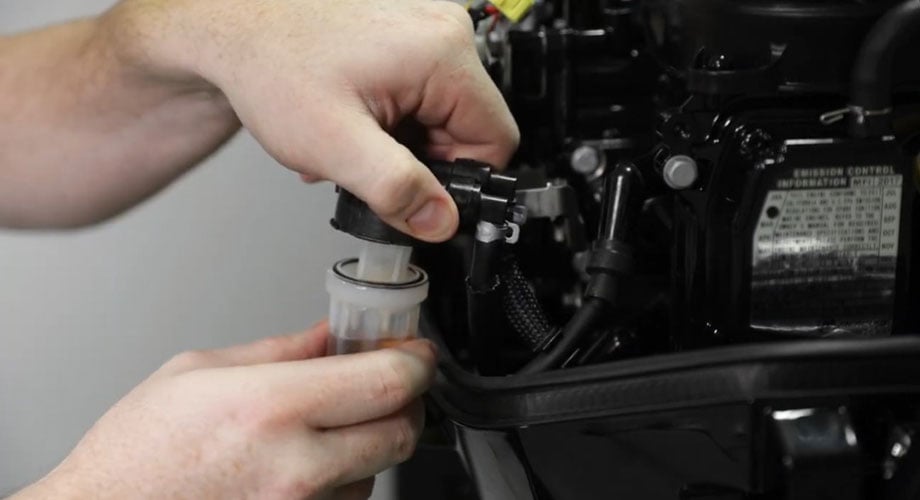
The first line of defense for your fuel is the fuel filter. Most outboards have at least one, and often more, fuel filter(s). These are designed to catch any debris, water, or sediment that might be present in your fuel. Over time, these filters can become clogged, restricting fuel flow and starving your engine. Checking and replacing fuel filters is a relatively simple task, but absolutely critical. Your manual will show you the location(s) and the specific filter type required for your model. When you replace them, be prepared for a bit of fuel spillage, so have rags and a container ready. I always make sure to run the engine for a few minutes after replacement to ensure the new filter is working and to bleed any air from the system if necessary. You can find quality marine-specific fuel filters on JLM Marine's fuel filter collection.
Next, you'll want to inspect fuel lines for cracks and leaks. These lines, often made of rubber or special plastic, can degrade over time, especially due to exposure to sunlight, fuel additives, or the harsh marine environment. Any cracks, bulges, or signs of hardening mean it's time for replacement. Ethanol-based fuels can also be particularly harsh on older fuel lines, causing them to become brittle or soft. It's essential to use fuel lines specifically rated for marine use and compatible with the type of fuel you're running. If you see any signs of fuel weeping or smell gas around the lines, replace them immediately; a fuel leak on a boat is a serious fire hazard.
Finally, to maintain fuel quality, especially when the boat might sit for periods between uses, I highly recommend the use of fuel stabilizers and additives to maintain fuel quality. Products like STA-BIL are fantastic for this. When you fill up your tank, especially before storing the boat for the off-season, adding a stabilizer ensures that the fuel doesn't degrade, form gums, or absorb moisture, which can clog injectors or carburetors. It's a small investment that can prevent a world of future headaches. As the Great Days Outdoors Editorial Team mentions, ensuring fresh, stabilized fuel is in the tank is a key part of pre-season preparation.
Lubrication and Moving Parts Care
Proper lubrication is key to reducing friction, preventing wear, and ensuring smooth operation of all the moving parts on your outboard. Neglecting these points can lead to stiff controls, premature wear on components, and even seized parts. I've certainly experienced stiff steering due to lack of lubrication on a previous boat, and it's not a pleasant sensation.
You'll want to lubricate throttle and shift linkages. Over time, these mechanical connections can become stiff or corroded, making it difficult to shift into gear smoothly or operate the throttle precisely. Locate the grease fittings (also known as zerk fittings) on these linkages and pump them full of marine-grade grease until you see fresh grease seeping out, pushing the old or dirty grease ahead of it. This ensures the internal components of the fittings are well-greased.
Similarly, greasing tilt and trim mechanisms is also important. These hydraulic or electric systems rely on smooth movement and proper lubrication to lift and lower your outboard. Again, look for zerk fittings on the tilt rams and pivot points and lubricate them thoroughly with marine grease. This will help prevent rust and ensure the trim system operates efficiently.
Don't forget about the other steering and other moving components maintenance. This includes greasing the steering arm, any swivel brackets, and even checking the propeller shaft splines for lubrication when you have the prop off. If your outboard has a tilt lock mechanism or other pivot points, make sure they are also addressed. Using a quality marine grease is crucial here, as it's designed to withstand water and salt, providing long-lasting protection.
Propeller Inspection and Maintenance
The propeller is what does all the work of pushing your boat through the water. Any damage to it directly impacts your boat's performance, fuel efficiency, and speed. I always give my propeller a good once-over before a busy season.
The first step is checking for propeller damage: nicks, dings, bent blades. Even minor damage can unbalance the propeller, causing vibrations and reducing efficiency. Run your hand over the blades, feeling for any imperfections. Look for obvious bends, chips, or gouges. The BoatEngine.com Technical Team wisely advises inspecting around the propeller for any signs of leaking lubricant, which could indicate a damaged seal or gearcase, and to look for cracks, chips, or bent blades on the propeller itself.
If you find minor damage, some dings can be professionally repaired by a propeller shop, or in some cases, you might be able to file them down carefully. However, if you find bent blades or significant damage, it's best to consider securing or replacing the propeller. Damaged props are inefficient and can cause more harm than good. When removing a propeller, note the order of any washers, keys, and the locking nut assembly so you can put it back correctly, or install a new one.
Propeller maintenance tips to avoid performance issues also include ensuring it's properly tightened to the shaft. A loose propeller can spin on the prop shaft, damaging the splines and potentially leaving you stranded. Always use a propeller wrench or socket set of the correct size, and tighten the castle nut securely, often with a new cotter pin inserted through the aligned holes in the nut and shaft. Keeping your propeller clean and free of marine growth also contributes to optimal performance.
Engine Oil and Lower Unit Care
This section covers some of the more critical fluid changes for your outboard. These aren't just routine tasks; they are vital for the long-term health and reliability of your engine and drivetrain.
For four-stroke outboards, changing engine oil and oil filters is much like doing it on a car. You'll need to consult your owner's manual for the correct type and viscosity of oil, typically an SAE 10W-30 or 10W-40 marine-specific oil that meets standards like SAE and NMMA FC-W certification. Warm the engine up slightly to help the oil drain more easily. Then, locate the drain plug (usually at the lowest point of the oil pan or crankcase) and the oil filter. Place a drain pan underneath, remove the drain plug, let the old oil drain out completely, and then replace the plug with a new gasket if specified. Unthread the old oil filter, making sure to wipe the mounting surface clean, then apply a thin film of new oil to the rubber gasket of the new filter before screwing it on hand-tight plus an additional quarter-turn. Refill the engine with the correct amount of new oil.
The lower unit gear oil is often overlooked, but it's incredibly important. This oil lubricates the gears and bearings in the lower unit. Mercury Marine, for instance, recommends changing lower unit gear oil perhaps every 100 hours or annually, whichever comes first, and definitely after initial break-in. The process involves removing both the drain plug and the vent plug on the lower unit. You'll then use a special gear oil pump to fill the lower unit from the drain hole until the oil reaches the vent hole. This ensures all air is purged from the system. If you notice milky or foamy oil when draining, it's a sign that water has entered the lower unit, which requires immediate attention to find and fix the leak. Replacing lower unit gear oil annually is crucial for longevity and cost savings.
Finally, the importance of flushing the cooling system and water pump impeller inspection cannot be overstated. After running your outboard, especially in saltwater, flush the cooling passages with fresh water using a flush attachment or by running the engine in a tank of fresh water. This prevents salt and debris from accumulating and corroding the cooling system. The water pump impeller is a rubber component that circulates cooling water. It's a wear item and can degrade over time, especially if run dry. Many mechanics recommend replacing the impeller annually or bi-annually, or at least inspecting it during your tune-up for signs of cracking or stiffness to prevent overheating. For those interested in doing it yourself, see our comprehensive guides on Mercury water pump impeller replacement and Johnson/Evinrude outboard water pump replacement.
Battery and Electrical System Checks
A reliable electrical system is what gets your engine started and keeps all your boat's accessories running. I always do a thorough check of the battery and connected wiring as part of my tune-up, knowing that a dead battery or corroded connection can leave you high and dry.
The first step is checking battery charge and cleaning terminals. Outboard motors typically use marine deep-cycle or starting batteries. You can use a voltmeter to check the battery's voltage; a fully charged battery should read around 12.6 volts or higher. If the voltage is low, it may need charging or replacement. More importantly, inspect the battery terminals and cable ends for any signs of corrosion – that fuzzy white or greenish powder. If you see corrosion, disconnect the battery cables (always disconnect the negative terminal first, then the positive), and clean the terminals and cable ends thoroughly with a wire brush and a solution of baking soda and water. Rinse with fresh water, dry completely, and reapply a dielectric grease or corrosion inhibitor to prevent future buildup before reconnecting (positive first, then negative).
Next, inspecting wiring for corrosion or damage is crucial. Trace the wiring harness from the battery to the engine, looking for any frayed wires, cracked insulation, or corroded connections at the motor or ignition switch. Loose connections or corroded wires can cause intermittent performance issues or complete failure.
Finally, testing electrical connections and troubleshooting ignition issues can be done by ensuring all connectors are secure and free from corrosion. If you're experiencing starting problems, it's worth checking the connections at the starter motor, ignition coil, and kill switch. A simple continuity test with a multimeter can help pinpoint faulty wires or connections if you suspect an ignition problem.
Safety and Workspace Preparations

Safety first, always! Working on a boat engine involves potential hazards like fuel, oils, and moving parts. Setting up a safe workspace and using the right protective gear is non-negotiable in my book. I've always believed that if a job is worth doing, it's worth doing safely.
My first step is always ensuring a safe workspace setup. This means working in a well-ventilated area, preferably outdoors or in an open garage, especially when dealing with fuel or running the engine. Proper lighting is also essential, allowing you to see clearly what you're doing and spot potential issues. I also like to have a fire extinguisher readily available whenever I'm working with fuel or running the engine.
Then comes the personal protective equipment. I never work on an engine without wearing sturdy gloves to protect my hands from grease, oil, and sharp edges, and safety goggles to shield my eyes from flying debris or splashes. Depending on the task, I might also wear ear protection.
Crucially, you need to know about handling fuels and lubricants safely. Always store fuels in approved containers and away from ignition sources. When draining old fuels or oils, use appropriate containers and dispose of them legally and responsibly. Never smoke or use open flames near fuel or the engine. Spills should be cleaned up immediately with absorbent materials. Following these precautions ensures I can work on my boat without putting myself or my surroundings at unnecessary risk.
Common Mistakes and Troubleshooting Tips

Even with the best intentions, mistakes can happen during a tune-up. Being aware of common pitfalls and having some troubleshooting knowledge can save you time and frustration.
One major pitfall is avoiding skipped steps and wrong parts usage. It's easy to get enthusiastic and rush through a tune-up, but every step is there for a reason. Make sure you're using the exact spark plugs, filters, and fluids recommended by your outboard's manufacturer. Using the wrong parts can lead to poor performance, damage, or even void your warranty. Always refer to your owner's manual. I once tried to use a slightly different spark plug because it was readily available, and my engine ran terribly until I replaced it with the correct one.
When troubleshooting starting issues, overheating, and power loss, remember the basic principles of internal combustion: you need fuel, spark, and compression. If an engine won't start, I first check the fuel supply, then the spark (by removing a plug wire, grounding the plug, and cranking to see if it sparks), and if those are okay, I might consider compression issues. Overheating usually points to a cooling system problem – typically a clogged intake or a failed water pump impeller. Power loss can be due to fuel delivery issues, ignition problems, or even internal engine wear.
Finally, a pragmatic question is when to call a professional mechanic. While DIY is great, some tasks are best left to the experts. If you're dealing with complex electrical issues, internal engine problems (like low compression), or if you've attempted a tune-up and the problem persists or worsens, it's time to seek professional help. For instance, if lower unit oil is milky, it indicates a leak that needs expert diagnosis, not just refilling. As the folks at BoatEngine.com suggest, your owner's manual is your first resource for essential information.
Maintenance Scheduling and Record Keeping
A regular tune-up is great, but consistency is key. Establishing a good maintenance schedule and keeping detailed logs ensures your outboard motor stays in top condition year after year.
The recommended maintenance intervals are typically based on either time or operating hours, as outlined in your owner's manual. Many manufacturers provide a schedule of what needs to be done at certain hour milestones (e.g., every 100 hours, 200 hours, 500 hours) as well as yearly tasks, like changing lower unit oil or inspecting the impeller. I personally like to track my hours using an hour meter on the boat, but if you don't have one, keeping a log tied to boating seasons is also effective.
Keeping and using maintenance logs for prevention is invaluable. I keep a logbook where I record every tune-up, oil change, filter replacement, and any repairs I've performed, along with the date and hours. This not only helps me remember what's been done and when the next service is due, but it also provides a history that can be useful if I ever sell the boat or seek professional diagnosis. It's like a medical chart for your engine!
Finally, always pay attention to manufacturer-specific recommendations and warranty considerations. Many manufacturers require regular maintenance by authorized dealers to keep their warranties valid. Even if you're doing DIY work, following the manufacturer's guidelines for fluids, parts, and procedures is crucial to avoid voiding any warranty you might still have.
Additional Tips for Seasonal and Saltwater Use
Boating in saltwater presents unique challenges, primarily corrosion. My experience on the coast has taught me the importance of extra care for engines exposed to briny conditions.
One of the most critical steps for saltwater boat motor maintenance is post-season cleaning and corrosion prevention. After your last outing of the season, thoroughly flush the cooling system with fresh water. Wash down the exterior of the entire outboard, paying special attention to areas where salt spray can accumulate, like under the cowling. A specialized marine lower unit flushing attachment is a must-have for this.
To further combat the corrosive effects of salt, I highly recommend using anti-corrosion sprays and additives. Products designed for marine use can be applied to exterior metal parts, electrical connections, and even the spark plug wells to create a barrier against corrosion. Some people even use specialized engine fogging oil for internal protection during storage, which acts as a protective coating on cylinder walls. Gold Eagle Brands, for example, offers products like STA-BIL that can help with fuel system protection and corrosion.
When it comes to off-season storage best practices, if you're storing the boat for an extended period, it's best to stabilize the fuel as mentioned earlier and change the engine oil and lower unit oil before storage. This ensures that any acidic byproducts from combustion or contaminants in the oil are removed. If you have a 4-stroke engine, ensure it's stored in an upright position as recommended by the manufacturer to prevent oil from migrating into the cylinders or exhaust. I've learned that taking these steps means my outboard fires up much more readily and runs smoother when spring rolls around.
FAQ: Your Questions Answered
Q1: How often should I tune up my outboard motor?
A: The frequency of your outboard motor tune-ups depends heavily on usage and the manufacturer's recommendations. As a general guideline, most manufacturers suggest a basic tune-up annually or every 100 hours of operation, whichever comes first. However, more intensive checks and fluid changes, like lower unit oil, might be recommended on a similar schedule regardless of hours used if the boat is stored seasonally. For boats used frequently, especially in saltwater, more frequent checks of critical items like water pumps and fuel filters are a wise idea.
Q2: Can I perform my own boat motor tune-up safely?
A: Absolutely, yes! Most basic outboard tune-up tasks, such as changing spark plugs, fuel filters, engine oil, and lower unit oil, can be performed safely by a DIYer if you follow proper procedures and take necessary precautions. Always ensure you're working in a well-ventilated area, wearing appropriate personal protective equipment like gloves and eye protection, and handling fuels and lubricants with care. Consulting your owner's manual is paramount for specific instructions and torque specifications. However, if you encounter complex issues or feel unsure about any step, it's always best to consult a qualified marine mechanic.
Q3: What tools do I need for an outboard motor tune-up?
A: For a standard tune-up, you'll need a selection of common hand tools, plus a few specialized items. Essential tools include a socket set with various sizes, screwdrivers, pliers, and a spark plug socket. You'll also need a feeler gauge for gapping spark plugs, a grease gun with marine-grade grease, a gear oil pump for lower unit oil changes, and access to your owner's manual for specific part numbers, fluid types, torque specs, and service intervals. Having rags, a drain pan, and a flush attachment for the cooling system are also highly recommended.
Q4: Why is my boat motor overheating after a tune-up?
A: This is a frustrating problem, but often stems from the cooling system. If your engine overheated after a tune-up, it's possible that the water pump impeller was not replaced correctly, or it may have failed during testing. Another common cause is debris that was dislodged during the tune-up and has subsequently clogged a water intake passage or thermostat. It's also possible that a thermostat was not reinstalled correctly or is faulty. Double-check that the water intakes on the lower unit are clear and that you are getting a strong stream of water from the "tell-tale," the small stream of water that exits the engine when it's running. If the problem persists, it's best to have a professional inspect the cooling system thoroughly.
Q5: How do I store my outboard motor in the off-season?
A: Proper off-season storage is crucial for protecting your outboard motor. For four-stroke engines, change the engine oil and filter, and drain and refill the lower unit gear oil before storage to remove potential contaminants. Stabilize the fuel with a quality fuel stabilizer like STA-BIL and run the engine for a few minutes to allow the treated fuel to circulate through the system. If you have a two-stroke, you'll typically fog the cylinders by spraying storage fogging oil into the spark plug holes while cranking the engine (but not starting it) to coat the cylinder walls. Clean the exterior of the engine thoroughly, especially for saltwater use, to remove salt and corrosion. Store the engine in an upright position, as per the manufacturer's recommendations, to prevent oil and fluids from migrating into unwanted areas.
When you think about keeping your boat running smoothly, the idea of a DIY outboard motor tune-up might seem a bit daunting. But as I've discovered over my years enjoying the water, it's incredibly rewarding and achievable. We've covered the essential steps, from the humble spark plug to the vital lower unit oil, emphasizing the importance of each task for performance, efficiency, and reliability. Remembering the expert sentiment that basic tune-up principles remain consistent, even with modern engines, is a great takeaway. Regularly maintaining your outboard doesn't just save you money on hefty mechanic bills – which can easily surpass $150 an hour – it also provides the immense satisfaction of knowing your vessel intimately and being prepared for whatever the water throws at you.
My final takeaway from countless hours spent working on my own outboards, and from seeing the positive results firsthand, is that consistent, diligent maintenance is the single best investment you can make in your boat. It's not just about fixing what's broken; it's about proactive care that extends the life of your engine, enhances your enjoyment, and ensures you're always safe. Don't let maintenance be a mystery; embrace it as an integral part of the boating lifestyle. For more expert guidance and quality parts, be sure to visit JLM Marine's hub.