


Check for Fuel & Oil Leaks Before Every Trip
- Why Pre-Trip Leak Checks Matter
- Fuel Leak Inspection Procedure
- Oil Leak Inspection Procedure
- Tools for Leak Detection
- When to Fix It Yourself vs. Get Help
- Safety Rules for Leak Inspections
- What Leaks Mean for Your Engine
- Preventing Leaks Through Maintenance
- Pre-Trip Leak Check Routine
- OEM vs. Aftermarket Leak Repair Parts
Pop the hood before you start the engine. Look under the boat. Takes two minutes and saves you from sinking at the dock or catching fire halfway across the bay. I've pulled apart enough seized powerheads and scraped enough melted wiring to know that most catastrophic failures start as a slow drip someone ignored for three weekends.
Why Pre-Trip Leak Checks Matter
Fuel leaks are a fire hazard. Oil leaks kill engines. According to FMCSA data, proper pre-trip inspections prevent about 14,000 accidents yearly through early leak detection. That's trucks, but the principle holds for outboards—catch it early or pay later.
A 2019 Piper PA-28 crash in Loveland, Colorado, killed the pilot after a loose fuel hose sparked an inflight engine fire. The plane flew without a mechanic pre-flight inspection under a special permit. The leak went undetected. One quick visual check could have prevented it.
Fuel Leak Inspection Procedure

Start with your nose. If you smell gasoline, you've got a leak. Check the bilge, the engine bay, and around the fuel tank. Gasoline vapors are heavier than air and settle low.
Visual Fuel System Check
- Fuel lines: Look for cracks, swelling, or wet spots on the rubber hose. Ethanol-blended fuels degrade older nitrile rubber lines faster than pure gasoline by breaking down the polymer structure. If the line feels soft or sticky, it's failing.
- Fuel primer bulb: Squeeze it. If fuel weeps out around the connections or through cracks in the bulb housing, replace it.
- Fuel tank fittings: Check where the fuel line connects to the tank. Look for fuel stains, corrosion, or loose clamps.
- Fuel filter housing: Twist it to check it's tight. A loose filter bowl leaks at idle and worsens under vibration.
Use a flashlight. Fuel stains show up as darker, oily residue on aluminum or fiberglass. If the engine compartment smells like gas but you see nothing, run your hand (dry, no sparks) along the fuel line. Pull it back and sniff—gasoline evaporates fast, but the smell lingers on your skin.
Common Fuel Leak Points
- Fuel line barbs: The brass or plastic nipples that hose clamps grip. Corrosion or over-tightening cracks the barb, letting fuel seep.
- Carb bowl gaskets (older motors): They harden over time and weep fuel at the bowl seam. For help rebuilding these, check our carburetor repair kits collection for high-quality parts.
- Fuel pump diaphragm: If you see fuel inside the lower cowling or mixing with the oil, the diaphragm is torn.
For hard-to-find leaks, UV dye works. Add it to the tank, run the motor for five minutes, then scan with a UV flashlight. The dye glows at the leak point. We've used this on countless motors where the leak only shows up under pressure or vibration. For fuel pumps and filters replacement, browse our fuel pump kit collection for reliable parts.
Oil Leak Inspection Procedure
Oil leaks leave puddles. Check the water under your boat after it's been sitting. Fresh oil appears as a rainbow sheen. Check the lower unit, the powerhead, and the midsection.
Lower Unit Gear Oil
Pull the drain screw. If milky oil comes out, you've got water intrusion from a bad seal. That's not a leak out, it's a leak in, but it still means the seal is shot. Pure gear oil should be amber or dark brown, not foamy.
- Propshaft seal: Look for oil streaks on the propshaft or inside the prop hub. If the seal is leaking, you'll see fresh oil around the prop nut.
- Shift shaft seal: Oil seeping from the shift shaft indicates a failed seal in the lower unit housing.
If you're losing gear oil but see no drips, the seals are leaking into the water while running. Check the oil level before and after each trip. For seal replacements, explore the outboard motor parts collection to find matching seal kits.
Powerhead Oil (2-Stroke Oil Injection Systems)
Oil injection systems on motors like Yamaha, Mercury, or Evinrude E-TEC can develop leaks at:
- Oil tank fittings: Check where the oil line connects to the tank. Look for oil stains or drips.
- Oil pump: Look for oil around the pump housing or on the mounting bolts.
- Injection nozzles: Oil weeping from the nozzle threads into the intake manifold indicates a bad O-ring.
Oil on the outside of the powerhead usually means a bad gasket or seal. Wipe it clean, run the motor for ten minutes, then check again to see where it's coming from. If you need parts for Evinrude engines, consider our Evinrude outboard motor parts collection for OEM-quality items.
4-Stroke Outboard Oil Leaks
4-stroke outboards have crankcases like a car engine. Common leak points:
- Valve cover gasket: Oil seeps down the side of the engine. You'll see black streaks on the valve cover.
- Oil pan gasket: Oil drips from the lowest point of the engine. Check the mounting bolts—if they're loose, the gasket is crushed unevenly.
- Oil filter: If it's not tight, it leaks. Spin it another quarter-turn by hand if you see oil around the base.
- Dipstick tube O-ring: Oil seeps around the dipstick. Replace the O-ring.
If you see blue smoke from the exhaust at startup, you're burning oil. That's not a leak, but it means oil is getting past the rings or valve seals.
Tools for Leak Detection
You don't need much. Here's what we keep in the toolbox:
- Flashlight: LED, bright enough to see into the bilge.
- Shop rags: White or light-colored. Oil and fuel show up better than on dark rags.
- Inspection mirror: The cheap telescoping kind from the auto parts store. Helps you see behind the engine.
- UV dye kit: Add to fuel or oil, scan with UV light. Available at any marine supply.
- Fuel pressure gauge: Screws into the fuel line. If pressure drops when the motor sits, you've got a leak or a bad check valve.
When to Fix It Yourself vs. Get Help
Tightening a loose hose clamp? Do it yourself. Replacing a fuel line? Easy—cut the old one, slide on the new one, double-clamp both ends with stainless clamps. Use fuel-rated hose (SAE J1527 or better), not hardware-store vinyl. Browse our fuel hose and clamps collection for high-quality parts that ensure safety and durability.
If the leak is at the fuel pump, carburetor internals, or inside the powerhead, and you don't have a service manual, take it to a shop. Fuel system pressure testing requires a gauge and the knowledge to not blow yourself up. We've had customers try to patch fuel lines with electrical tape or garden hose. It doesn't work. Gasoline eats through it in a week.
For oil leaks, if it's a simple gasket (valve cover, oil pan), you can do it with basic tools and a new gasket. For seals (crankshaft, propshaft), you need a seal puller and driver set, plus the specs to know how deep to seat the new seal.
Safety Rules for Leak Inspections 
- No smoking, no sparks. Gasoline vapor ignites easier than liquid.
- Ventilate. Open the engine cover, turn on the bilge blower for four minutes before starting the motor if you smell gas.
- Shut off the fuel. If you're checking the fuel system, close the tank valve or disconnect the line before pulling anything apart.
- Wipe up spills immediately. Use oil-absorbent pads in the bilge. Kitty litter works in a pinch.
If you see a steady stream of fuel—not a drip, but a stream—don't start the motor. Tow the boat back or anchor and fix it on the spot if you've got parts.
What Leaks Mean for Your Engine
Small oil leaks (a few drops per trip) won't kill the motor immediately, but they'll empty the sump over weeks. Once the oil level drops below the pickup, the motor runs dry. Bearing seizure happens fast—within minutes at WOT. A 2019 fuel tanker overturn in Manchester Township, NJ, leaked fuel oil after the driver lost control. That's extreme, but the principle holds: leaks get worse, not better.
Fuel leaks waste money and create a fire risk. A pinhole in a fuel line sprays atomized gasoline under pressure. That mist ignites easier than a puddle. A 2025 semi-truck explosion on I-44 in Missouri caused a 300-gallon diesel spill and injured three after a mechanical failure. Outboards run gasoline, which is more volatile than diesel. Don't ignore the drip.
Preventing Leaks Through Maintenance

Most leaks are preventable. Here's how:
- Replace fuel lines every 5 years. Doesn't matter if they look fine. Ethanol degrades the inner liner, and you won't see it until it fails.
- Use stainless steel hose clamps, not the cheap zinc-plated ones. Saltwater corrodes zinc clamps in a season. Double-clamp every fuel connection.
- Change lower unit gear oil annually. Fresh oil keeps seals lubricated. Old oil hardens them.
- Flush the motor after every saltwater trip. Salt crystals corrode fittings and crack seals. Run fresh water through the cooling system for ten minutes. Our guide on how to replace a Mercury outboard water pump impeller includes tips on flushing and cooling system maintenance.
For 4-stroke outboards, follow the manufacturer's oil change interval—usually 100 hours or annually. Old oil turns acidic and eats gaskets. Use the correct viscosity. Yamaha 4-strokes call for 10W-30 or 10W-40 FC-W rated oil. Using automotive oil voids the warranty and accelerates seal wear.
Pre-Trip Leak Check Routine
Make it a habit. Before you turn the key:
- Check the bilge for fuel or oil. Stick your head in and sniff. Look for rainbow sheens in the water.
- Inspect fuel lines and clamps. Squeeze the primer bulb and watch for leaks.
- Check the engine oil level (4-strokes). Pull the dipstick. Top off if it's low.
- Look under the cowling. Wipe any oil or fuel you see, then check where it's coming from after you run the motor.
- Sniff the engine compartment. If it smells like gas, find the leak before you start.
Run the motor at the dock for two minutes before you cast off. Watch for smoke, listen for hissing, and check the bilge again. If everything's dry, you're good to go. For detailed inspection tips, see our outboard engine pre-run inspection guide.
OEM vs. Aftermarket Leak Repair Parts
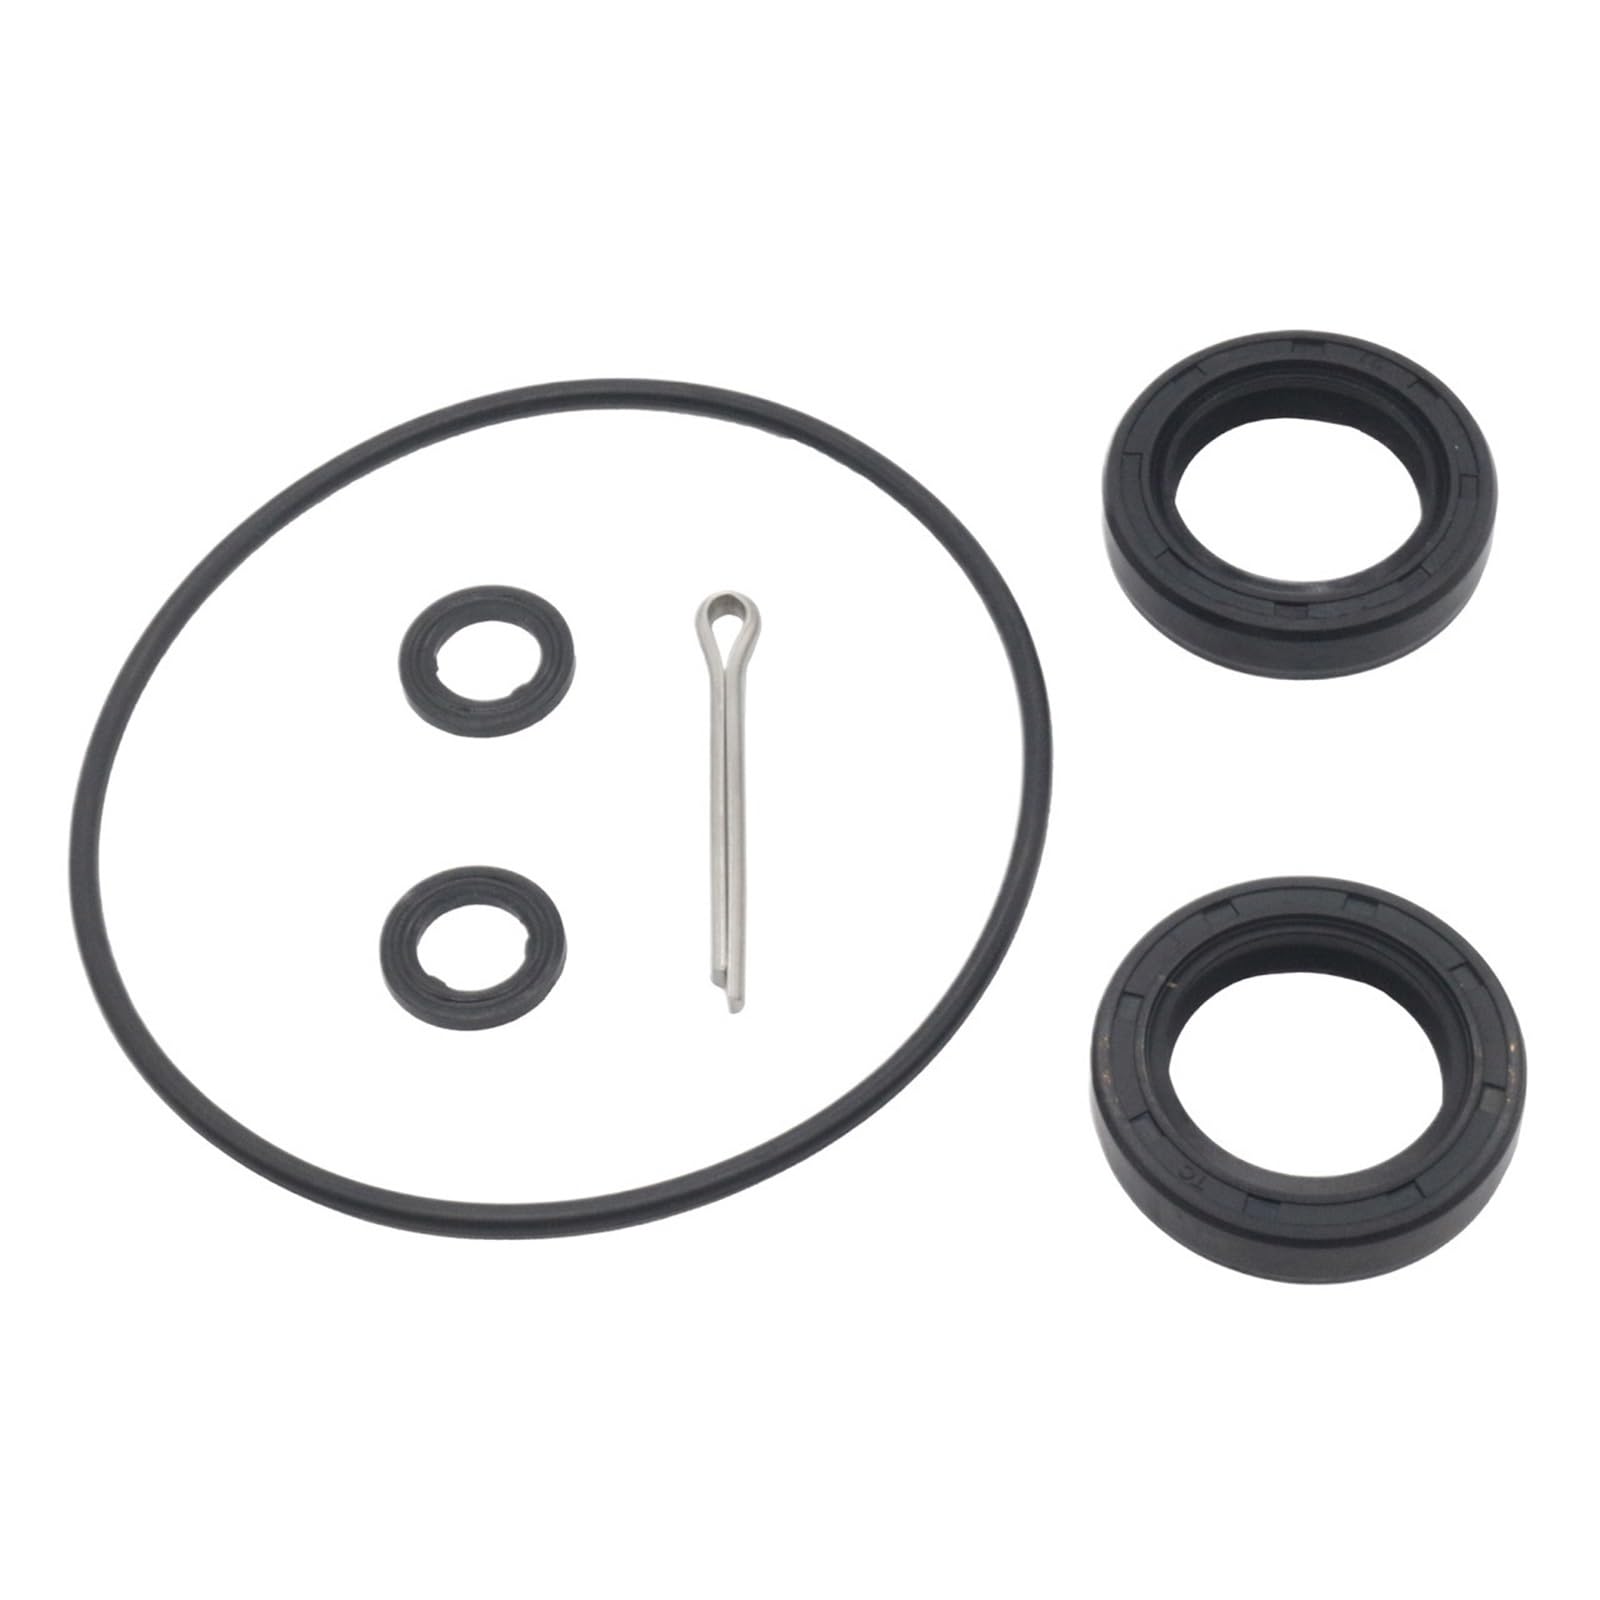
OEM gaskets and seals fit right and last, but you're paying for the logo. A Yamaha lower unit seal kit runs $80 from the dealer. The same seal from a reputable aftermarket supplier like JLM Marine costs $35 and uses the same NBR (nitrile butadiene rubber) spec. We've installed thousands of JLM seals and gaskets—they fit factory-spec and hold up to saltwater just like OEM.
Avoid no-name kits from random sellers. The rubber is often too hard (wrong durometer), the fit is sloppy, and they leak within a season. Some factories that produce OEM parts also manufacture excess capacity for aftermarket brands. JLM Marine sources from those same factories, so you're getting OEM-quality parts without the dealership markup.
For fuel lines, use SAE J1527 Type A1-15 rated hose minimum. It's ethanol-resistant and handles modern fuel blends. OEM fuel line from Mercury or Yamaha is good, but non-OEM from a marine supplier (Gates, Attwood, or JLM) works just as well at half the price.
Wipe down the powerhead with a rag after every trip. Makes it easier to spot fresh leaks next time.
For premium parts, visit the JLM Marine home page to browse all categories and collections.