


Troubleshooting Air Bubbles in Outboard Fuel Line: Carburetor to Filter
- Understanding Fuel Prime Loss in Outboard Engines: The Technical Breakdown
- Recognizing Symptoms of Fuel Prime Loss: Your Engine's Warning Signs
- Step-By-Step Visual Inspection of Fuel Line Components: The ABYC Approach
- How to Perform the Clear Hose Bubble Test to Locate Air Leaks: The Born Again Boating Method
- Fixing Air Leaks and Repairing Fuel Line Components: Marine-Grade Solutions
- Primer Bulb Use and Troubleshooting Primer Airlocks: Proper Technique Matters
- Safety Considerations When Working with Fuel Systems: ABYC Guidelines
- Common Outboard Fuel System Issues: A Diagnostic Reference Table
- Professional Service Considerations: When to Call in the Experts
- Additional Resources and Support for Outboard Fuel System Maintenance
- About the Author
- References

This article is designed to be your go-to guide for understanding exactly why your outboard engine might be losing its prime and, more importantly, how you can fix it. We'll dive deep into the common causes, show you how to visually inspect your fuel system, and guide you through a tried-and-true method for pinpointing those elusive air leaks.
Here's a look at what we'll cover to get your outboard running right:
- Understanding the basics of fuel prime loss and its common culprits.
- Recognizing the tell-tale signs your engine is losing prime.
- A thorough, step-by-step visual inspection of your fuel system components.
- Mastering the clear hose bubble test to definitively find air leaks.
- The most effective methods for repairing fuel line leaks and damaged parts.
- Proper primer bulb usage and how to fix common primer airlock issues.
- Where to find additional resources and support for maintaining your outboard's fuel system.
By the end of this guide, you'll be equipped with the knowledge and confidence to tackle fuel prime loss head-on, ensuring your time on the water is spent enjoying the ride, not wrestling with an unreliable engine.
Understanding Fuel Prime Loss in Outboard Engines: The Technical Breakdown

Fuel prime loss is that frustrating situation where your outboard engine suddenly loses its "prime," meaning the fuel system can no longer efficiently draw fuel from the tank to the engine's carburetor or fuel injectors. It's a common ailment, especially among boaters with older engines or those that haven't been used for a while. Personally, I find it's often one of those things that sneaks up on you until it becomes a major problem. You might notice your engine sputtering, dying unexpectedly, or requiring constant priming just to keep it running smoothly. These symptoms aren't randomly occurring; they're direct consequences of air entering your fuel system, displacing the fuel that the engine desperately needs.
The core issue leading to this loss of prime is almost always an air leak somewhere between your fuel tank and the engine's fuel intake. This isn't just my opinion; it's a technical fact emphasized in service manuals from major manufacturers like Mercury Marine and Yamaha. According to Mercury's maintenance guide, "Air entering the fuel system on the suction side will disrupt the fuel flow, creating vapor lock conditions and poor performance." This disruption happens because outboard fuel systems typically operate under negative pressure (vacuum) when drawing fuel from the tank.
Types of Outboard Engines and Fuel Systems: Susceptibility Differences
It's important to note that not all outboards are equally susceptible to fuel prime loss. Generally, older, 2-stroke carbureted engines tend to be more prone to these issues. This is largely because their fuel systems are simpler and often rely on a vacuum created by the engine to draw fuel. If there's a leak, this vacuum can easily pull in air.
In contrast, 4-stroke and fuel-injected outboards usually have more sophisticated fuel delivery systems. They often incorporate electric fuel pumps, fuel pressure regulators, and vapor separator tanks (VSTs) that help maintain fuel pressure and can sometimes self-purge minor air intrusions. The Yamaha service manual notes that their electronic fuel injection systems maintain a constant 42-45 PSI of pressure, which helps resist air intrusion but can still be compromised by significant leaks.
While fuel injection systems are generally more forgiving, they aren't entirely immune to problems; a severe air leak can still cause significant issues, though the symptoms might manifest differently. For instance, a fuel-injected engine might simply run poorly or have difficulty reaching optimal RPMs rather than a complete stall from loss of prime in the way a carbureted engine might. My nephew, who just got his first boat – a modern 4-stroke – has thankfully avoided these specific kinds of issues, but he's learned to appreciate the importance of a sealed fuel system nonetheless.
Recognizing Symptoms of Fuel Prime Loss: Your Engine's Warning Signs

When your outboard engine is losing prime, it's not being subtle. You'll likely notice a pattern of increasingly frustrating operational hiccups. One of the most common symptoms is the outboard engine stalling after shutdown or even while you're running. It's like the engine is constantly gasping for a breath of fuel. I remember one time, I'd just finished a fishing trip, shut down the engine, and when I tried to restart it an hour later, it was like it had forgotten how to run. It would sputter and die almost immediately.
You might also experience the engine sputtering due to fuel air bubbles. This sounds like a rough, uneven combustion cycle. Instead of a smooth purr, you get pops and coughs. It's your engine's way of telling you it's getting a mixture of air and fuel, which is far from ideal for optimal performance. According to Mercury Marine's troubleshooting guide, this sputtering is directly caused by "inconsistent fuel delivery due to air intrusion in the system."
Another common sign is the need to prime the primer bulb multiple times, sometimes even during operation, just to keep the engine alive. If you constantly find yourself pumping that bulb like you're trying to inflate a stubborn dinghy, chances are you've got an air leak somewhere upstream. These symptoms are your outboard's alarm system, letting you know it's time to investigate.
Step-By-Step Visual Inspection of Fuel Line Components: The ABYC Approach

The first logical step in tackling any problem is a thorough visual inspection. You can't fix what you can't see, right? When I'm troubleshooting, I always start at the engine and work my way backward towards the tank. This systematic approach helps prevent missing crucial details and aligns with the American Boat and Yacht Council (ABYC) recommended inspection procedures.
Begin with the connections right at the engine. This is a common area where things can go wrong. You'll want to carefully inspect outboard fuel lines for leaks. Look for any obvious signs of damage – cracked hoses, frayed wires (though less common in fuel lines, always good to check), or even just loose connections. Pay close attention to the fuel hose clamp inspection outboard points. Are they tight? Did someone use an old, rusted clamp that's lost its gripping power?
The ABYC standards recommend that all hose clamps should be constructed of corrosion-resistant materials and sized appropriately for the hose diameter. I've seen situations where a seemingly minor corrosion issue on a bracket holding a fuel filter can cause enough of a gap to let air in. That's why looking at the entire assembly, not just the hose itself, is critical.
Next, focus on the primer bulb. This is a common failure point. Is the primer bulb damaged? Does it feel mushy, or are there visible cracks or signs of wear? A worn-out primer bulb can develop small leaks itself, allowing air to be drawn in or fuel to weep out. Also, check for any multiple hose extensions. While sometimes necessary, each extra connection is another potential point of failure or leakage. Beyond the primer bulb and the immediate engine connections, move your inspection towards the fuel filter assembly. Is the fuel filter bracket showing signs of rust or looseness? Any gap or compromise here can be a gateway for air.
You can find quality replacement parts like fuel filters and primer bulbs at trusted suppliers such as JLM Marine's fuel filter collection.
Common Issues Found During Visual Inspection: The Marine Technician's Checklist
During your visual check, a few problem areas tend to pop up repeatedly. Hose clamp failure is extremely common. Over time, these little metal bands can lose their tension, especially when subjected to the marine environment's salt, sun, and vibration. They might look okay, but if they're not snug, air will find its way in.
According to a certification checklist used by ABYC-certified marine technicians, specific areas to inspect include:
- All hose connections for proper seating and tight clamping
- Fuel lines for cracks, bulges, or signs of permeation
- Primer bulbs for elasticity, cracks, or deformation
- Fuel filters for proper sealing at both inlet and outlet
- Fuel tank pickup tube connections for integrity
I've also found those notorious splice repairs that were done with questionable materials or techniques. Boat owners sometimes extend fuel lines, and if those splices aren't perfectly sealed, they become prime targets for air leaks.
It's also crucial to remember that not all leaks are obvious. Sometimes, a crack can be so small or located in a spot that's difficult to see immediately, like the barb fitting where the hose connects to a component. This is where the next step in our troubleshooting process becomes invaluable. You can't always rely on just seeing the problem; sometimes, you need to demonstrate it.
How to Perform the Clear Hose Bubble Test to Locate Air Leaks: The Born Again Boating Method
This is the gold standard for diagnosing fuel line air leaks, and honestly, it's a technique I've come to rely on heavily. It's a visual confirmation that leaves little room for doubt. The beauty of this test, as demonstrated by experts like Born Again Boating, is its simplicity and accuracy in identifying fuel air leaks directly.
As Born Again Boating explains in their tutorial: "The quickest way to troubleshoot is to start at the engine, then move from the engine towards the fuel tank." This methodical approach is what makes the test so effective.
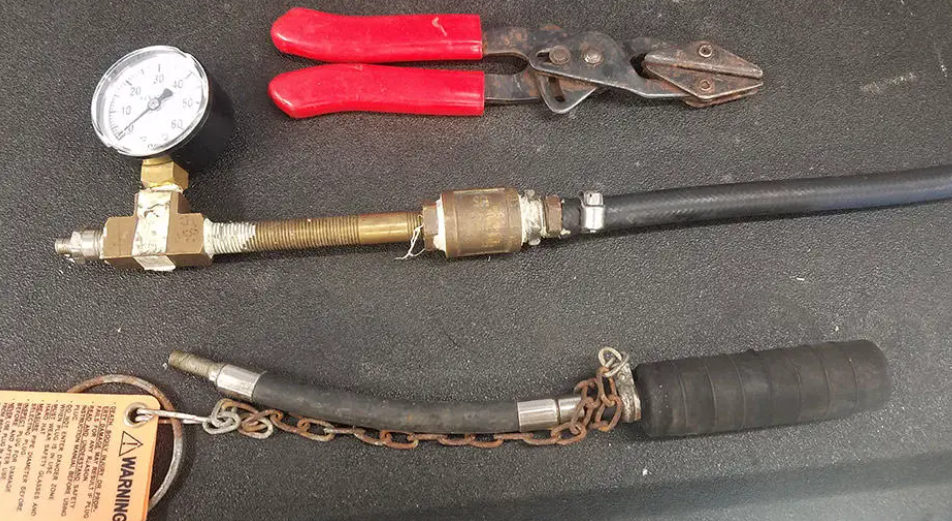
To set this up, you'll need a short piece of clear, marine-grade fuel hose and a couple of hose clamps that fit. First, with the engine cowling off, disconnect the existing fuel line from the engine's fuel intake (usually after the primary fuel filter). Now, connect your clear hose in its place, securing both ends with proper fuel line clamps. Make sure the clear hose is long enough to allow you to see it clearly while the engine is running or while you're pumping the primer bulb.
Once the clear hose is installed, prime the engine using the primer bulb until it feels firm. Now, start the engine. The real diagnostic work begins here: you're watching the fuel flowing through that clear hose. Are there any air bubbles in the fuel line? If you see a steady stream of bubbles, or even intermittent ones, you know there's an air leak somewhere between the fuel tank and where you've placed the clear hose.
The genius part of this test, as Born Again Boating explains, is its ability to be used for locating outboard fuel line leaks. If you see bubbles, you then move the clear hose connection point upstream towards the fuel tank. Disconnect the clear hose from its current spot and reconnect it further back in the fuel line system (e.g., connected directly to the primer bulb outlet, then to the water separator outlet, and so on). Each time, prime and run the engine (or crank it) to observe the fuel flow. The point where the bubbles disappear is the precise location of your air leak. It's a truly elegant solution for what can be an incredibly frustrating problem.
Pinpointing Leak Locations for Effective Repair: Real-World Applications
By systematically moving the test point, you can effectively locate outboard fuel line leaks anywhere in the system. I vividly remember a case where a persistent sputtering issue was resolved by this method. We'd gone through all the usual checks, replaced the primer bulb, and tightened a few clamps, but the problem persisted. When we used the clear hose, we saw bubbles right at the engine intake. We moved the hose upstream, and the bubbles were gone when it was connected directly to the primer bulb's output. This told us the leak was very specifically within the primer bulb assembly itself or its immediate connection.
This experience mirrors a case study from Born Again Boating where they found that "even corrosion on a fuel filter bracket was found to cause an air leak, which was not visually apparent." By moving the clear hose sequentially along the fuel line and testing at each connection, they were able to pinpoint the exact leak location.
Common leak sites that the bubble test helps pinpoint include hose barb fittings—those little nipple-like connections where hoses attach to other components. These can become brittle with age and develop hairline cracks. The fuel pickup tube in the tank can also be a source of trouble if a seal or the tube itself develops a crack. And as I mentioned earlier, even corrosion on a fuel filter bracket can create a slight gap that allows air to be drawn in. Sometimes, the leak is so subtle that you won't see any visible damage until you've performed this precise diagnostic. It's the most data-driven approach to fixing these fuel system teething issues.
Fixing Air Leaks and Repairing Fuel Line Components: Marine-Grade Solutions

Once you've identified the source of the air leak using the clear hose test, the repair itself is usually straightforward. The key is to replace the faulty component correctly. This means replacing compromised sections of fuel hose, ensuring that hose clamps are tightened properly and are of good quality. You might need to replace a worn-out primer bulb or a fuel filter that has a compromised seal. If you find a problem with a fitting, ensure you get the correct replacement part.
The issue with blue/gray ethanol fuel hose problems is indeed significant. Many older fuel hoses, especially those with a blue or gray inner liner, are not compatible with modern ethanol-blended fuels. According to the BoatUS Foundation's research, ethanol can degrade these hoses over time, making them brittle, porous, or even causing the inner liner to break down and clog the fuel system. Their testing showed that some older hoses became permeable after just one boating season with ethanol-blended fuels.
I've seen this happen firsthand, where the inner lining essentially 'unravels,' creating blockages and leaks. It's not uncommon for these hoses to fail prematurely when exposed to ethanol. The Boat Galley documented a similar case where "the non-permeable liner had broken free and twisted up, causing obstructions" inside the fuel hose.
This leads me to a critical point on prevention: suggest proactive fuel hose replacement before symptoms appear. If your boat is more than a few years old and still has its original fuel lines, it's a wise investment to replace them with hoses specifically rated for marine use and ethanol compatibility. Brands like JLM Marine offer high-quality fuel hoses designed to withstand the harsh marine environment and the corrosive effects of modern fuels, ensuring a reliable fuel supply and preventing these frustrating air leaks before they start. It's one of those maintenance tasks that saves you a lot of headaches down the line.
Fuel Hose Quality and Replacement Recommendations: USCG Compliance
The type of fuel hose you use is incredibly important. As I touched on, those older blue or gray lined hoses are a ticking time bomb when it comes to ethanol. These hoses often degrade from the inside out, and the debris can clog filters or even get into the engine.
My advice? Always opt for clear, multi-layer fuel hoses specifically designed for marine applications and verified to be compatible with ethanol fuels. Look for hoses that meet U.S. Coast Guard requirements, which specify that marine fuel hoses must be labeled "USCG Type A1-15" for gasoline systems. These hoses are engineered to resist permeation and degradation from ethanol, ensuring a consistent and clean fuel supply.
The U.S. Coast Guard also recommends inspecting fuel hoses annually and replacing them every 5-7 years, even if they appear to be in good condition. This preventative approach is far less expensive and troublesome than dealing with breakdowns on the water. Ensuring your fuel lines are in good condition is a proactive measure that virtually eliminates a major source of air leaks and fuel delivery problems.
Primer Bulb Use and Troubleshooting Primer Airlocks: Proper Technique Matters

The primer bulb is a critical component in many older outboard fuel systems, acting as a manual pump to draw fuel from the tank and push it into the engine's fuel system. Even with a perfectly sealed fuel system, improper use of the primer bulb can lead to issues. I've seen many people pump the primer bulb incorrectly, and it's surprising how often this simple mistake leads to confusion.
The correct technique involves holding the primer bulb as vertically as possible. This orientation allows the internal check valves to function as designed, drawing fuel from the tank and pushing it towards the engine. When you pump it vertically, you're effectively filling the line, and then the bulb itself, with fuel, creating that firm resistance that tells you the system is primed.
A common user mistake is pumping the bulb while it's horizontal or at an odd angle. When the bulb is not vertical, it can be difficult for gravity to assist the fuel flow into the bulb. This can lead to the bulb drawing and pumping air, not fuel, into the line. Instead of priming the engine, you just end up aerating the fuel line and potentially creating a temporary airlock. My own attempts at priming have sometimes felt like an aerobic exercise, but getting the angle right makes a huge difference.
Troubleshooting airlock symptoms often revolve around understanding how air gets trapped. An empty fuel tank is a prime suspect – if the pickup tube isn't submerged, the primer bulb will suck the last bit of fuel and then air. You might also have an airlock if the fuel pickup tube itself has a leak, or if there's a significant leak further up the fuel line. If your primer bulb remains soft and won't build pressure, it's a strong indicator of a leak or a blockage somewhere in the system.
Safety Considerations When Working with Fuel Systems: ABYC Guidelines
Before we go further, it's important to address safety when working on fuel systems. According to the American Boat and Yacht Council (ABYC guidelines), there are several precautions you should take:
- Always work in a well-ventilated area to prevent the buildup of fuel vapors.
- Disconnect the battery before beginning work on the fuel system to eliminate potential ignition sources.
- Have a fire extinguisher rated for fuel fires (Class B) within reach.
- Do not smoke or have open flames in the area while working on fuel systems.
- Clean up any fuel spills immediately and properly dispose of fuel-soaked materials.
- If you're unsure about any repair, consult a professional marine technician certified by the ABYC.
These guidelines aren't just bureaucratic red tape; they're crucial for your safety. Gasoline vapors are extremely flammable and can ignite from even a small spark. I always make sure to follow these precautions, even for what seems like a simple task. Your safety is worth more than any convenience or shortcut.
Common Outboard Fuel System Issues: A Diagnostic Reference Table

To help quickly identify potential problems, here's a comprehensive table of common symptoms, their likely causes, and recommended solutions, based on technical service documentation:
| Symptom | Likely Cause | Recommended Fix | Source |
|---|---|---|---|
| Engine starts but stalls shortly after | Air leak on suction side of fuel system | Use clear hose test to locate leak, replace affected component | Mercury Marine Service Manual |
| Primer bulb collapses and won't firm up | Blockage in fuel line or pickup, or major air leak | Check for kinked hoses, clogged filters, or perform bubble test | Yamaha Outboard Maintenance Guide |
| Bubbles visible in fuel filter | Air leak between tank and filter | Replace hoses, check connections at tank pickup and fuel line junctions | ABYC Inspection Checklist |
| Engine runs rough at high RPM | Intermittent fuel starvation due to minor air leak | Inspect anti-siphon valve, tighten all connections, replace worn primer bulb | Suzuki Service Bulletin |
| Fuel leaks from primer bulb | Worn or cracked primer bulb | Replace primer bulb with marine-grade equivalent | USCG Safety Guidelines |
| Cannot get engine to start despite repeated priming | Air lock in system or major fuel delivery issue | Check for proper venting of tank, possible carburetor issues, or perform complete fuel system inspection | Mercury Troubleshooting Guide |
| Consistent fuel starvation on rough water | Fuel pickup exposure due to low fuel or improper pickup placement | Keep tank filled above 1/4, consider redesign of pickup location | ABYC Fuel System Standards |
This table provides a quick reference for diagnosing common fuel system issues based on authoritative technical sources. Remember that combinations of these symptoms may indicate multiple issues, and systematic troubleshooting is essential.
Professional Service Considerations: When to Call in the Experts
While many fuel system issues can be addressed by a knowledgeable boat owner, there are times when professional help is warranted. According to the National Marine Manufacturers Association, you should consider consulting a certified marine technician when:
- You've attempted the clear hose test and other basic troubleshooting but can't locate the air leak
- The engine exhibits multiple, seemingly unrelated symptoms
- You suspect issues with the engine's internal fuel pump or injectors
- Recent fuel system repairs haven't resolved the problems
- You notice fuel leaks that pose safety hazards
To find a qualified marine technician, you can use the ABYC's "Find a Certified Professional" directory at https://abycinc.org/certified-professionals. These certified technicians have the training and specialized equipment needed to tackle complex fuel system problems.
Additional Resources and Support for Outboard Fuel System Maintenance

Maintaining an outboard's fuel system can feel complex, but there's a wealth of information and community support available. For those who learn best visually, I always recommend checking out video tutorials. Platforms like YouTube are brimming with content from experienced mechanics and boating enthusiasts who demonstrate these troubleshooting steps in real-time. Seeing the clear hose test performed or witnessing the correct primer bulb pumping technique can be incredibly helpful.
Engaging with the boating community, whether through online forums or local clubs, is another fantastic resource. People are often happy to share their experiences and offer advice on tackling specific outboard issues. I've found that asking detailed questions in forums related to my engine model can often lead to solutions I wouldn't have discovered on my own.
For those looking to deepen their knowledge, there are even courses available for marine technicians and dedicated boat owners. These can provide more in-depth understanding of fuel systems and advanced troubleshooting techniques. The American Boat and Yacht Council (ABYC) offers certification courses and technical resources that are invaluable for serious boaters.
Born Again Boating troubleshooting tips
The Born Again Boating community, in particular, offers a fantastic practical approach to troubleshooting fuel issues. They emphasize hands-on methods like the clear hose bubble test, which is exactly the kind of actionable advice that saves boaters' time and money. Their focus on demystifying complex mechanical issues makes them an invaluable resource for anyone looking to maintain their own boat. I've personally benefited from their clear explanations and visual aids when tackling my own outboard's quirks. You can find their detailed guides at https://www.bornagainboating.com.
It's clear that dealing with fuel prime loss in an outboard engine is a common, albeit frustrating, issue for many boat owners. We've explored how leaks, particularly from the fuel line between the carburetor and filter, can lead to sputtering, stalling, and the need for constant priming. The key takeaway? A continuous, uninterrupted flow of fuel is paramount for smooth engine operation.
My final take on this is that preventative maintenance and systematic troubleshooting are your best allies. By understanding the typical failure points, performing thorough visual inspections, and utilizing diagnostic tools like the clear hose bubble test, you can confidently identify and fix air leaks. Never underestimate the impact of worn hose clamps, cracked fuel lines, or a faulty primer bulb – these seemingly small issues can severely impact your engine's performance.
Don't be afraid to get your hands dirty and dive into your fuel system. With the right approach and a systematic mindset, you can conquer fuel prime loss and ensure your outboard is always ready for the water. Happy boating!
References
- Born Again Boating - Outboard Lose Prime
- American Boat and Yacht Council - Fuel System Standards
- Mercury Marine Service Manual
- Yamaha Outboard Maintenance Guide
- U.S. Coast Guard Boating Safety Division
- The Boat Galley - Outboard Fuel Line Problems
- BoatUS Foundation - Ethanol Research
- National Marine Manufacturers Association
- JLM Marine
About JLM Marine
Founded in 2002, JLM Marine has established itself as a dedicated manufacturer of high-quality marine parts, based in China. Our commitment to excellence in manufacturing has earned us the trust of top marine brands globally.
As a direct supplier, we bypass intermediaries, which allows us to offer competitive prices without compromising on quality. This approach not only supports cost-efficiency but also ensures that our customers receive the best value directly from the source.
We are excited to expand our reach through retail channels, bringing our expertise and commitment to quality directly to boat owners and enthusiasts worldwide.
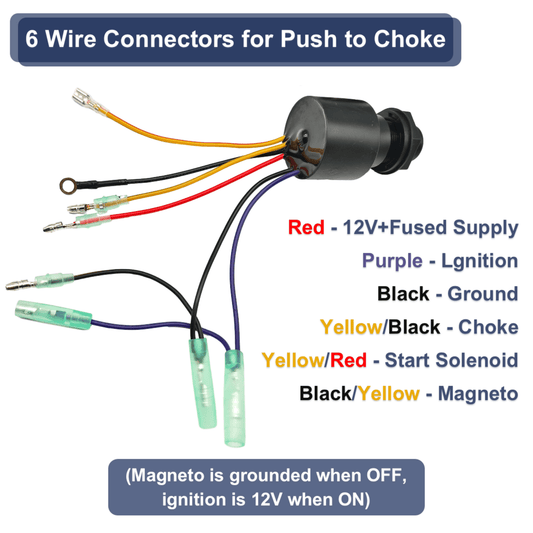
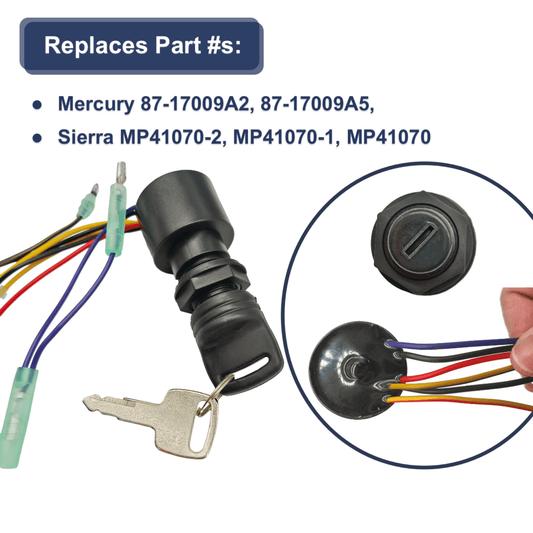
Electric Parts on Sale
- $21.50
- $21.50
- Unit price
- per

- $19.00
$15.00- $19.00
- Unit price
- per

- $16.19
$19.00- $16.19
- Unit price
- per
- $35.88
- $35.88
- Unit price
- per
- $34.99
- $34.99
- Unit price
- per

- $16.00
$12.00- $16.00
- Unit price
- per

- $21.99
$26.00- $21.99
- Unit price
- per

- $42.49
$50.00- $42.49
- Unit price
- per
- $17.50
- $17.50
- Unit price
- per

- $22.35
$26.00- $22.35
- Unit price
- per

- $59.60
$71.00- $59.60
- Unit price
- per
- $37.04
- $37.04
- Unit price
- per

- $26.99
$32.00- $26.99
- Unit price
- per
- $37.00
- $37.00
- Unit price
- per
- $84.00
- $84.00
- Unit price
- per

- $46.08
- $46.08
- Unit price
- per

- $28.99
- $28.99
- Unit price
- per

- $25.99
$31.00- $25.99
- Unit price
- per
- $25.99
- $25.99
- Unit price
- per

- $48.99
$58.00- $48.99
- Unit price
- per