


Outboard Overheating 101: Quick Checks to Prevent Damage
- The Tell-Tale Stream Check
- Water Intake Grates: The Stupidly Simple Fix
- Impeller Inspection and Replacement
- Thermostat: The Hidden Chokepoint
- Poppet Valve (Pressure Control Valve)
- What to Do If You See Steam
- False Overheats: The Faulty Sensor
- Trim Angle and Overheating
- The 3-Minute Dockside Checklist
- When to Stop and Call a Pro
- Tools You'll Actually Need
- OEM vs. Aftermarket Impellers and Thermostats
- Maintenance Schedule to Prevent Overheating
- What Happens If You Ignore It

Your overheat alarm just went off. First thing: shut down immediately. Don't try to limp back to the dock. Running hot for even thirty seconds can warp the head, blow a gasket, or crack the block. Kill it, let it cool, then start checking.
The Tell-Tale Stream Check
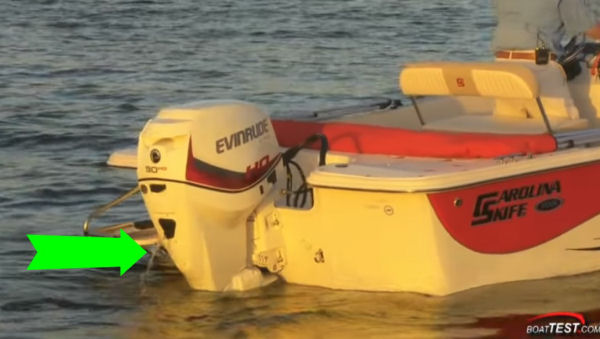
Before you pull anything apart, look at your pee stream. That little stream of water spitting out the side of the cowling tells you almost everything. At idle, it should be strong and cool to the touch. Not warm—cool. If it's weak, sputtering, or bone-dry, you've got a flow problem. If it's hot enough to make you pull your hand back, same thing: not enough water moving through the block.
Here's the tricky part: some motors pee fine at idle but barely dribble once you throttle up. That usually means your poppet valve (pressure control valve) is stuck or your impeller is half-shot and can't keep up with demand at higher RPM. We'll get to that.
Water Intake Grates: The Stupidly Simple Fix

Pull the motor up and look at the intake screens on the lower unit. You're checking for grass, plastic bags, sand clumps, mud—anything that can choke off water flow. I've seen motors overheat because a plastic grocery bag wrapped itself over the intakes. Takes ten seconds to check, saves you a thousand-dollar tow bill.
If you run in shallow or silty water, this should be part of your pre-trip routine. Every time. Don't skip it.
Impeller Inspection and Replacement
The impeller is a rubber star-shaped pump inside the lower unit. It spins, and the vanes flex to suck water up from the intakes and push it through the block. Over time, sand and debris grind down the vanes. They crack, flatten out, or snap off completely. When that happens, you're not pumping enough water.
Replace it annually or every 100 hours. Don't wait until it fails. A new impeller costs forty bucks. A new head gasket job because you cooked the motor costs three grand. For detailed guidance, see our Signs Your Outboard Impeller Needs Replacement blog.
How to Replace the Impeller
You'll need a 10mm socket, flathead screwdriver, and a torque wrench. Some motors also need a gear puller, but most don't.
- Drop the lower unit. Unbolt it from the midsection (usually four to six bolts). Disconnect the shift linkage—there's a pin or clip holding it. Don't yank it; wiggle it loose. The lower unit should slide straight down off the driveshaft.
- Pull the water pump housing. It sits right above where the lower unit connects. Remove the bolts (usually four or six). Lift it straight up. Inside, you'll see the impeller.
- Check the impeller. Look for cracked vanes, missing chunks, or vanes that are permanently flattened. If it looks even slightly questionable, replace it.
- Install the new impeller. Coat it lightly with marine grease or dish soap so it slides in without tearing. Pay attention to the direction of the vanes—they need to curve the right way to pump water up, not down. There's a small woodruff key that slots into the driveshaft; if you miss it, the impeller won't spin. Double-check that it's seated.
- Reassemble the housing. Don't overtighten the bolts. Plastic housings crack if you crank them down too hard. Snug is enough.
- Reinstall the lower unit. Here's where people screw up: you need to align the shift shaft and the water tube. The water tube is a small plastic pipe that channels water from the pump up into the block. If it's not seated in the grommet, you'll have zero cooling flow even with a brand-new impeller. Wiggle the lower unit gently as you slide it up until the tube slips into place. Reconnect the shift linkage and torque the bolts to spec. For a full walk-through, follow our Step-by-Step: Installing a Water Pump Repair Kit on a Yamaha Outboard guide.
If you snap a bolt trying to get the lower unit off, stop. Seized bolts are common on older motors. Hit them with penetrating oil, let it sit overnight, then try again with heat if you have a torch. If you keep forcing it, you'll twist the head off and then you're drilling out a stud.
Thermostat: The Hidden Chokepoint
The thermostat sits in the powerhead and regulates engine temperature. When the motor's cold, it stays closed, keeping water circulating only in the block so the engine warms up faster. Once it hits operating temp (usually around 143°F), it opens and allows water to flow out through the pee stream.
If it gets stuck closed, water never exits. The engine just keeps heating that same trapped water until it boils. Salt buildup is the usual killer, especially if you don't flush after saltwater use.
Testing the Thermostat
Pull it out of the housing (you'll need to remove a few bolts and possibly drain some coolant on four-strokes). Drop it in a pot of hot water on the stove. Heat it up. Around 140–145°F, it should visibly open. If it stays clamped shut or only opens partway, toss it and install a new one. Check out our easy process in Testing a Yamaha Outboard Thermostat in Hot Water.
When you reinstall, use a new gasket or O-ring. Reusing the old one usually leads to a slow leak that turns into an air pocket in the cooling system, which causes—you guessed it—overheating.
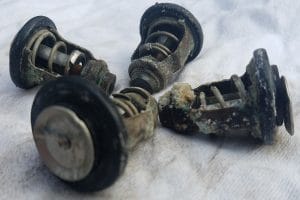
Poppet Valve (Pressure Control Valve)

This one gets overlooked. The poppet valve controls water pressure and volume at high RPM. At low speed, your impeller doesn't need much help. But when you open the throttle, water pressure spikes, and the poppet valve regulates it so you're not blowing seals or over-pressuring the system.
Symptom: Motor runs cool at idle, overheats at 4,000+ RPM.
The valve can get clogged with sand or salt, or the spring can weaken and let it stick open or closed. Pull it, flush it, check the spring tension. If it's corroded or won't move freely, replace it. It's a cheap part. For similar issues and fixes, see our Outboard Overheating—Diagnose & Fix Intermittent Cooling Issues After High RPMs.
What to Do If You See Steam

Steam means the motor is critically hot. Shut it down immediately. Don't idle it, don't try to nurse it home. You're cooking the block.
Once it's off:
- Let it cool for at least thirty minutes. Don't touch anything; you'll burn yourself.
- Check the pee stream (once cool enough to run briefly). If there's no stream at all, it's almost certainly the impeller or a blocked intake.
- Pull the cowling and look for obvious issues: a blown hose, a cracked fitting, or steam still rising from the head.
- If you're on the water and can't diagnose it, call for a tow. Trying to restart and run a steaming motor will destroy it.
False Overheats: The Faulty Sensor
Sometimes the alarm screams and the motor feels fine. Could be a bad temperature sensor. Grab an infrared temp gun and shoot the cylinder head. If it's reading 160°F but the gauge says 210°F, your sensor's lying. Replace it before it makes you tear apart a perfectly good cooling system.
Trim Angle and Overheating
If you run with the motor trimmed way up (bow high), you can suck air into the intakes. The prop partially lifts out of the water, and the intake grates pull in a mix of air and water instead of solid water. That causes the pee stream to sputter and the engine to run hot intermittently.
Drop the trim. If the overheating stops, that was your problem. Trim is for efficiency, not for running in six inches of water.
The 3-Minute Dockside Checklist

Before every trip:
- Look at the intake grates. Clear any crud.
- Check the pee stream (run it on the hose with earmuffs or in a barrel). Strong and cool?
- Oil level. Top it off if low. For two-strokes, verify your fuel mix ratio.
- Belts (if your motor has them). Cracks or fraying? Replace it.
After saltwater use:
- Flush with fresh water for at least five minutes using earmuffs or a flush port. This dissolves salt crystals before they clog your passages. Make this a habit and protect your engine from damage by shopping for parts in our Cooling System collection.
When to Stop and Call a Pro
You should stop wrenching and call a certified marine tech if:
- You see bubbles in the pee stream. That's exhaust gas mixing with cooling water, usually a blown head gasket.
- The motor goes into safe mode (shakes, cuts power, won't rev past 2,000 RPM) and you've already checked the basics.
- You snap a bolt trying to remove the lower unit or water pump housing. Don't drill it out yourself unless you know what you're doing.
- There's visible damage to the block, cracks in the housing, or oil mixing with the cooling water.
A head gasket replacement on an outboard runs $1,500–$3,000 depending on the model. Catching it early with these checks keeps you in the "quick fix" zone.
For reliable replacement parts, always consider buying from JLM Marine to get quality components direct from the factory.
Tools You'll Actually Need

For impeller and thermostat work:
- 10mm, 12mm, and 14mm sockets
- Flathead and Phillips screwdrivers
- Torque wrench (don't guess on the lower unit bolts)
- Needle-nose pliers (for shift linkage pins)
- Marine grease or dish soap (to lubricate the new impeller)
- Infrared temp gun (for checking actual block temp vs. gauge reading)
- Penetrating oil (for seized bolts)
OEM vs. Aftermarket Impellers and Thermostats
OEM parts fit perfectly and last. No argument there. But you're paying a 40–60% markup for the logo on the box. High-quality aftermarket suppliers source from the same factories that make OEM components or match the specs exactly. We've run JLM Marine impellers and thermostats on dozens of motors with zero failures. The rubber compound is correct, the vanes hold their shape, and the fitment is dead-on.
Cheap no-name kits from random online sellers? Skip them. The rubber is too stiff, the vanes flatten out in a season, and you'll be tearing the leg off again next month. Saving ten bucks isn't worth the headache or the risk of cooking your motor when the impeller fails offshore.
Maintenance Schedule to Prevent Overheating
Every trip:
- Visual check of intake grates
- Confirm pee stream at idle
Every 10 hours or monthly:
- Flush with fresh water (saltwater users)
- Inspect hoses and clamps for cracks or leaks
Every 100 hours or annually:
- Replace impeller
- Test or replace thermostat
- Inspect and clean poppet valve
- Check belt condition (if applicable)
Every 200 hours or every two years:
- Full cooling system flush with descaler (for saltwater motors)
- Pressure-test the cooling system for leaks
Stick to this and you'll almost never deal with overheating. For more tips on maintaining your outboard, check out Understanding Maintenance Schedules: Mercury vs. Yamaha.
What Happens If You Ignore It
Running an overheating motor, even for a few minutes, causes the aluminum head and block to expand unevenly. Gaskets blow. Cylinder walls score. In extreme cases, the block cracks. We've seen motors with heads so warped they looked like potato chips. Once that happens, you're not bolting on a new gasket and calling it good. You're either machining the head flat again (if it's not too far gone) or replacing the entire powerhead.
The average powerhead replacement for a mid-size outboard (75–150 HP) runs $4,000–$8,000 depending on the model. Compare that to a $40 impeller or a $25 thermostat.
Sources:
- RJN Marine: How to Diagnose Overheating Issues in Outboard Motors
- Dangar Marine YouTube: The Other Reason Outboards Overheat
- Marine Diesel Specialists: Is Your Boat Motor Overheating?
- Heavyseas: Outboard Engines: Types, Overheating Causes and Maintenance
- Annapolis Inflatables: DIY Outboard Motor Repairs Every Boat Owner Can Handle
- JLM Marine: Testing a Yamaha Outboard Thermostat in Hot Water
- JLM Marine: Outboard Overheating—Diagnose & Fix Intermittent Cooling Issues After High RPMs
- Sea Tow: What to Do When Your Boat Engine Overheats
- BoatUS: What If Your Temperature Gauge Spikes?
Flush your engine with fresh water after every saltwater trip. Five minutes of flushing now beats a weekend pulling the lower unit to clear salt blockages later. For premium parts to keep your outboard running smoothly, browse our extensive Boat Accessories collection and Outboard Motor Parts at JLM Marine.