


Step-by-Step Process for Checking and Swapping Out a Marine Engine Belt
Step-by-Step Process for Checking and Swapping Out a Marine Engine Belt

Checking and changing a marine engine belt means you look at, take off, put on, and tighten the belt so it fits right. Doing this often helps your boat engine stay safe and work well. You can do this job if you have the right tools and are careful. Taking care of your marine engine belt keeps your equipment safe and makes your boat trips go well.
Key Takeaways
- Look at your marine engine belt before each trip to spot cracks, fraying, or wear early.
- Use the correct tools and follow safety steps such as disconnecting the battery and wearing gloves.
- Check pulleys for smooth movement and clean grooves to prevent belt damage.
- Maintain proper belt tension—about ½–1 inch deflection at midpoint—so it isn’t too tight or too loose.
- Always keep a spare belt aboard and consult a pro if you hear odd noises or feel unsure.
Importance
Engine Health
Your marine engine needs a healthy belt to run well. The belt connects important parts like the alternator and water pump. If the belt wears out or breaks, your engine can overheat or lose power. You might see warning lights or hear strange noises—these signs mean the belt needs attention.
Tip: Check your belt before every trip. A quick look can save you from bigger problems later.
A good belt helps your engine:
- Keep the battery charged
- Pump water to cool the engine
- Run smoothly without sudden stops
If you ignore the belt, you risk engine damage. Replacing a worn belt costs less than fixing a broken engine.
Safety
A strong belt keeps you safe on the water. If the belt fails, your engine could stop in the middle of a trip. You might lose steering or power. This can be dangerous, especially if you are far from shore or in bad weather.
- You avoid getting stranded
- You prevent sudden engine failure
- You protect everyone on board
Note: Always carry a spare belt and the right tools. You can fix small problems before they become emergencies.
Tools and Safety
Tools Needed
Get all your tools ready before you begin. The right tools make the job safer and faster:
- 3/8‑inch ratchet or wrench
- New marine engine belt (refer to your engine manual)
- Gloves to protect your hands
- Safety glasses
- Screwdrivers (flathead and Phillips)
- Clean rags
- Flashlight
- Belt‑tension gauge (optional but helpful)
Tip: Manuals, design guides, and belt‑tension calculators help you pick the right belt and tension.
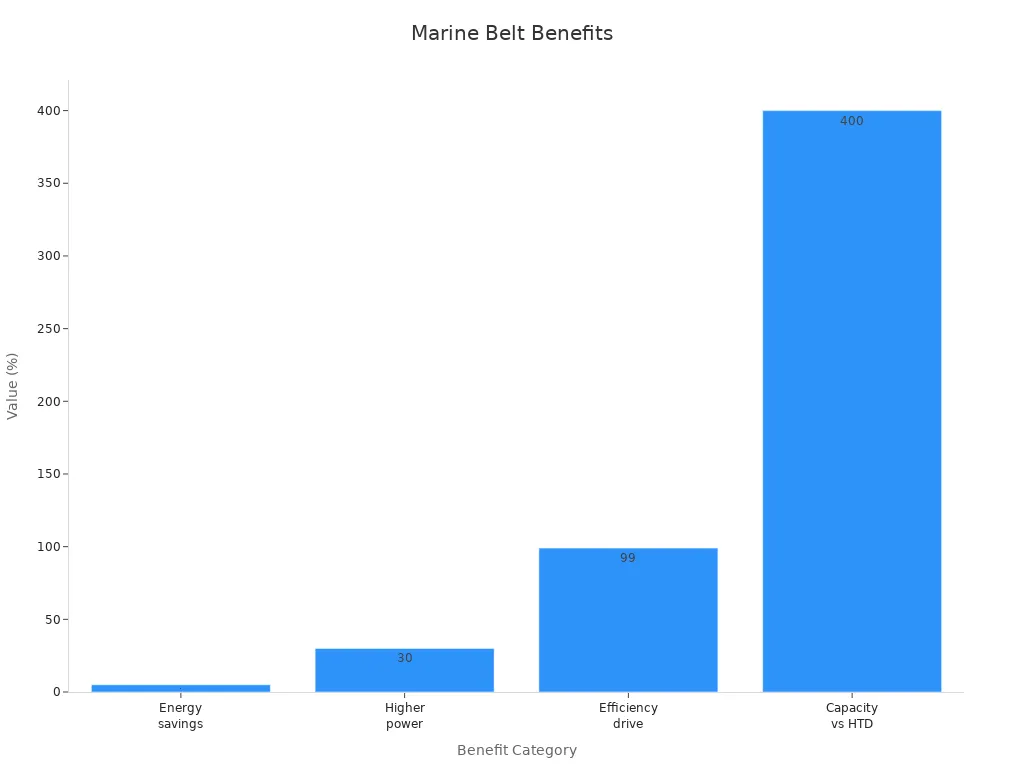
The table below (data from Gates and other manufacturers) shows how modern synchronous belts outperform older V‑belts:
| Benefit Category | Value / Description |
|---|---|
| Energy Savings vs. V‑belts | ≈ 5 % better efficiency |
| Higher Power Ratings | ≈ 30 % higher load capacity |
| Efficiency for Life of Drive | ≈ 99 % sustained efficiency |
| Capacity Compared to HTD Belts | ≈ 4 × capacity |
| Maintenance | Essentially maintenance‑free |
| Noise Reduction | Patented tooth profile lowers noise |
| Durability | Rust‑free stainless‑steel hardware |
| Reliability | Improved load‑carrying & shear strength |
Safety Precautions
Always think about safety when you work on your marine engine. Saltwater and long trips can accelerate belt wear. If you inspect belts often, you can catch cracks or fraying before they become serious.
Follow these basic safety rules each time:
- Disconnect the battery to prevent accidental starts.
- Let the engine cool before touching anything.
- Wear gloves and safety glasses.
- Keep the work area clean and dry.
- Use proper tools and keep them organized.
- Never touch belts or pulleys while they’re moving.
- Double‑check that everyone is clear before cranking the engine.
- Reinstall all guards when finished.
- Route hoses and cords to avoid tripping hazards.
- Remove sharp objects from the workspace.
Marine Engine Belt Inspection
Visual Check
Remove the engine cowling to access the belt. Use a flashlight and look for:
- Cracks along edges or ribs
- Fraying or loose threads
- Glazing (shiny surfaces)
- Stretching or sagging
- Missing ribs or chunks
- Cuts, deep scratches, or embedded debris
Tip: Inspect pulleys, rollers, and bearings too. A worn pulley can destroy a new belt quickly.
If you see any damage, replace the belt right away. Regular visual checks keep your boat reliable.
Tension Check
Press the belt midway between two pulleys; it should deflect about ½–1 inch. Too loose causes slippage, too tight stresses bearings. Two common tension methods:
| Method | Description | Evidence | Pros | Cons |
|---|---|---|---|---|
| Force / Deflection | Use a pencil‑type gauge to measure deflection force. | Span ÷ 64 = deflection | Cheap, precise | Slower |
| Frequency Meter | Tap the belt; meter reads vibration frequency. | Calculates tension automatically | Fast & accurate | Higher cost |
Preparation
Engine Off
Shut off the engine, remove the key, and disconnect the negative battery cable. Wait at least 30 minutes for hot parts to cool.
Workspace Ready
Clear loose objects, wipe spills, and keep fasteners in a tray. Remove the cowling and place it in a safe spot.
| Task | Why It Matters |
|---|---|
| Remove cowling | Ensures clear engine access |
| Organize tools | Speeds up the job |
| Wipe up spills | Prevents slips |
Removal
Loosen Tensioner
Locate the belt tensioner (or alternator pivot) and use a 3/8‑inch ratchet to relieve tension. Some engines have an automatic spring tensioner; others require loosening the alternator or water‑pump bolts.
Tip: Use the exact‑size wrench to avoid rounding the tensioner bolt.
- Using the right tool prevents stripped fasteners.
- Special serpentine‑belt tools make tight spaces easier.
- Following the correct steps prevents noise, premature belt failure, and costly repairs.
Remove Belt
Slide the belt off the pulleys by hand. If it feels stuck, check for covers or guards that must be removed first.
Note: Stretch‑fit belts require a special removal tool; cutting or prying them ruins the belt.
Photograph or sketch the belt routing before removal so you can install the new belt correctly.
- Never pry with screwdrivers—pulley edges can be damaged.
- Check each pulley for dirt or wear after belt removal.
- Keep the old belt aboard as an emergency spare if it’s still serviceable.
Pulley Check
Inspect Pulleys
Spin each pulley by hand. It should turn smoothly without wobble or grinding. Examine grooves for nicks, rust, or debris.
Industry guidelines stress that clean, aligned pulleys prevent premature belt wear.
Tip: Use a flashlight to see inside grooves; compressed air can blow out stubborn debris.
Clean Components
Wipe pulleys with a clean rag. Use a soft nylon brush for stubborn grime. Avoid metal tools that can scratch the groove surfaces.
Installation
Route Belt
Follow your reference photo or manual. Place the belt over each pulley, ensuring ribs seat fully in the grooves.
Tip: If you’re unsure, engine manuals usually have a routing diagram.
Set Tension
Let an automatic tensioner take up slack, or pivot the alternator/water pump until the belt deflects ½–1 inch at midpoint. Tighten mounting bolts securely.
| Tension Level | What You Notice | Possible Outcome |
|---|---|---|
| Too Loose | Squeal, slip, black dust | Loss of charging, overheating |
| Too Tight | Hard to press, whining | Bearing damage, short belt life |
| Correct | 0.5–1 inch deflection, quiet | Smooth operation |
Note: Re‑check tension after the first short run; new belts can stretch slightly.
Marine Engine Belt Tension
Check Alignment
Lay a straightedge across pulley faces; all pulleys should align. Even small misalignment causes squeal and dust.
Test Deflection
Press the belt again after alignment. The rule of thumb: span 16 in → 0.5 in deflection; 24 in → 0.75 in; 32 in → 1 in.
| Shaft Distance (in) | Deflection (in) |
|---|---|
| 16 | 0.5 |
| 24 | 0.75 |
| 32 | 1.0 |
Final Steps
Reconnect Battery
Reconnect the negative battery cable and ensure the clamp is tight.
Replace Cowling
Reinstall the engine cowling, fastening all latches or screws.
Test Run
Crank the engine and let it idle. Listen for squeal or rattle. Watch temperature and voltage gauges. Shut down and re‑check tension if needed.
Troubleshooting
Squeal or Slippage
Squeal usually means low tension or misalignment. Tighten the belt, inspect pulleys, and clean any oil from the grooves.
Tension Issues
A belt that’s too tight can whine and overheat bearings; too loose will slip and leave black dust. Use a tension gauge or finger deflection test to adjust.
Common Mistakes
- Not checking pulley alignment before installing the new belt
- Over‑tightening or under‑tightening the belt
- Using the wrong belt size or type
- Failing to clean pulleys
- Skipping periodic inspections
Maintenance Tips
Inspection Frequency
Inspect the belt before every outing; monthly if you boat often. Record findings in a logbook.
Spare Belts
Carry a spare belt stored in a cool, dry place. Replace the spare if it shows cracks from age.
When to Call a Pro
If the belt wears out quickly, or noises persist despite correct tension and alignment, consult a marine mechanic.
FAQ
How often should you check your marine engine belt?
Before every trip; at least monthly for frequent use.
What signs show your marine engine belt needs replacing?
- Cracks or fraying
- Glazed (shiny) surface
- Missing ribs or chunks
- Persistent squeal
Can you use any belt for your marine engine?
No. Use only the size and type specified in your engine manual.
What should you do if the new belt squeals after installation?
Check tension first. If noise continues, verify pulley alignment and clean grooves.