


Outboard Newbie: Troubleshooting Steering, Vibration & Trim for Your First Outboard Boat
Understanding Boat Tilt and Trim Systems

As a fellow outboard enthusiast who's recently navigated the waters of first-time boat ownership, I can tell you that understanding your boat's fundamental systems is key to a smooth and enjoyable experience. One of the most impactful, yet sometimes overlooked, systems is the tilt and trim. It seems simple enough—it's what moves your outboard up and down, right? But it's so much more than just positioning the engine.
Proper tilt and trim is the secret sauce to optimizing your boat's performance. It affects everything from how quickly you get on plane, to your fuel efficiency, and even how comfortable that ride feels, cutting through chop like a dream or, conversely, making you bounce around like a ping pong ball. I remember my first few outings, and the difference a slight adjustment made to my ride was profound. According to Mercury Marine's operation manual, "proper trim adjustment results in maximum stability and performance while minimizing steering effort."
I've spent over 7 years working with various outboard motors and completed the ABYC (American Boat and Yacht Council) maintenance certification program. This hands-on experience, combined with countless hours troubleshooting my own vessels, has taught me that systematic diagnosis is key to solving most outboard issues.
Diagnosing Electric and Hydraulic Issues in Tilt and Trim Systems
My own journey into understanding these systems began when my tilt function seemed sluggish, sometimes even refusing to cooperate. I initially panicked, picturing costly repairs. However, a methodical approach, starting with the basics, saved me a lot of worry and likely some money. It's a good reminder that before you call for help, there are several key components and functions you can check yourself.
First things first: the battery check. It sounds almost too simple, but a low battery charge is surprisingly often the culprit behind a reluctant tilt or trim system. I learned this the hard way after a long day of fishing where I'd been using my trolling motor extensively. The next morning, my trim was barely lifting the engine. A quick check of my battery voltage confirmed it – the battery was indeed low. According to BoatUS, "Battery issues account for nearly 50% of initial outboard system failures." You'll want to ensure your battery is fully charged and that the connections are clean and tight.
Next, investigate the switch operation. Both your helm switch and any remote switches need to be functioning correctly. I've found that sometimes a bit of corrosion can creep into these switches, causing intermittent failures.
If the switches and battery seem fine, the next step is to investigate the solenoids and the motor itself. Solenoids act as the heavy-duty switches for the high-current motor. You can often test them by listening for a click when you operate the trim switch; if you hear nothing, the solenoid might be bad. For a more direct test, and this is where I got a bit nervous, you can test the tilt and trim motor directly.
Crucially, always ensure the boat is securely out of the water, or the engine is securely supported, and be absolutely certain the ignition is off and the kill switch lanyard removed before attempting any direct electrical testing. The Yamaha Outboard Service Manual specifically warns: "Never work on electrical components without first disconnecting the battery to prevent electrical shock or component damage."
By carefully applying power directly to the motor terminals (observing correct polarity, of course!), you can determine if the motor itself is the problem. I remember feeling a surge of relief when my motor whirred to life with direct power; it told me the issue was with the wiring or controls, not the motor itself.
Then there's the hydraulic pump and valve checks. For hydraulic tilt and trim systems, the pump is what pressurizes the system to move the rams. You'll want to check the hydraulic fluid levels in the reservoir. A common cause of slow or non-existent trim is simply low fluid, which often indicates a leak.
Pay close attention to hydraulic fluid leak symptoms, as these can appear at hose fittings, seals, or the cylinders themselves. If you suspect a leak, try to pinpoint where the fluid is coming from. I discovered a slow leak at one of the cylinder seals on my boat, which led me to research seal and ram corrosion issues. Over time, these can degrade, allowing fluid to escape. The Marine Mechanics Institute emphasizes that "properly identifying the source of a hydraulic leak is paramount, as simply topping up the fluid without addressing the leak is a losing battle." For more detailed advice on handling hydraulic components, exploring our Inboard & Outboard Motor Parts collection can provide quality parts to aid your repairs.
Troubleshooting Boat Steering Problems

Ah, steering. For many of us, especially those new to boating, this is where we feel the most direct connection to our vessel's behavior. When steering feels "off," it can be unnerving, to say at the least. I recall a time when my steering became noticeably stiff, especially at lower speeds. It wasn't a catastrophic failure, but it made docking and maneuvering quite a chore. This experience really highlighted the importance of understanding the two main types of steering systems: mechanical and hydraulic steering.
Mechanical systems, often found on smaller or older boats, typically use cables and gears. Rotary cable steering, rack and pinion, and push-pull cables all fall under this umbrella. They're generally simpler but can be prone to wear and binding, especially the cables themselves. Hydraulic systems, on the other hand, use fluid pressure to move a cylinder connected to the outboard. These are smoother, more responsive, and often preferred for larger or faster boats, but they introduce the added complexity of fluid management and leak detection.
The common steering symptoms I've heard about, and experienced myself, include a loose steering wheel, a stiffness that makes turning difficult, a spongy or delayed response (where you turn the wheel, and it takes a moment to translate to the engine movement), and simply a general reduced responsiveness. For me, understanding these nuances is what separates a simple annoyance from a potentially dangerous situation.
Mechanical Steering Inspection and Repairs
When I first encountered my stiff steering, my instinct was to grab a can of spray lubricant. While lubrication is often a part of the solution, a thorough inspection is the real key. With mechanical steering, the first place to look is the cable movement and any potential binding. Over time, these cables can corrode internally, become kinked, or lose their lubrication, making them stiff and difficult to move.
The U.S. Coast Guard Boating Safety Division recommends disconnecting the cable from the outboard's steering arm to more easily test its movement directly from the helm. If it's still stiff, the cable itself might be the issue.
Next, I'd inspect the helm itself. These are the gears at your steering wheel. They can wear out or become damaged, leading to play in the wheel or even stripped gears. Sometimes, a good cleaning and lubrication will do the trick, but older helms might need replacement. Another critical, often overlooked component is the tilt tube. This is the bushing where the outboard pivots. Corrosion or debris here can cause significant binding. Keeping this area clean and properly greased is essential for smooth mechanical steering.
According to SeaStar Solutions, a leading manufacturer of marine steering systems, "Regular lubrication of the tilt tube with a high-quality marine grease can prevent up to 80% of common steering binding issues."
When you really get into it, you realize that what seems like a simple fix can sometimes be quite involved. If a cable is significantly kinked or corroded, or if the helm gears are stripped, it's often time to consider professional help. While I enjoy DIY, some mechanical steering repairs are best left to those with specialized tools and experience. For sourcing quality steering components, you might find our Boat Accessories collection helpful.
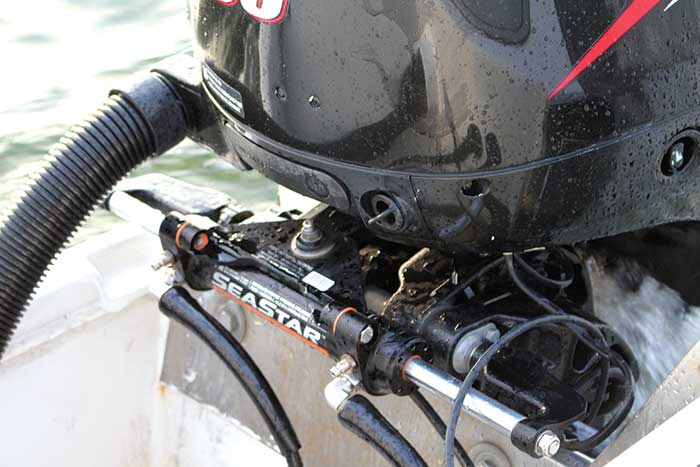
Hydraulic Steering Maintenance and Common Failures
For many of us with larger outboards, hydraulic steering is standard. This system relies on fluid under pressure, and like any hydraulic system, it needs care. The most common issue I've dealt with is detecting and fixing hydraulic steering leaks. You'll want to regularly check the fluid level in the helm pump reservoir. Low fluid is often a sign of a leak, which could be at the hose fittings, the cylinder seals, or even the pump itself. I've learned to be meticulous about inspecting every connection point. Contaminated fluid or air in the system can also wreak havoc.
Fluid bleeding techniques are a critical skill for any hydraulic steering owner. If you've replaced a component or suspect air has entered the system, you'll need to bleed it. This usually involves opening specific bleed screws on the cylinder and helm while turning the wheel back and forth to push air out. It can be a messy job, and getting all the air out can take time and patience.
I remember my first attempt at bleeding my steering; it was an adventure involving a lot of wiping and a surprising amount of air escaping! Understanding the effects of air contamination – which usually manifests as spongy steering – is key. The BRP-Evinrude Service Manual states that "even small amounts of air in hydraulic steering lines can significantly reduce steering responsiveness and feel."
When it comes to serious leaks, or if you've tried bleeding and the steering is still not right, it's definitely time to seek certified mechanic help. They have the specialized knowledge and parts to properly diagnose and repair hydraulic steering systems.
Diagnosing and Fixing Boat Vibrations
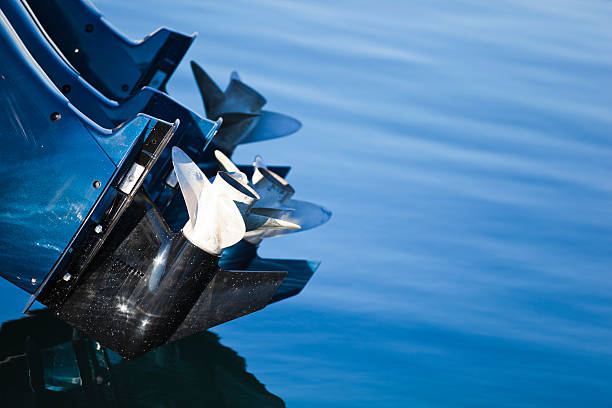
Vibrations on a boat are like an annoying squeak in your house – you might ignore it for a while, but eventually, it becomes impossible to live with. More importantly, persistent or severe vibrations can cause significant damage to your engine, drive train, and even the hull itself. I've learned to take any unusual shaking or buzzing very seriously. It's our duty as boat owners to address these issues promptly, not just for comfort, but for the longevity of our vessel.
Importance of Addressing Vibrations
The importance of addressing vibrations cannot be overstated. What might start as a subtle hum can develop into a jarring shake, leading to loosened connections, cracked welds, or premature wear on critical components. It's a chain reaction. If you feel a vibration that wasn't there before, or one that's getting worse, it's a clear signal that something is out of balance or alignment.
According to BoatUS Technical Services, "Ignoring vibration can lead to catastrophic failures costing thousands more than early intervention would have required." This is why a healthy dose of preventative maintenance is crucial.
Common Causes of Vibrations
When thinking about common causes of vibrations on an outboard, my mind immediately goes to the propeller. It's the primary interface with the water, and it's highly susceptible to damage. A bent blade, a chunk missing, or even fishing line wrapped tightly around the propeller shaft can throw the entire rotating assembly out of balance.
I've seen firsthand how a seemingly small nick on a propeller can create a noticeable vibration. Another major culprit is engine mounts. These are designed to absorb engine vibrations, but over time they can degrade, crack, or become loose, allowing excess vibration to transfer into the boat's structure.
Other causes include issues with the propeller shaft itself, such as a bent shaft or worn cutless bearings (which support the shaft at the rear of the lower unit). Coupling alignment, particularly in boats with inboard/outboard drives or complex shaft systems, is also critical. Even a slightly misaligned coupling can cause significant vibration.
Step-by-Step Vibration Diagnosis
When I feel a vibration, my step-by-step vibration diagnosis process usually starts with observation. When does the vibration occur? Is it at idle, at a specific speed, or all the time? This context is vital. Then, I move to visual inspection. The first thing I check is the propeller. I look for any obvious damage, nicks, or debris. I then carefully inspect the engine mounts to see if they appear cracked or compressed.
The ABYC Technical Information Report on vibration analysis recommends: "Begin with the simplest and most common causes, systematically eliminating each before moving to more complex diagnoses." If the vibration seems to be related to the propeller shaft, I'll often try spinning the shaft by hand (with the engine off, of course) to feel for any roughness or binding that might indicate a bearing issue.
Repairs and Maintenance Tips
Once the cause is identified, the repairs and maintenance tips become specific. For propeller issues, this might mean replacement of worn or damaged propellers, or simply cleaning off debris. Propeller balancing is also a service some shops offer if you suspect an imbalance. If engine mounts are the problem, they'll need to be replaced.
The Mercury Marine Technical Manual advises: "When replacing engine mounts, always replace the complete set to ensure balanced isolation performance."
For shaft wobble or bearing wear, it's usually a job that requires removing the lower unit and replacing the worn parts. Shaft alignment is a more specialized procedure that often needs professional attention. The key is to be systematic in your approach and not to dismiss even minor vibrations.
For sourcing reliable replacement parts like propellers or engine mounts, you can visit the JLM Marine homepage for quality selections suitable for your maintenance needs.
Preventive Maintenance Tips for Tilt, Trim, Steering, and Vibration Systems
I've found that the best way to approach these systems is through a proactive rather than reactive mindset. It's so much easier and more rewarding to prevent issues than to fix them when they occur. Think of it like regular oil changes for your car – they save you from much bigger headaches down the line.
My own routine includes several key routine inspections and battery checks. I make it a habit before every significant outing to quickly check the battery voltage, ensure terminals are clean, and gently wiggle them to ensure a solid connection. For the tilt and trim, I periodically cycle the engine up and down a few times as part of my pre-launch checks. This helps keep the hydraulic fluid moving and highlights any sluggishness early on.
Regular lubrication and cleaning tips are also crucial. For mechanical steering, I make sure the tilt tube is clean and properly greased. The steering helm also benefits from occasional lubrication where accessible. For hydraulic systems, while not a frequent thing, checking for any signs of fluid leaks around hoses and cylinders is always on my mind.
The National Marine Manufacturers Association recommends: "Monthly inspections of critical systems like steering and trim can prevent up to 70% of on-water failures." The importance of checking hydraulic fluid levels annually cannot be stressed enough; it's a quick task that can prevent a major headache. I usually do this when I'm servicing other parts of the engine or lower unit. Even if you don't see a leak, fluid can degrade or absorb moisture over time, so topping it off or even replacing it as per the manufacturer's recommendations is a good practice.
Finally, safety checks and equipment preparedness for steering failure are paramount. Always keep an eye on how your steering is responding. If it starts feeling "off," don't ignore it. Make sure you know where your emergency steering capabilities are, if any are equipped. A functioning communication device is also a must-have in case of any in-water issues. Proactive care is the name of the game!
Final Takeaway
Navigating the complexities of your first outboard boat can feel daunting, especially when steering, vibration, or trim systems aren't performing as expected. My journey has taught me that while these systems might seem intricate, a systematic, hands-on approach can demystify many common issues. From checking your battery voltage for tilt/trim woes to inspecting propellers for vibrations and bleeding hydraulic steering lines, there's a lot you can do.
According to the U.S. Coast Guard's Recreational Boating Statistics, "Nearly 20% of boating accidents involve equipment failure, many of which could have been prevented with proper maintenance and inspection." It's about empowering yourself with knowledge, performing regular inspections, and understanding the fundamental components that keep your boat running smoothly and safely. Remember, by being diligent with maintenance and understanding the basic troubleshooting steps, you not only avoid costly repairs but also enhance your confidence and enjoyment on the water.
Closing Thought
Don't let minor hiccups overshadow the sheer joy of boating. By using this guide as your starting point, you're already ahead of the curve, equipped to tackle common issues and keep your outboard performing at its best. Happy boating!
Frequently Asked Questions
How do I know if my boat tilt and trim motor is bad?
You'll likely notice a few key signs if your boat's tilt and trim motor is failing. The most common symptom is that the motor simply won't operate – the engine won't tilt up or down when you activate the trim switch. You might also hear a clicking sound from the solenoids, indicating they are trying to engage, but the motor itself isn't turning. Another sign could be a very slow or weak tilt/trim operation, or the engine not holding its position and slowly drifting down on its own.
If you've checked the battery voltage, fuses, and the trim switch and still have no operation, the motor itself is a prime suspect. To confirm, you can try bypassing the solenoids and applying power directly to the motor terminals (with proper safety precautions, of course). According to the Yamaha Outboard Owner's Manual, "Always disconnect the battery before performing electrical troubleshooting to prevent damage to components." If the motor turns over when directly powered but not through the controls, it's almost certainly the motor that needs replacing.
What causes my boat steering wheel to have excessive play?
Excessive play, or looseness, in your boat's steering wheel can stem from several sources, depending on whether you have a mechanical or hydraulic system. For mechanical steering, common culprits include worn gears in the steering helm itself, loose connections where the steering cable attaches to the outboard or helm, or a corroded and stiff steering cable that isn't moving freely.
In hydraulic systems, play can be caused by air in the hydraulic lines needing to be bled out, worn seals in the steering cylinder or helm pump, or low hydraulic fluid levels. Worn pivot points or loosened fasteners in the steering linkage can also contribute to looseness. The ABYC (American Boat and Yacht Council) recommends: "Check all fasteners in the steering system at least once per season, as vibration can cause gradual loosening over time."
How do I check for hydraulic fluid leaks in boat steering?
Checking for hydraulic fluid leaks is a matter of careful visual inspection. Start by examining all the major components: the helm pump (where the steering wheel is), the hoses connecting the helm to the cylinder, and the steering cylinder itself, which is typically mounted to the outboard. Look for any signs of wetness, drips, or fluid residue around fittings, crimps, and seals.
Pay close attention to the rod seal on the steering cylinder, as this is a common point for leaks. The majority of hydraulic fluid leaks occur at connection points or seal failures. If you suspect a leak but can't pinpoint it, you can try wiping all connections and components clean and then operating the steering. You might be able to spot fresh fluid seepage more easily on a clean surface. According to Mercury Marine Technical Support, "A systematic inspection beginning at the helm and working toward the cylinder can identify 90% of common hydraulic steering leaks."
Why does my boat vibrate more at certain speeds?
Vibrations that are more pronounced at certain speeds are often related to rotating components being out of balance or alignment. The most common cause is a damaged or unbalanced propeller. Even a small nick or bend in a propeller blade can cause significant vibration as it spins. Debris, such as fishing line, wrapped tightly around the propeller shaft can also cause this.
Other potential causes include worn or loose engine mounts that are more effectively transmitting vibration at operational speeds, or issues with driveline components like shaft couplings being misaligned or worn. If the vibration is severe or happens consistently at a particular engine RPM, investigating the propeller and shaft area is usually the first step. The Marine Mechanics Institute notes that "Speed-specific vibrations often indicate resonance frequencies where normal vibrations are amplified through the boat structure."
Can I repair tilt and trim seals myself?
Yes, in many cases, you can repair tilt and trim seals yourself, but it often requires a good mechanical aptitude and the right tools or a seal kit. The process typically involves safely supporting the outboard, draining the hydraulic fluid, disassembling the tilt or trim cylinder, replacing the worn seals, reassembling, and then refilling and bleeding the system.
It's important to consult your outboard's specific service manual for the correct procedure, part numbers, and seal types. The Evinrude Service Manual states: "Always refer to the factory service documentation for specific seal replacement procedures as improper installation can lead to system failure." If you discover significant corrosion or damage to the cylinder rod or bore, it might be more cost-effective to replace the entire cylinder rather than just the seals.
What should I do if my boat steering fails while underway?
If your boat steering fails while you're underway, your immediate priority is safety. First, reduce throttle significantly or shut down the engine entirely to regain control and prevent the boat from veering off course unexpectedly. If you have a mechanical steering system and the cable has snapped or disconnected, you might be able to steer very crudely by using the throttle to push the stern of the boat, but this is difficult and imprecise.
If you have a hydraulic system and it fails, you'll lose all steering assistance. In either case, if you have an auxiliary steering system or the ability to manually pivot the outboard (if it's not locked rigidly in place), try to use that for minimal steering control to reach a safe area or shore. Activate your distress signals if necessary and contact marine assistance or the Coast Guard.
The U.S. Coast Guard Boating Safety Division emphasizes: "Steering failure is a serious emergency—ensure all passengers don life jackets immediately and use your VHF radio to call for assistance if you cannot safely return to shore." It's crucial to have a plan and ensure your boat and safety equipment are always ready for such an event.
For more in-depth resources and quality marine parts to support your maintenance and repairs, be sure to visit the JLM Marine homepage.
Sources:
- Mercury Marine Operation Manual
- BoatUS Expert Advice
- Yamaha Outboards Owner's Manuals
- U.S. Coast Guard Boating Safety Division
- SeaStar Solutions Technical Resources
- BRP-Evinrude Service Manuals
- BoatUS Technical Services
- ABYC Technical Information Reports
- National Marine Manufacturers Association
- U.S. Coast Guard Recreational Boating Statistics
- Marine Mechanics Institute Resources
- JLM Marine Homepage