


Why Won’t My Outboard Reach Full RPM?


If your outboard won't reach its rated wide-open throttle (WOT) RPM, you're dealing with either fuel starvation, ignition breakdown, excess load, or a prop problem. Most outboards are spec'd to hit somewhere in the 5000–6000 RPM range at WOT under normal load, but check your cowl decal or owner's manual for your exact number. If you're falling short, something is choking power or overloading the engine.
Fuel Delivery Problems Account for 60% of RPM Issues

Fuel delivery problems cause about 60% of throttle-related failures, according to Mercury Marine technical bulletins. Ignition system failures contribute around 20%, per the Marine Mechanics Institute. That remaining 20% splits between prop issues, overheating-induced limp mode, and mechanical faults like low compression. We see this breakdown in our own shipping data—we sell five fuel pump kits for every starter solenoid, and fuel filter replacements outnumber spark plug sets three to one.
Ethanol Fuel Phase Separation and Octane Issues
Ethanol attracts water. When your tank sits through temperature swings, water separates out and settles at the bottom with the ethanol—this is phase separation. Your fuel pickup sucks up that watery ethanol layer, and water doesn't burn. The engine sputters, bogs, and won't rev. Worse, phase separation effectively lowers the octane rating of what's left in the fuel line, which can cause pre-ignition and kill power even if the engine gets enough volume.
Non-ethanol fuel avoids this entirely. If you're stuck with E10 or E15, use a quality fuel stabilizer designed to keep water suspended in the fuel so it can't phase-separate. We send kits to guys in Canada where non-ethanol is easier to find, and they report far fewer bogging complaints than boaters in the States running pump gas. Always match your fuel octane to the engine spec; running lower octane than required causes pre-ignition that robs RPM.
DIY ethanol test: Pour a sample of your fuel into a clear jar, add a tablespoon of water, shake it, and let it sit for an hour. If a distinct layer forms at the bottom, your fuel has already phase-separated and needs to be drained and replaced.
Clogged Fuel Filters
A clogged fuel filter is the single most common fuel delivery fault. The engine runs fine at idle because fuel demand is low, but when you open the throttle the filter can't flow enough volume and the engine chokes. You'll hear sputtering or feel a sudden loss of power as RPM climbs.
Inspect and replace your fuel filter at least once a year, or every season if you boat in dusty or high-humidity conditions. The filter is usually inline between the tank and the engine. Disconnect the fuel line, pull the old filter, and install the new one with the arrow pointing toward the engine. If you're clogging filters repeatedly, inspect your fuel lines—older rubber lines degrade from the inside, and the loose liner particles flow downstream and pack the filter. Clear fuel lines let you visually confirm debris flow and catch this problem early. For convenient replacements, browse our selection in the fuel filter collection.
Difficulty: Easy. Time: 15 minutes.
Fuel Hose Deterioration and the Grey Fuel Line Problem
Fuel hoses crack, harden, or go spongy over time from heat, sunlight, and ethanol exposure. A cracked hose sucks in air, leaning out your fuel mixture and causing inconsistent power, especially at higher RPMs when the fuel pump works harder. A hose that's collapsing internally restricts flow just like a clogged filter.
Older grey fuel lines are notorious for internal delamination that isn't visible from the outside. The inner liner breaks down, flakes off, and clogs your filter and carburetor jets. If you see visible cracks, hardening, or a spongy feel, replace the hose. Clear fuel lines resist degradation better and let you see blockages or air bubbles. Use marine-grade hose, proper hose clamps, and replace one line at a time to avoid mixing up connections.
Fuel Pump Functionality and Pulse Line Testing
The fuel pump draws fuel from the tank and pushes it to the carburetor or injectors. If the pump is weak or failed, the engine starves for fuel under load. Symptoms include loss of power at higher RPMs, sputtering, or the engine dying after a few minutes of running. It might run fine in neutral but refuse to get on plane.
Most outboard fuel pumps are mechanical diaphragm pumps driven by crankcase pressure pulses. Test fuel pressure with a gauge at the carburetor inlet; consult your service manual for the correct spec and test point. If pressure is low or zero, the pump is bad—but also inspect the pulse line from the crankcase to the pump. A cracked or air-leaking pulse line will cause a good pump to fail. Look for pinholes, stiffness, or visible cracks in that small line.
Common mistake: When replacing a diaphragm pump, the plunger spring or gasket can drop into the cowling and get lost. Work over a clean rag.
Visual pump symptoms:
- Diaphragm: pinholes, stiffness, or tears
- Electric pump: no sound/hum when key is on, or pump runs but no pressure buildup
Explore reliable parts in our fuel pump kit collection to find OEM-grade replacements designed for performance and longevity.
Propeller Obstructions and Spun Hub Diagnosis
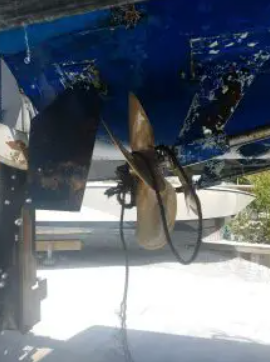
Checking for Debris and Fishing Line
Fishing line, plastic bags, or weeds wrapped around the prop blades or hub restrict how freely the propeller spins. The engine revs, but the prop can't transfer power to the water. Always tilt the engine and confirm it's off before inspecting the prop—don't skip this safety step.
Visually inspect the blades and hub. Cut away any wrapped line with a knife or pliers. If you find a bent or cracked blade, replace the prop. A damaged prop causes vibration that can wreck your gearcase seals and bearings.
Detecting a Spun Prop Hub
A spun hub happens when the rubber insert inside the propeller hub slips on the prop shaft. The engine revs freely, RPM climbs, but the boat barely moves and speed stays low. To diagnose it, mark both the prop hub and the shaft with a grease pencil or paint marker before a test run. After running at throttle, check if the marks are still aligned. If they've shifted, the hub is spinning independently and the prop needs replacement.
You'll often smell burning rubber from a spun hub during or after a hard throttle run—that's the rubber insert overheating as it slips.
Prop pitch matters: If you recently changed props and now can't reach WOT RPM, the new prop is likely over-pitched for your engine and load. Dropping pitch by 2 inches typically gains 400–600 RPM. If you're running heavy loads or towing, a lower-pitch prop helps the engine reach rated RPM; for light, fast setups, you can increase pitch for more top-end speed but you'll sacrifice acceleration and RPM headroom.
For further learning on whether RPM issues could be due to propeller problems, see our related article on Propeller Slip or Engine Issue? When Your Boat Can’t Reach Speed.
Ignition System Breakdown at High RPM
Ignition failures account for about 20% of outboard performance complaints, per the Marine Mechanics Institute. The engine might idle fine, but when RPM climbs the ignition components can't keep up and the spark breaks down.
Spark Plug Reading Guide
Pull your spark plugs and inspect them. The color and condition tell you what's happening inside the combustion chamber:
- Tan/light brown, dry: Normal, healthy combustion
- Black and sooty: Rich fuel mixture or oil fouling; check carburetor tuning or oil injection
- Wet and black: Oil fouling from excessive oil or a failing oil pump
- White or blistered: Lean fuel mixture, possibly from an air leak or clogged jet; this is dangerous and can melt a piston
- Carbon buildup on threads: Old plugs that need replacement
Replace plugs if they're fouled, worn, or the gap is out of spec. Use the exact plug type and gap specified in your service manual. Check the plug wires and caps for corrosion or cracking, too. For carburetor tuning tips, you might find our Yamaha Outboard Carburetor Rebuild Tutorial helpful to restore ignition timing consistency, which aids in smooth RPMs.
Difficulty: Easy. Time: 20 minutes.
Electrical Component Testing for Stator and Coil Failures
A failing stator, ignition coil, or CDI unit can provide enough voltage at idle but break down under the higher electrical demands of full throttle. In one case, a Yamaha 130 hp 2-stroke wouldn't rev past 2000 RPM; the cause was a bad stator that limited spark energy at higher RPM. Replacing the stator restored full power.
Testing these components requires a multimeter and often a DVA (Direct Voltage Adapter) to measure peak voltage output from the stator and coils. For example, stator output is typically checked at cranking RPM and should show peak voltage over 100V DVA (consult your service manual for exact specs). Low or erratic voltage points to a failing stator. Coil resistance is tested with an ohmmeter; out-of-spec resistance means the coil is breaking down internally.
If you're not comfortable with electrical testing, this is where a qualified mechanic with a DVA tester and wiring diagrams is worth the money.
Cooling System Failures and Limp Mode
Overheating triggers a protective "limp mode" on most modern outboards, drastically cutting power and RPM to prevent engine damage. If your cooling system isn't moving enough water, the engine won't let you reach WOT.
Water Pump Impeller Inspection
The impeller is a rubber vane pump that spins with the driveshaft and pulls water from the lake or ocean up through the engine's cooling passages. Over time, the vanes wear down, crack, or get damaged by debris. A worn impeller means weak water flow and overheating.
The telltale stream—the small stream of water that spits out the side of the cowling—is your visual indicator. If it's dribbling or gone, you have a cooling problem. Water should spit steadily at idle and improve with throttle. If it's weak at both speeds, the impeller is likely shot.
Replacing an impeller requires removing the lower unit. When you slide the pump housing back onto the new impeller, rotate the driveshaft clockwise as you push the housing down; this helps the vanes fold properly and seat without tearing. It's a common weekend job with the right tools and a service manual.
Trick: Apply a thin coat of glycerin or water-pump grease to the impeller vanes before installation to help them seat smoothly and prevent dry-start damage.
If you want to learn more about water pump maintenance, see our detailed guides including How to Replace a Mercury Outboard Water Pump Impeller and the Water Pump Repair Kit vs. Impeller Only article. You can find OEM-quality water pump parts in our cooling system collection and water pump impeller collection.
Poppet Valve and High-RPM Overheating
Some outboards use a pressure-relief poppet valve in the cooling system. If this valve sticks open, the engine will overheat specifically at high RPMs (when water pressure is highest and should be forcing the valve closed), but it might show normal temperatures at idle. This is a tricky diagnosis because the telltale stream looks fine at idle, but the engine still goes into limp mode under load. Cleaning or replacing the poppet valve fixes it.
Flush your engine with fresh water after every saltwater run to prevent salt buildup and corrosion that can clog water jackets and stick valves.
Checking Throttle Cable Linkage and Idle Settings

Throttle Linkage Inspection
Make sure the throttle cable is actually opening the throttle plate or carburetor butterfly all the way to the stop. At the engine, push the throttle arm by hand and confirm it hits the full-throttle stop with no resistance. If the cable is binding, frayed, or the linkage is loose, the throttle won't open fully even when you've got the control lever all the way forward.
Check for cable slack at the engine anchor point. There should be minimal slack—roughly 1/8 inch of free play is acceptable; more than that and the cable isn't pulling the throttle fully open. Adjust the cable at the anchor or replace it if it's corroded or stiff. For quality throttle parts and cables, browse our boat accessories collection.
Also confirm the kill switch lanyard is fully seated. A partially engaged kill switch can (rarely) restrict RPM or prevent starting.
Starting procedure: Always start the engine in neutral. If you try to start with the throttle advanced, some engines default to a low-RPM mode and won't throttle up until you cycle the key.
Idle Mixture and Transition
If your carburetor's idle mixture screws are drastically out of adjustment, the engine can struggle to transition smoothly from idle to throttle, causing a stumble or bog. Consult your service manual for the correct baseline setting (often 1 to 1.5 turns out from lightly seated) and adjust in small increments. This is a fine-tuning step and won't usually cause a total failure to reach WOT, but it can affect throttle response. For help rebuilding carburetors and tuning idle screws, check out our Carburetor Repair Kit collection.
Troubleshooting Logic: If X, Then Y

If basic checks don't solve the problem, follow this logical order:
- Verify tachometer accuracy: Confirm your tach is reading correctly by comparing it to a known-good handheld tach or GPS-based RPM logger.
- Check no-load RPM in neutral: If the engine hits spec RPM in neutral but not under load, the problem is excess drag (prop, hull, weight) or an overloaded prop pitch.
- If compression is good AND spark is strong at all cylinders: Focus on fuel pressure and volume. Test fuel pressure at the carburetor; if it's low, trace back through the fuel pump, pulse line, filter, and tank vent.
- If fuel pressure is good AND ignition is verified: The issue is likely load-related—wrong prop pitch, spun hub, fouled hull, or internal engine damage (worn rings, blown head gasket).
For a complete range of parts to assist in these repairs, visit the inboard & outboard motor parts collection.
When to Call a Mechanic
We're all for DIY, and we supply the parts to help you get it done. But some jobs require specialized tools, diagnostic software, or just plain experience. If you've checked fuel filters, spark plugs, prop condition, telltale flow, and throttle linkage and the engine still won't reach rated WOT, it's time for a pro.
Red flags that need a mechanic:
- Severe misfire across multiple cylinders
- Persistent overheating alarms even with a new impeller
- Engine hitting only 50% of rated RPM or less
- Compression test shows a cylinder below 90 psi
- You don't have the tools (DVA tester, fuel pressure gauge, compression gauge) or the service manual
A certified marine technician has diagnostic software to read ECM fault codes, specialized testers for stators and power packs, and the experience to spot internal engine damage before it gets worse. Don't burn money on guesswork parts if the root cause is unclear.
OEM vs. quality aftermarket: OEM parts are good, but you're paying a premium for the logo. Cheap no-name aftermarket parts—especially fuel pumps and impellers—are junk; the rubber is too hard, the fit is sloppy, and you'll be tearing into the lower unit again next season. JLM Marine parts are factory-spec quality without the dealership markup. The impellers fit right, the fuel pump diaphragms last, and you're not burning cash unnecessarily. We ship worldwide, and we've sent kits to Australia, Europe, and across the US to guys with this exact problem who needed reliable parts fast.
Pro tip: Run your engine at WOT for a few minutes every trip. Outboards are designed for high RPMs, and running at WOT burns away carbon deposits that build up during trolling or idle time. A clean combustion chamber is a happy combustion chamber.
For more detailed information, parts, and expert advice, visit the JLM Marine main website.