


Two-Stroke Oil Injection Troubleshooting Guide
- How Oil Injection Systems Deliver Lubrication
- Mechanical vs. Electronic Injection Systems
- What Actually Fails: Common Breakdown Points
- Step-by-Step Troubleshooting Checklist
- When to Keep the System vs. Convert to Premix
- Oil Type and Quality: What to Use
- Maintenance Procedures to Prevent Failures
- Early Warning Signs of Pump Failure
- Decision Checklist: Keep It or Premix?
- Premix Ratio Reference

After twenty years wrenching on outboards and powersports engines, I can tell you the number-one killer of two-stroke engines isn't age or hours—it's oil starvation from a neglected injection system. When your oil pump quits or an air pocket sits in the line, your piston scores in minutes, and you're looking at a full rebuild.
This guide covers what actually goes wrong with oil injection systems, how to diagnose the problem before it grenades your motor, and the maintenance steps that keep these systems running. No fluff—just the procedures we use in the shop when a Mercury or Yamaha comes in smoking or seizing.
How Oil Injection Systems Deliver Lubrication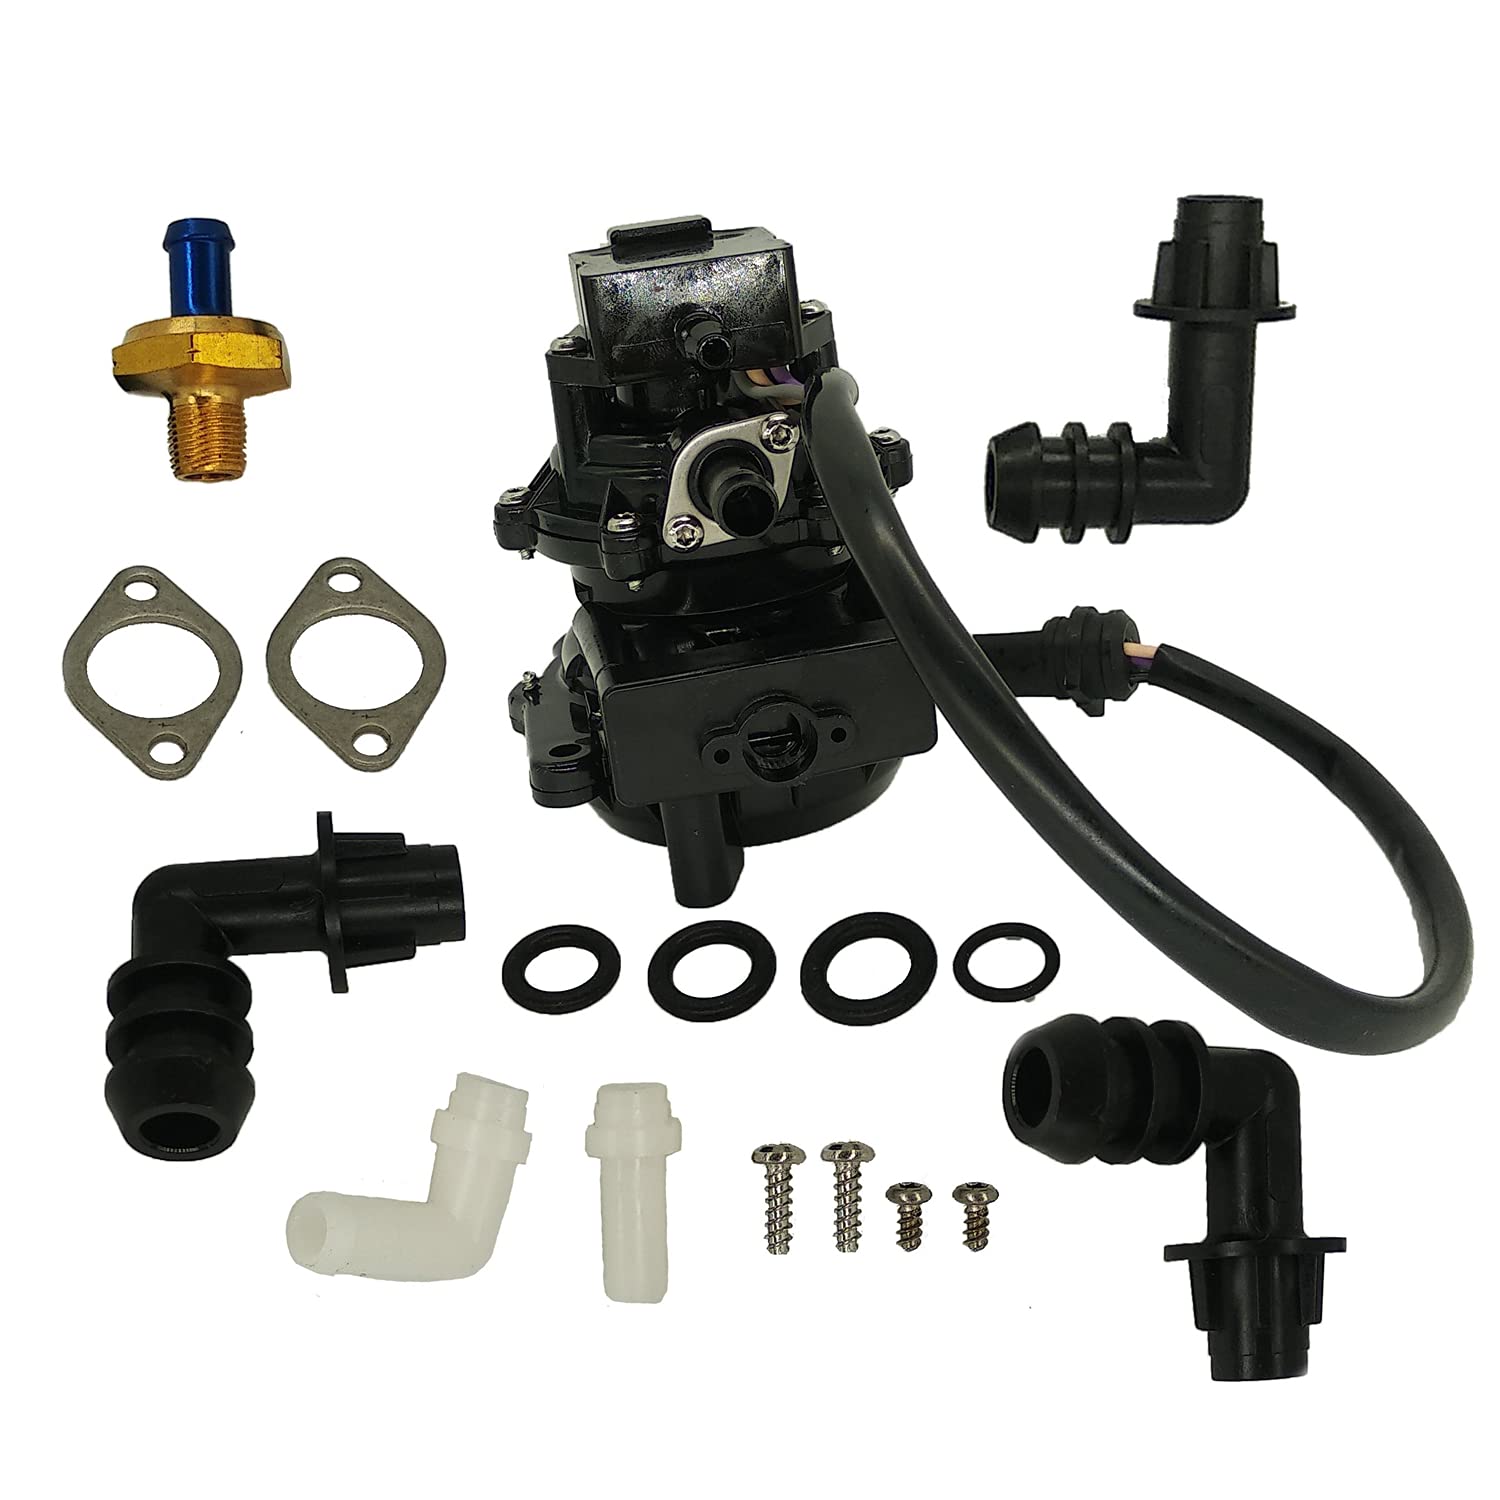
Oil injection replaces manual premixing by automatically metering oil from a separate tank into the fuel stream or intake. The pump is usually driven by a cable linked to your throttle or by a mechanical gear off the crankshaft. At idle, the pump delivers a lean ratio—around 120:1—because the engine doesn't need much oil when it's barely working. Crack the throttle wide open, and the pump ramps up to 20:1 or richer, flooding the bearings and cylinder walls with lubrication under load.
The system has three main parts: the oil reservoir (often with a low-level float or sensor), the metering pump, and the delivery lines that run from the pump to the carburetor throat or directly into the crankcase. Modern electronic systems on newer Mercs and Yamahas use a solenoid pump controlled by the ECU instead of a mechanical cable, which gives finer control and fewer mechanical failure points like stripped nylon gears.
When it works, it's seamless. The engine gets exactly the oil it needs at every RPM. When it doesn't, you get a scored cylinder before the oil light even blinks.
Mechanical vs. Electronic Injection Systems
Older mechanical systems—common on pre-2000 outboards and most dirt bikes—use a gear or cable to physically drive the pump. A nylon drive gear meshes with the crankshaft or throttle linkage. Over ten-plus years, heat and stress make that nylon brittle. When it strips, the pump stops turning, oil delivery drops to zero, and the engine runs dry with no warning unless you have a working low-oil alarm.
Electronic systems found on modern Mercury Optimax or Yamaha HPDI engines replace the mechanical linkage with an ECU-controlled solenoid pump. Technicians report these are "very reliable" and "much superior" to the older mechanical setups because there's no physical gear to shred and the computer can detect pump failures through flow sensors. If you've got a late-model outboard, your biggest risk shifts from gear failure to sensor corrosion or wiring issues—still a problem, but easier to diagnose with an ECU code.
What Actually Fails: Common Breakdown Points

Most injection system failures we see trace back to three things: air in the lines, degraded hoses, or a dead pump. Here's how each one kills your engine.
Running the Oil Tank Dry and Air Locks
If you let the oil reservoir run empty, air gets sucked into the pump and delivery lines. When you refill the tank, that air doesn't magically disappear—it sits in the line as a pocket, and the pump pushes air instead of oil. Your engine might run fine for a few minutes on residual oil in the crankcase, then seize when that's gone.
Priming is the only fix. Locate the bleed screw on the pump body or the lowest point in the oil line. Loosen it until you see a steady, bubble-free stream of oil, then retighten. On systems without a bleed screw, crack the inlet hose fitting at the pump. One Idaho mechanic puts it plainly: "Remove that screw till oil comes out the hole. Put the screw back in and you're bled. If there's no bleed screw, loosen the oil inlet hose bolt and bleed it from there."
For outboards, cycling the choke a few times can help build pressure from the tank to push oil through. Don't assume the system will self-prime—it won't, and the few minutes it takes to bleed can save a $1,500 top-end rebuild.
Porous and Cracked Oil Lines
The clear plastic hoses that route oil from tank to pump and pump to manifold don't last forever. UV exposure, engine heat, and age make them stiff and brittle. You won't always see a dripping leak—sometimes the hose develops micro-fissures that "wick" oil or, worse, suck in air under vacuum.
To test for porosity, bend a suspect hose sharply. If you see hairline cracks or if the hose feels noticeably harder than a new replacement, swap it immediately. A Beta dirt bike came into the shop last year with oil seeping into the cylinder overnight because the delivery line had become porous—not a visible split, just degraded enough to let oil migrate where it shouldn't.
Replace all oil lines if they're original and the engine is over five years old. It's a $20 part versus a seized piston. For quality replacement parts, check out the boat accessories collection that includes hoses and related maintenance items to keep your engine in top condition.
Nylon Gear Stripping on Older Mechanical Pumps
On older Mercury V6 two-strokes and some Yamaha models, a small nylon gear drives the oil pump off the crankshaft. Heat cycles and age cause that gear to crack or strip its teeth. When it fails, the pump shaft stops turning, oil delivery halts, and you have no warning unless the low-oil alarm circuit is functional (and many aren't, because the warning module or horn has also aged out).
Mercury added a motion detector to later 2.5-liter engines specifically to alert the operator if the plastic gear stopped moving. If your engine predates that feature, the only way to catch impending failure is to visually inspect the gear during annual service. Replacing a nylon gear on a Mercury V6 requires lifting the powerhead—a four-hour job—but it's cheaper than a new powerhead after the old gear grenades mid-run. You can find OEM Mercury outboard motor parts including oil pump components to assist in this replacement.
Oil Gelling and Winter Storage Failures
Oil left sitting in the pump and lines during winter storage can thicken, gel, or solidify, especially if you mixed synthetic oil with castor-based oil (they don't play well together and form a sludge). When you fire up the engine in spring, the pump can't draw the thickened oil, or it pushes a slug of goo that clogs the fine passages in the pump or carburetor jet.
Proper winterization means flushing the system. Run the engine with the oil line disconnected and let it pull all the old oil out, or use a winterizing lubricant compatible with your pump seals. Some techs drain the tank completely and run the engine on premix for the last few gallons of the season to leave nothing behind that can gel. Skipping this step is why we see so many "won't start in April" engines with clogged oil passages. For recommended lubricants, see specialized products in fuel & induction supplies.
Step-by-Step Troubleshooting Checklist 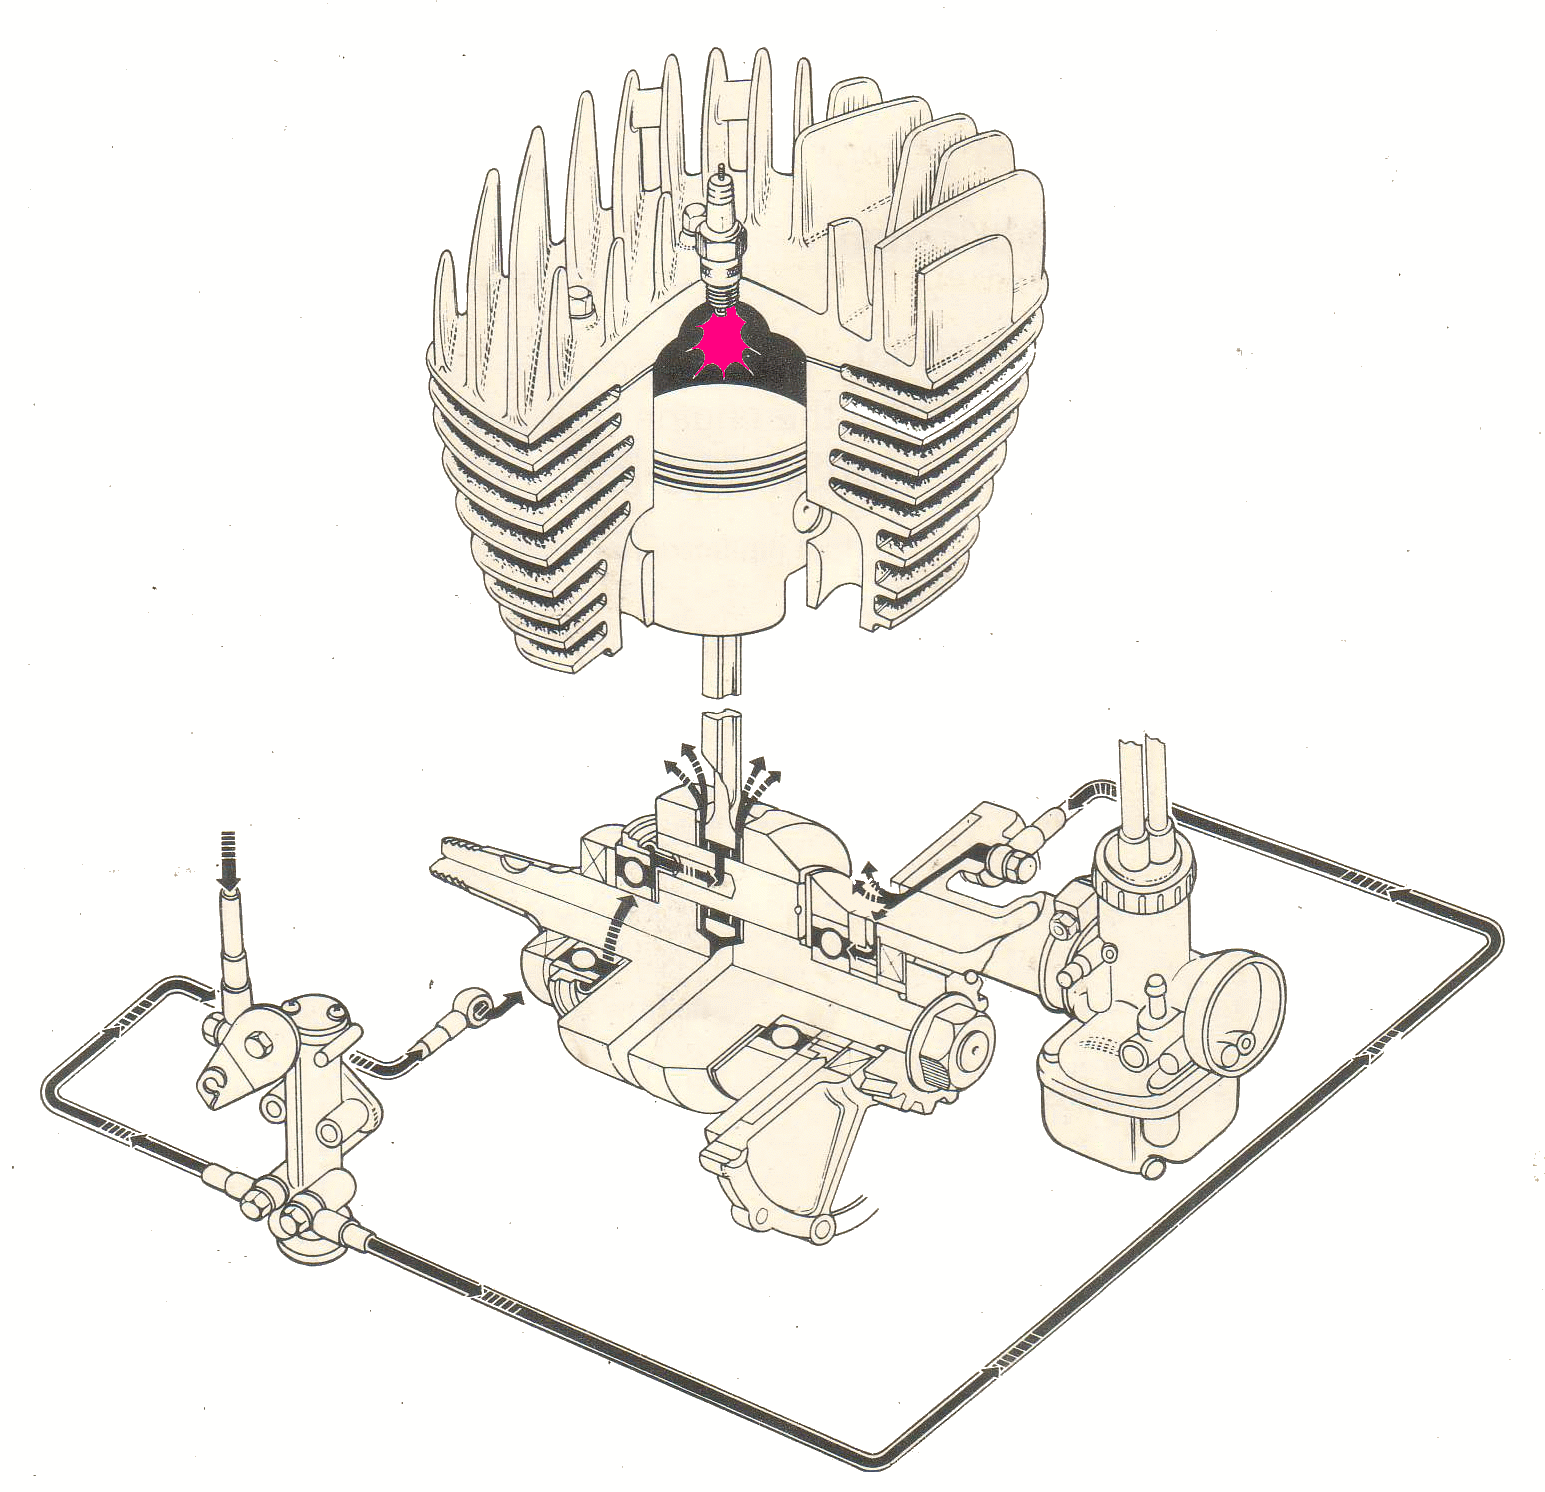
Here's the procedure we follow in the shop when an oil injection system is suspect. Work from easiest to hardest.
Step 1: Verify oil level and refill the tank.
Check the reservoir. If it's low or empty, refill with the correct two-stroke injector oil (not premix oil—injector oil is thinner and formulated for pump delivery). Note whether the low-oil alarm or warning light is functioning. If the tank was dry, you now have air in the system—proceed to Step 2.
Step 2: Prime the pump and bleed all air from the lines.
Locate the bleed screw on the pump body (usually a small brass screw on the bottom or side). Loosen it one full turn with the engine off. Manually actuate the throttle or use the primer bulb (on outboards) to push oil from the tank through the pump. Watch for oil to seep from the bleed screw. When oil flows steadily without bubbles, tighten the screw. If there's no bleed screw, crack the hose fitting at the pump inlet and repeat the process.
Step 3: Inspect all hoses and connections for cracks or porosity.
Pull each section of clear line and flex it. Look for stiffness, discoloration, or micro-cracks. Blow air gently through the hose from tank to pump; it should pass freely. If the hose feels hard or shows any surface crazing, replace it. Check the tank pickup screen for debris or clogs—if the pump can't draw oil from the tank, it'll suck air instead.
Step 4: Verify pump operation with the engine running.
Start the engine and let it idle. Disconnect the oil delivery line at the manifold (where it enters the carburetor or intake). You should see oil "burping" out of the disconnected line in time with the pump cycles. One mechanic describes it clearly: "Pull this line off at the manifold… if oil is burping out of there, your oil pump is working." If you see no oil or only air, the pump is dead, the line is clogged, or there's still an airlock upstream.
Step 5: Check pump adjustment and throttle linkage.
With the engine off and throttle at wide-open position, verify the pump arm or cable is at maximum stroke. On Yamaha pumps, align the pin with the index dot. On Mikuni pumps, the two alignment marks should line up. Refer to your shop manual for the exact spec, but the principle is the same: maximum throttle must equal maximum pump delivery. If the cable is out of adjustment, the pump never delivers full oil at high RPM, and you risk oil starvation under load.
Step 6: Test for internal pump failure.
If the pump spins but delivers no oil even after bleeding, the internal seals or check valves inside the pump body have failed. Remove the pump, disassemble it, and inspect the plunger and seals. If you see scoring on the plunger or torn seals, the pump is toast. Replacement is the only fix—rebuilding these pumps is rarely cost-effective. For replacement parts, browse outboard motor parts for your brand.
When to Keep the System vs. Convert to Premix

Oil injection is worth keeping if you maintain it and the engine sees variable RPM use—trolling, cruising, and the occasional wide-open run. The variable oil delivery saves oil and reduces plug fouling compared to a fixed 50:1 premix.
Convert to premix if any of the following apply:
- Your engine is pre-2000 with a mechanical pump and aging hoses, and you don't want to gamble on a nylon gear.
- You've had repeated injection failures or can't reliably source replacement parts.
- You race or run at sustained high RPM where a rich, consistent premix ratio (like 32:1 or 40:1) gives you peace of mind.
- You simply don't trust the system and would rather control lubrication manually.
To convert, you'll need a block-off plate to seal the pump mounting hole, and you'll have to plug the oil delivery ports on the intake or carburetor. Re-jet the carburetor to account for the oil now mixed into the fuel (premix effectively makes the fuel "thicker," so you may need to go up one jet size). Then run your chosen ratio—40:1 is a safe starting point for most engines—and tune from there. You can find the necessary parts in the carburetor repair kit collection.
Some techs recommend: "If you're not sure your pump is working, simply run 20:1 premix. The worst that will happen is you'll foul spark plugs and smoke a lot." That's solid backup advice if you're mid-season and suspect a problem but can't immediately diagnose it.
Oil Type and Quality: What to Use

Always use a two-stroke oil specifically labeled for injection systems. Premix oils are often too thick and will clog the fine passages in the pump. Injection oils are designed to flow at low temperatures and meter accurately through small orifices.
Avoid mixing oil types in the same tank. Synthetic and castor-based oils can react and form sludge. Stick with one brand and formula for the life of the engine. If you're switching oils, drain the old reservoir completely and flush the lines before filling with the new oil.
We've had good results with quality injector oils that meet or exceed the manufacturer's specs. Whether you choose an OEM-branded oil or a reputable aftermarket option, the key is consistency and following the viscosity and additive requirements in your engine manual.
Maintenance Procedures to Prevent Failures
Set a schedule and stick to it. These are the intervals that prevent most injection failures:
Every 25 hours or monthly (whichever comes first):
- Check oil reservoir level and top off.
- Visually inspect all clear hoses for stiffness, cracks, or discoloration.
- Verify the low-oil warning light or buzzer is functional (disconnect the oil level sensor wire; the alarm should sound).
Every 100 hours or annually:
- Replace all clear plastic oil lines regardless of appearance if they're over three years old.
- Remove and inspect the oil pump drive gear (mechanical systems) for cracks or tooth wear.
- Clean or replace the tank pickup screen and any inline filters.
- Cycle the system through a full bleed procedure to purge any air that may have crept in.
Before winter storage (seasonal engines):
- Drain the oil tank or run the system dry by disconnecting the oil line and letting the engine pull the last of the oil out while running on premix.
- Alternatively, add a fuel stabilizer and run a compatible winterizing oil through the system according to the manufacturer's procedure, ensuring no stagnant oil is left to gel.
At first spring start-up:
- Refill the reservoir with fresh injector oil.
- Prime and bleed the system completely before running the engine under load.
- Verify oil delivery at the manifold as described in Step 4 of the troubleshooting checklist.
These steps take fifteen minutes every few weeks and cost almost nothing compared to a seized piston.
Early Warning Signs of Pump Failure

Catch these symptoms early and you can fix the problem before it becomes catastrophic:
- Excessive blue smoke at idle that clears at throttle: May indicate the pump is over-delivering due to a stuck plunger or incorrect adjustment, flooding the engine with oil.
- Smoke that suddenly stops or decreases dramatically: Could mean oil delivery has dropped or ceased entirely—check immediately.
- Low-oil alarm sounds even with a full tank: Points to a faulty sensor, wiring issue, or loss of oil pressure from a failing pump.
- Visible air bubbles in clear oil lines while running: Indicates an air leak on the suction side (tank to pump) or a failing pump seal.
- Engine runs rough or misfires after refueling: If you've just filled the oil tank and didn't bleed the system, air pockets can cause erratic oil flow and lean-out one or more cylinders.
Decision Checklist: Keep It or Premix?
Use this list to decide whether to maintain your oil injection system or convert to manual premix.
Keep the injection system if:
- Your engine is post-2000 with an electronic pump and functioning ECU diagnostics.
- You regularly perform the maintenance schedule above.
- You use the engine in varied conditions (trolling, cruising, occasional WOT) where variable oil delivery is beneficial.
- Replacement parts (hoses, sensors, pump) are readily available for your engine model.
Convert to premix if:
- Your engine is pre-2000 with a mechanical gear-driven pump and you've already replaced the nylon gear once.
- You've experienced repeated injection failures or oil starvation incidents.
- You idle for extended periods (trolling) and want the certainty of a fixed rich ratio like 40:1.
- You race or operate at sustained high RPM and prefer consistent lubrication over economy.
- You find measuring and mixing oil less stressful than monitoring hoses, sensors, and bleed screws.
There's no "wrong" choice—both systems work if you respect their requirements. The wrong choice is ignoring maintenance on an injection system and hoping it'll keep working.
Premix Ratio Reference
If you decide to convert or run premix as a backup, here are the common ratios and their measurements per gallon of gasoline:
- 20:1 = 6.4 oz oil per gallon (very rich, short-term troubleshooting or break-in)
- 32:1 = 4.0 oz oil per gallon (rich, often used for racing or high-load applications)
- 40:1 = 3.2 oz oil per gallon (common recreational ratio for most two-strokes)
- 50:1 = 2.6 oz oil per gallon (lean, typical for modern engines with good oil and tight tolerances)
Always follow your manufacturer's recommendation. Running too lean risks seizure; running too rich fouls plugs and carbons up the exhaust.
If you take one thing from this guide, make it this: check your oil level and bleed the system every time you refill the reservoir, and swap those clear hoses every three years whether they look bad or not. For more detailed parts and accessories to maintain all your marine engine needs, visit the JLM Marine hub.