


DIY Boat Interior Lighting: How to Install & Troubleshoot LED Strip Lights on Your Vessel
Table of Contents
- Understanding LED Lighting for Boats
- Planning Your Boat LED Lighting Installation
- Step-By-Step Installation Process for LED Boat Lights
- My Personal LED Lighting Transformation Story
- Maintenance and Troubleshooting for Boat LED Lights
- Lessons Learned: What I Wish I'd Known Before Starting
- Buying Guide and Warranty Considerations
- Comparing LED Strip Types for Marine Applications
- Troubleshooting Quick Reference Guide
Understanding LED Lighting for Boats 
Upgrading your boat's interior lighting with LED strip lights is, in my opinion, one of the most satisfying and cost-effective DIY projects you can undertake. It's not just about adding a bit of flair; it's about enhancing safety, functionality, and the overall ambiance of your vessel. I've always been impressed by how much a well-placed LED strip can transform a dark, utilitarian space into something more inviting and even luxurious. When I first started looking into this, I was a bit overwhelmed by the options available, but after diving in, I found it's quite manageable.
The core benefit of LED strip lights is their versatility. Unlike bulky fixtures, these flexible strips can be fitted into tight spaces, along curves, and under trim, providing a clean, modern look that's hard to achieve with traditional lighting. They are incredibly energy-efficient, a critical factor on any boat where every amp drawn from the battery matters. Plus, their longevity means you won't be constantly replacing bulbs.
According to the American Boat and Yacht Council (ABYC) standards for marine electrical systems, LED lighting draws significantly less power than traditional lighting – typically 4.8 watts per meter for standard 3528 type LEDs, which is comparable to a single traditional incandescent dome light but with far greater coverage area and efficiency. This makes them ideal for boats where power conservation is essential for extended time away from shore power.
LED Strip Types and Their Applications
When you start browsing for LED boat lights, you'll quickly encounter different types, each suited for specific purposes. Understanding these differences is crucial for a successful installation.
- Monochrome LED Strips: These are the workhorses, emitting a single color – typically white, blue, or red. White LEDs come in various color temperatures, from warm white (like an incandescent bulb) to cool white (more daylight-like), which you'll want to match to the desired mood. Blue is a popular choice for a cool, ambient glow, especially in cabins. Red LEDs are often used for minimal light that preserves night vision, making them ideal for navigation or cockpit areas.
- RGB LED Strips: These are the fun ones! RGB (Red, Green, Blue) strips contain individual LEDs capable of producing a wide spectrum of colors. By mixing these primary colors, you can achieve millions of hues. This is fantastic for creating custom ambiance. I once saw a setup where the owner could change the cabin color to match the exterior water conditions – quite a novel touch!
- Tunable White LED Strips: For those who want precise control over the warmth or coolness of white light, tunable white strips are the answer. You can adjust between warm and cool whites, offering flexibility for different times of day or activities. Imagine having a warm, cozy light for relaxing in the evening and a crisp, bright white for reading or tasks during the day.
- Addressable LED Strips (e.g., WS2812B, NeoPixels): These are the most advanced, allowing individual control over each LED or small groups of LEDs. This means you can create dynamic lighting effects, chasing patterns, and complex color transitions. While they offer incredible customization, they also require more complex wiring and a programmable controller, which might be beyond a beginner's scope, but the results can be spectacular if you're an electronics enthusiast.
Key Features to Consider
Beyond the color type, several technical specifications matter:
- LED Density: This refers to how many LEDs are packed into a meter (or foot) of strip. Higher density strips, like those with 60 or 120 LEDs per meter, provide a more even, consistent light with fewer visible "hot spots" where individual LEDs are apparent. For a smooth, diffused look, especially when not using a diffuser channel, higher density is generally better.
- Color Temperature (for white LEDs): Measured in Kelvin (K), this dictates the warmth or coolness of the white light. I personally prefer a warm white (around 2700K-3000K) for cabin interiors as it feels more homey, but some might prefer a cooler, more neutral white (4000K-5000K) for task lighting.
- Waterproof Rating (IP Rating): This is perhaps the most critical factor for marine applications. We'll delve deeper into this, but simply put, you need to ensure your chosen strips can withstand the marine environment.
Planning Your Boat LED Lighting Installation 
Before you even think about cutting wire or sticking anything down, proper planning is paramount. A well-thought-out plan will save you headaches, potential electrical issues, and ensure your lighting is both functional and safe. It's like charting a course before you set sail; you need to know where you're going and what you need to get there. For comprehensive boat parts and accessories to help with your installation, consider exploring JLM Marine's extensive collection for quality products suited to marine environments.
Typical Areas for Boat Lighting
Where do people typically install these lights? The possibilities are extensive, limited only by your imagination and the boat's layout.
- Interior Cabins: This is a prime spot. Think under bunks, along galley cabinets, illuminating the V-berth, or creating soft ambient light in the main salon or dinette. Many boats have recessed areas or cabinetry where LED strips can be hidden, providing indirect illumination that's easy on the eyes.
- Decks and Cockpits: Courtesy lights along the deck edges, under the gunnels, or illuminating steps and companionways significantly improve safety during night navigation or while moving around the boat after dark.
- Helm and Dashboard: Subtle lighting here can improve visibility of instruments without causing glare that impairs night vision.
- Underwater Lighting: While this guide focuses on interior, it's worth noting that waterproof LED strips rated IP68 can also be installed on the hull for a stunning underwater effect.
- Storage Areas: A simple strip inside a locker or under a seat can make finding items a breeze.
Assessing Power Sources and Electrical Considerations
Every boat has a 12V DC electrical system, usually powered by the engine's alternator or shore power through a converter. Your LED strips will need to be compatible with this voltage. Most common LED strips designed for automotive or marine use run on 12V DC.
It's essential to understand your boat's power consumption. Adding a lot of lighting could tax your battery bank, especially if you don't run your engine frequently or have limited charging sources. I always recommend understanding your battery's capacity (measured in Amp-hours, Ah) and calculating the total current draw of your new lighting system. For example, a 5-meter (approx. 16-foot) strip using 4.8 watts per meter would draw about 2 amps at 12V (5m * 4.8W/m = 24W; 24W / 12V = 2A). Multiply that by how many meters you plan to install.
According to the ABYC E-11 standard for DC electrical systems on boats, properly sized wiring and circuit protection are mandatory for safety. The standard recommends that circuits be protected with fuses or circuit breakers sized appropriately for the wire gauge and expected current draw, which leads us to our next consideration.
Safety Precautions
Safety is non-negotiable on a boat, especially when dealing with electrical systems.
- Disconnect the Battery: This is the absolute first step. Before you do anything involving wiring, disconnect the negative terminal of your main battery. This prevents accidental shorts and keeps you safe.
- Avoid Unnecessary Drilling: I've learned that the fewer holes you drill into your boat's hull or structure, the better. Your boat's interior is often finished with fiberglass or wood paneling, and there are usually channels, moldings, or existing conduits where you can run wires discreetly. Look for existing wire pathways or existing recesses where strips can be mounted.
- Understand Wire Gauge: Using the correct wire gauge is vital. For typical LED strip runs on a boat, 16 AWG marine-grade wire is usually sufficient, but for longer runs or higher current draws, you might need thicker gauge wire (like 14 AWG or even 12 AWG) to prevent voltage drop.
- Consider Fuses: While LED strips themselves don't typically draw a huge amount of current individually, protecting the circuit with an inline fuse is a best practice. This prevents damage to the strip, your wiring, and your boat's electrical system in the event of a short circuit.
Choosing the Right LED Strips for Your Boat
The marine environment is harsh, and that's an understatement. Saltwater, constant vibration, UV exposure, and humidity mean you need components designed for these conditions. This is where waterproof ratings come into play.
Waterproof Ratings Explained (IP Codes)
IP stands for "Ingress Protection," and the two digits following it tell you how well the product is protected against solids (like dust) and liquids (like water).
- IP65: This rating means the strip is protected against dust ingress and is protected against low-pressure water jets from any direction. This is perfectly adequate for most interior cabin applications where the strip is unlikely to be directly sprayed or submerged. However, if you're installing it near a galley sink or head, where there's a chance of splashing, you might want to go higher.
- IP67: This offers a higher level of protection. It means the strip is dust-tight and can withstand immersion in water up to 1 meter (about 3 feet) for up to 30 minutes. For areas like a cockpit or areas prone to condensation or occasional spray, IP67 is a better choice.
- IP68: This is the gold standard for marine applications, especially if the lights will regularly encounter water. It means the strip is dust-tight and can be continuously immersed in water, usually under specified pressure conditions (e.g., 1.5 meters for 30 minutes, or even deeper). This is what you want for any exterior lighting or areas that are regularly washed down or exposed to significant moisture.
Ideally, look for LED strips specifically marketed as "marine-grade." These are often potted or coated with a silicone or epoxy material to enhance their water resistance and durability.
Cutting LED Strips and Maintaining Waterproofing
Most LED strips are designed to be cut to length. You'll see little copper pads or scissor icons indicating the cut points. Here's where things get tricky regarding waterproofing. When you cut a strip, you expose the circuitry at the end.
- Resealing: After cutting, it's absolutely imperative that you properly seal the cut end yourself. The best way to do this is with marine-grade heat-shrink tubing. Cut a piece of heat shrink just long enough to cover the end of the strip, slip it over the cut edge, and use a heat gun to shrink it down snugly. For an extra layer of protection, you can apply a small amount of marine-grade silicone sealant inside the heat shrink before sealing, or apply a dab of silicone sealant over the sealed end, especially if it's an IP67 or IP68 rated strip you've cut. Many LED strips come with end caps and adhesive, which are a good starting point.
Powering LED Strips on Boats
Connecting your LED strips safely and reliably to your boat's 12V system is crucial to prevent burnout, ensure consistent performance, and avoid electrical hazards.
Why Direct Wiring to a 12V Battery is Generally Recommended
For most DIY installations, wiring directly to your boat's existing 12V DC system is the standard and recommended approach. Modern boats almost universally use 12V systems, and this is precisely what most LED strips are designed for. The advantage is tapping into a stable, readily available power source.
However, I strongly advise against directly wiring to the battery terminals themselves without proper fusing and circuit protection. Instead, it's best to tap into an existing fused circuit breaker panel or install a new dedicated circuit with its own fuse or circuit breaker, connected to the battery via an appropriate fuse.
If you're looking for quality parts to help set up these circuits and switches, the boat accessories selection at JLM Marine offers plenty of marine-grade options for fuses, connectors, and wiring supplies.
Importance of Voltage Regulators and Preventing LED Burnout
This is a critical point that many DIY guides overlook, and it stems from my own early experiences with sensitive electronics. While LED strips are designed for 12V, the actual voltage output from a boat's charging system can sometimes fluctuate. Your alternator, especially when charging a depleted battery, can momentarily produce higher voltages (13.5V to 14.5V or even higher). If your LED strip is rated for a strict 12V, a voltage spike can easily burn out the LEDs, especially if they have lower voltage requirements or are sensitive components.
This is where a voltage regulator or a DC-DC converter becomes invaluable. These devices take the fluctuating input voltage from your boat's system and output a stable, consistent 12V (or whatever the LED strip requires).
- Voltage Regulators: These are often integrated into high-quality LED power supplies or can be purchased as separate inline modules. They ensure that even if your boat's voltage spikes to 14V, the LED strip still receives a steady 11.8V-12.2V. This is a critical step for maximizing the lifespan of your LED strips, particularly the more sensitive RGB and addressable types.
- Protecting Against Voltage Spikes: Even without a dedicated regulator for every strip, using a good quality fuse and ensuring your strips themselves have some internal protection mechanisms is a good idea. However, for true peace of mind and consistent performance, I'd strongly consider an inline regulator, especially for longer runs or more expensive, high-density strips.
According to a technical bulletin from the National Marine Electronics Association (NMEA), voltage fluctuations in marine electrical systems can range from 10.5V to 15V or more, depending on battery state and charging conditions. This is why proper regulation is essential for sensitive electronics like LED strips.
Steps to Connect LED Strips Safely
- Plan Your Power Source: Identify a suitable fused circuit on your main electrical panel. If no suitable circuit exists, you'll need to run a new wire from the battery bank's positive terminal, through an inline fuse holder (with an appropriate fuse rating), to your lighting controller or switch.
- Install Switches/Controllers: Most people want to be able to turn their lights on and off, and perhaps control brightness or color. Install a good quality marine-grade rocker switch or an RGB controller for your lighting zones. These switches need to be able to handle the total current draw of the LED strip(s) they control.
- Connect the Inline Regulator (Recommended): If using a voltage regulator, connect its input terminals to your fused power source (e.g., the output of the fuse block or directly from the battery via its fuse).
- Connect the LED Strip: Connect the output of the voltage regulator (or directly from the fused power source if not using a regulator) to the positive terminal of your LED strip. Connect the negative terminal of the LED strip to the ground side of your boat's electrical system (usually a common ground bus bar or directly to the battery's negative terminal).
- Use Proper Connectors: Always use marine-grade barrel connectors, butt connectors with heat shrink, or solder connections, followed by heat shrink tubing. These ensure a secure, low-resistance connection that is also protected from moisture.
- Test: Before permanently mounting the strips, connect everything and test. Ensure all sections light up correctly, colors are accurate (if RGB), and there are no flickers.
Step-By-Step Installation Process for LED Boat Lights

Now that we've covered the planning and power, let's get down to the actual installation. This is where your efforts start to pay off and you can see the transformation happening.
Cleaning and Preparing the Installation Surface
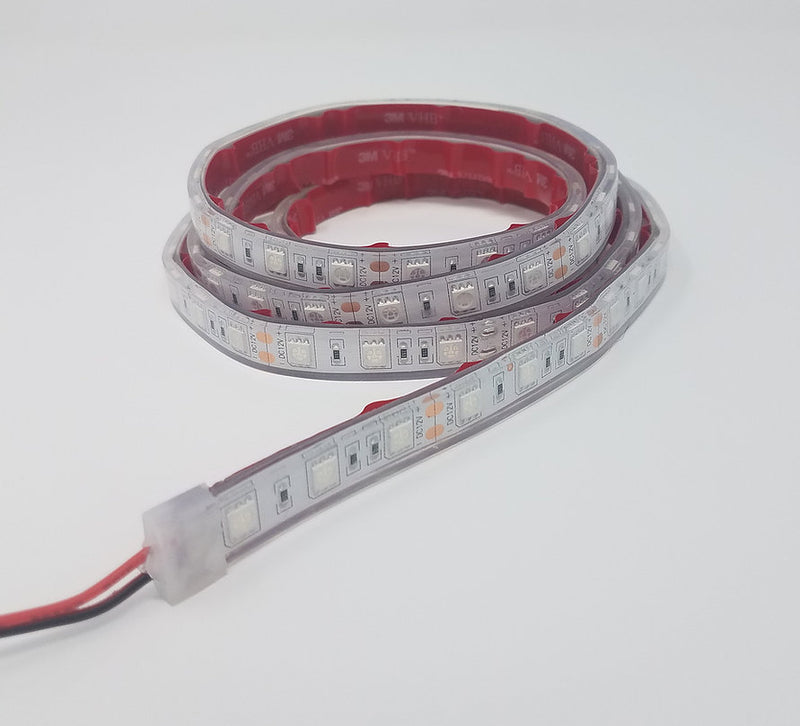
This is arguably the most crucial step for ensuring your LED strips stay put. Most good quality LED strips use a strong 3M VHB (Very High Bond) adhesive backing, but even the best adhesive won't stick properly to a dirty, greasy, or damp surface.
- Degrease: I always use Isopropyl alcohol (IPA) or a dedicated marine-grade surface cleaner/degreaser for this. Wipe down the entire area where the strip will be applied. For fiberglass or gelcoat, a thorough wipe with IPA is usually all you need. If you're adhering to a painted or coated surface, ensure the coating itself is sound and not peeling.
- Dry Thoroughly: Make sure the surface is completely dry before proceeding.
- Surface Texture: Very rough or porous surfaces might pose a challenge for adhesive strips alone. In these cases, or for areas with lots of vibration, you'll want to supplement the adhesive with other mounting methods.
Measuring, Cutting, and Adapting LED Strips
Once your surface is prepped, it's time to get the strips ready.
- Measure Twice, Cut Once: Lay out the strips where you intend to install them. Use the marked cutting points (usually indicated by copper pads or a scissor icon) to determine where to cut. Sometimes, you'll need to cut a strip and then use jumper wires or specialized connectors to navigate corners or bridge gaps.
- Cutting: Use sharp scissors or wire cutters for a clean cut. Avoid tearing the strip.
-
Connecting Segments: If you need to connect multiple pieces of LED strip, there are good options:
- Solder and Heat Shrink: This is the most reliable method for a strong, waterproof connection. You'll need a soldering iron, solder, and marine-grade heat-shrink tubing. Solder the appropriate wire lengths to the copper pads, ensuring correct polarity (+ to +, - to -), then slide the heat shrink over the joint and shrink it down.
- Snap-on Connectors: There are specialized snap-on connectors for LED strips. While convenient, I've found they can sometimes be less reliable in a high-vibration marine environment compared to a soldered connection. If you use them, ensure they are specifically rated for marine use and seal the connection with extra silicone or adhesive if possible.
Mounting Techniques for Cabin Strips, Deck Lights, and Underwater Applications
The method of mounting will depend heavily on the LED strip's waterproof rating and its intended location.
Using Adhesives, Mounting Clips, or Silicone Sealants
- Adhesive Backing: For IP65-rated strips in dry interior cabin areas, the factory adhesive is often sufficient, especially on smooth surfaces. Apply firm, even pressure along the entire length of the strip for at least 30 seconds.
- Mounting Clips: Many LED strips, especially those encased in silicone for better waterproofing, come with small plastic mounting clips. These are excellent for providing extra security. You can often screw these clips into place (using small self-tapping screws) along the strip's path, providing mechanical retention. I find these absolutely necessary in areas with constant vibration or on surfaces that aren't perfectly smooth.
- Silicone Sealant: For IP67 and IP68 rated strips, or to reinforce adhesive on less-than-perfect surfaces, consider using a thin bead of marine-grade silicone adhesive sealant along the edges of the strip once it's in place. This helps prevent water from getting under the strip and also adds to the bond strength.
- Plastic Channels/Diffusers: I'm a huge fan of using aluminum or plastic channels designed for LED strips. These not only provide a clean, professional look but also protect the strip from physical damage and UV exposure. They often come with clips or can be adhered/screwed in place. Some channels have frosted or diffused covers that create a very even, soft light without the "dot" effect of individual LEDs. This is particularly good for cabin lighting.
Avoid Drilling Holes When Possible
As I mentioned, minimize drilling. When you do need to secure something with screws (like mounting clips), consider using existing screw holes or finding a robust mounting point. If you absolutely must drill a new hole for wiring or mounting, use a quality marine sealant (like 3M 5200 or Sikaflex) around the hole penetration and any screws to prevent water ingress.
Use of Countersunk Screws for Deck-Mounted Lights
If you are installing any lighting on a deck or walking surface, it's crucial that any fasteners are countersunk flush with the surface. Nothing is more hazardous than a screw head protruding and snagging a foot or a fishing line.
Wiring and Testing
The moment of truth! Properly connecting and testing your work is vital.
Connecting Positive, Negative, and Switches
As detailed in the powering section, ensure all positive wires go to positive connections and negative wires go to negative connections. If you're using a switch, the positive wire from your fused power source will connect to one terminal of the switch, and the other terminal of the switch will connect to the positive terminal of your LED strip(s). Always double-check polarity before making any connections.
Use Heat Shrink Tubing or Silicone Sealant for Watertight Connections
This cannot be stressed enough for marine installations. Every connection—whether it's a splice, a butt connector, or a solder joint—needs to be protected from the surrounding environment.
- Heat Shrink Tubing: Use marine-grade heat shrink tubing that contains an adhesive sealant on the inside. This activates when heated, creating a waterproof and strain-relieved seal.
- Silicone Sealant: For added protection on cut ends of strips or over connections, a dab of clear marine silicone sealant adds an extra barrier against moisture ingress.
The ABYC E-11 standard specifically recommends that "all connections shall be protected from water splash and moisture accumulation," which underscores the importance of proper sealing techniques.
Testing Before Final Mounting
Before you press that strip firmly into place, or screw down those clips, test everything. Turn on your boat's accessory power, engage the switch, and verify that all the lights work as expected. Check for:
- Full Brightness: Are all sections lit evenly?
- Correct Colors: If RGB, are the colors accurate and vibrant?
- No Flickering: Any flickering could indicate a loose connection, insufficient power, or a faulty component.
If something isn't right, now is the time to troubleshoot. It's far easier to fix a problem when the strip is just loosely adhered or clipped, rather than permanently mounted.
My Personal LED Lighting Transformation Story

I'll never forget the first major LED lighting project I tackled on my 28-foot sailboat. The cabin was dark and dated, with a few dim incandescent fixtures that sucked power and provided minimal light. I decided to completely transform the space with a combination of white and RGB LED strips.
The main cabin was my biggest challenge. I wanted a soft, ambient light that wouldn't create harsh shadows or strain the eyes when reading at night. After measuring carefully, I chose to run strips along the inside edge of the cabin top, just where it meets the side walls. This location would allow the light to wash down the walls without being directly visible.
The preparation was key. I spent nearly two hours just cleaning these surfaces with isopropyl alcohol and waiting for them to dry completely. In retrospect, this thoroughness paid off because three years later, those strips are still firmly attached despite the constant humidity and occasional heavy weather.
For the galley, I installed strips under the cabinets to illuminate the countertop. This area proved particularly tricky because of the uneven fiberglass surface underneath the cabinets. The adhesive backing alone wasn't sufficient, so I used a combination of mounting clips (one every 8 inches) and a thin bead of marine silicone along the edges after installation. I also needed to bridge a gap between two cabinets, which required cutting the strip and connecting the sections with short jumper wires that I soldered and protected with marine heat shrink.
The v-berth presented another challenge – I wanted reading lights that wouldn't disturb a partner sleeping. My solution was to install small, individually switched sections on each side. This required splitting the power feed and adding small inline switches. The trickiest part was ensuring the wiring was completely hidden, which I accomplished by routing it through the existing wire channels behind the hull liner.
The biggest lesson I learned came when I first powered everything up before final mounting. Two sections didn't light. After some investigation, I discovered I had accidentally reversed the polarity on one connection, and on the other, I hadn't fully stripped the wire, resulting in a poor connection. Had I not tested before final mounting, fixing these issues would have been significantly more difficult.
Perhaps my most satisfying moment was adding a small motion-activated strip in the head compartment. This simple addition eliminated the fumbling for switches in the dark and has proven incredibly practical during night passages.
One mistake I made was not initially using a voltage regulator. About six months after installation, while the engine was running and charging the batteries, we experienced a voltage spike that damaged part of an RGB strip. After replacing that section, I installed inline regulators for all zones, and haven't had an issue since. That expensive lesson taught me the importance of protecting sensitive electronics from the sometimes unpredictable electrical environment on a boat.
Maintenance and Troubleshooting for Boat LED Lights
Even with careful installation, you might encounter issues down the line. Proper maintenance and knowing how to troubleshoot common problems will keep your lights shining bright.
Common Issues
- Flickering: This is usually caused by a poor connection somewhere in the circuit – could be at the power source, the switch, a solder joint, or even at the LED strip itself. Vibration can loosen connections over time.
- Dimming: Often, dimming is a sign of voltage drop. This happens when the wire gauge is too small for the length of the run, or if the connections have high resistance. It can also occur if the power supply is overloaded. For RGB strips, unequal voltage can cause color shifts in different sections.
- Adhesive Failure: This is typically due to improper surface preparation or installation in a wet/oily environment. Sunlight and heat can also degrade some adhesives over time.
- Water Intrusion: Despite your best efforts, water can find its way into connections or the strip itself if not properly sealed, leading to corrosion and failure.
- Section(s) Not Lighting Up: This could be a broken wire in a segment, a bad solder joint at a cut point, or a burnt-out section of LEDs.
The U.S. Coast Guard Safety Division periodically publishes bulletins on marine electrical systems and has noted that water intrusion is among the leading causes of electrical failures on recreational vessels. Their guidance emphasizes the importance of proper wire connections and protection against moisture, especially in DC systems like LED lighting.
Troubleshooting Methodology
When you encounter an issue, a systematic approach helps identify the root cause:
- Isolate the Problem: Is it affecting all lights or just one zone/strip?
- Check Power Source: Verify the voltage at the power source and at the LED strip with a multimeter.
- Inspect Connections: Look for loose, corroded, or damaged connections.
- Test in Sections: For longer runs, disconnect segments to identify if a specific section is causing the problem.
- Check for Water Damage: Look for signs of water intrusion or corrosion.
Real-World Troubleshooting: My Water Intrusion Nightmare
About a year after installing LED strips in my cockpit, I noticed one strip had sections that would intermittently flicker or go dark, particularly in damp conditions. Initially, I suspected a faulty strip, but the problem was inconsistent and puzzling.
After careful inspection, I discovered that water had found its way into a connection point where I had cut and rejoined the strip to navigate around a cupholder. Although I had used heat shrink, I hadn't applied it properly, leaving a tiny gap where moisture could enter. Over time, this created corrosion on the copper pads, causing an intermittent connection.
The fix wasn't simple – I had to cut out the damaged section entirely, re-solder fresh connections, and this time, I used a double-layer protection approach: first, I applied marine silicone directly to the exposed pads, then covered with adhesive-lined heat shrink, and finally added a second larger piece of heat shrink over the entire junction. I also created a small drip loop in the wiring to prevent water from running down the wire directly into the connection.
This experience taught me that in marine environments, you simply cannot overdo moisture protection. What seems adequately sealed in your dry workshop may prove woefully inadequate after months of temperature cycles, humidity, and vibration on the water.
Tips for Resealing Cut LED Strips and Protecting Connectors
As I've stressed, sealing is key.
- Re-seal Cut Ends: If an adhesive connection fails or you need to access a connection, always re-seal cut ends meticulously with marine-grade heat shrink and silicone sealant after any repair.
- Protect All Connections: Periodically inspect all visible connections. If any look corroded or the heat shrink seems loose, carefully re-seal them. Using silicone to create a small drip loop on vertical wiring can help water run off rather than collect.
Best Practices for Long-Term Durability
- Use Marine-Grade Everything: I can't say this enough. Marine-grade wire, connectors, sealants, and even the LED strips themselves are designed to withstand the corrosive environment.
- Manage Voltage Drop: For longer runs, use the thickest gauge wire your connectors will accept. Consider running power to both ends of a long strip or using a power distribution block for multiple strips if voltage drop is a concern.
- Avoid Physical Stress: Don't bend the strips too sharply (check the minimum bend radius), and protect them from sharp objects or abrasion. Using channels helps immensely with physical protection.
- Regular Inspection: As part of your boat's routine maintenance, give your lighting system a quick visual check. Look for any signs of wear, damage, or loose connections.
Lessons Learned: What I Wish I'd Known Before Starting 
After completing several boat LED installations, both on my vessel and helping friends with theirs, I've accumulated some non-obvious insights that can make the difference between a good installation and a great one:
Temperature Changes Matter More Than You Think
One summer, I installed LED strips in my cabin, carefully testing everything in 85°F weather. When fall came and temperatures dropped to the 40s, I discovered that some connections became intermittent due to thermal contraction. The lesson: make all connections with temperature variation in mind, leaving a tiny bit of slack and ensuring any soldered joints are properly flowed and not "cold soldered," which can crack under thermal stress.
Create Service Loops
I now always include small service loops (extra wire) at connection points, especially where strips meet solid wiring. This makes future repairs much easier, as you have some slack to work with rather than having to add new wire sections.
Label Everything During Installation
I use a simple label maker to mark wires and connections during installation. This seemingly small step has saved countless hours when troubleshooting issues years later. I label which circuit each strip is connected to, voltage requirements, and polarity – information that's invaluable when you're trying to diagnose a problem in the confined spaces of a boat.
Watch for RF Interference
On one installation, we discovered that the cheap RGB controller was causing interference with the VHF radio – a potentially dangerous situation. Higher quality, properly shielded controllers and good grounding practices eliminated this issue. Always test your communication equipment after any electrical installation.
Avoid Parallel Light Sources
I learned that mounting LED strips where they shine directly at glossy surfaces (like a varnished wood cabin liner) can create annoying reflections and glare. Always position strips to cast light at an angle or use diffusers to soften the effect.
Plan for Future Expansion
On my first installation, I sized the wiring and fuses exactly for the current load. Later, when I wanted to add more strips, I had to replace wiring and fuses. Now I always oversize slightly, making future additions easier.
These hard-earned lessons represent the kind of knowledge that only comes from real-world experience and problem-solving on the water. Implementing these insights from the beginning will save you significant frustration and rework.
Buying Guide and Warranty Considerations
Choosing the right products upfront can save you a lot of trouble later. And when it comes to specialized products like marine electronics, understanding warranty and support is crucial.
Voltage Compatibility and Why 12V or 24V is Preferred
As we've discussed, your boat likely operates on a 12V DC system. Most marine LED strips are designed to run on 12V. You might also encounter 24V systems on larger vessels, but 12V is far more common for recreational boats. Always ensure the voltage rating of your LED strips matches your boat's system voltage. If you're using a higher voltage strip, you'd need a DC-DC converter to step down the voltage, adding complexity. Stick to 12V strips whenever possible for simplicity and compatibility.
Importance of Warranty and Customer Support
When purchasing marine LED lighting, I always look for products with a solid warranty. This signifies the manufacturer's confidence in their product's durability. A typical warranty period for good quality marine LEDs might be 2-5 years.
- Read the Warranty: Understand what the warranty covers (e.g., defects, premature failure) and what it excludes (e.g., damage from improper installation, power surges, physical damage).
- Supplier Reputation: I prefer to buy from reputable marine suppliers like JLM Marine, who have a proven track record. Companies with over two decades in the business, like JLM Marine, understand the rigors of the marine environment and often stand behind their products. They also offer crucial support for ensuring you get the correct parts for your specific engine or boat, which is invaluable. A good supplier also provides readily available replacement parts, switches, wiring, and other necessary accessories, meaning you can get everything you need from one trusted source. This saves time and potential compatibility headaches.
When I purchased my RGB controller from JLM Marine, I experienced an issue with it not connecting to their smartphone app. Their technical support walked me through several troubleshooting steps, and when those didn't resolve the issue, they immediately shipped a replacement controller that worked perfectly. This level of responsive support is worth its weight in gold when you're mid-project.
Options for Customization
Many manufacturers offer options for customization, which can be a lifesaver for unique boat designs.
- Length: LED strips can often be ordered in custom lengths, saving you cutting and splicing work. I found this incredibly useful for a particularly intricate cabin layout I worked on.
- IP Rating: You can usually specify whether you need IP65, IP67, or IP68 protection for your chosen strip type.
- Light Density and Chip Type: Some suppliers allow you to choose the LED density (e.g., 60 LEDs/m, 120 LEDs/m) or even the type of LED chip used (which affects brightness and efficiency).
- Color Options: Beyond standard white, you can often select RGB, RGBW (RGB plus a dedicated white channel for better white light quality), or tunable white options.
When looking for these, seek out suppliers who provide detailed product specifications and are willing to help you match your needs to the right product.
Troubleshooting Quick Reference Guide

| Issue | Possible Causes | Solutions | Reference Section | |-------|----------------|-----------|-------------------| | No lights working | Power source issue, fuse blown, main connection failed | Check fuse, verify voltage at source, inspect main connection points | Powering LED Strips | | Flickering lights | Loose connection, voltage fluctuation | Secure all connections, add voltage regulator | Maintenance and Troubleshooting, Powering LED Strips | | Partial section not lighting | Cut point failure, damaged strip section | Check solder joints at cut points, replace damaged section | Maintenance and Troubleshooting | | Adhesive failure | Poor surface prep, humidity, heat | Clean surface with alcohol, use additional mounting clips or marine adhesive | Mounting Techniques for Cabin Strips | | Water damage/corrosion | Inadequate sealing, connection exposure | Reseal with marine heat shrink and silicone, create drip loops | Maintenance and Troubleshooting | | Color inconsistency (RGB) | Voltage drop on long runs | Use thicker wiring, power from both ends, add amplifiers for long runs | Powering LED Strips |
Expert Insights on DIY Boat Lighting
As a seasoned marine technician with over three decades in the field remarked, Joe Eckroth, "Once the sticky tape is in place, the LED strip channel is lifted and stuck into position. Place the lights where the boater won't have to look directly at the LEDs; Eckroth says the ideal location is under a lip. This indirect lighting maximizes night vision while providing softer illumination." Source: BoatUS, with expert Joe Eckroth. This advice on indirect lighting is something I always implement; it makes a huge difference in comfort at night. He also emphasizes, "Use sheathed marine-grade stranded tinned wire. In addition to other benefits, the sheath protects the wires as they pass over/around sharp edges." Source: BoatUS, with expert Joe Eckroth. Following these expert tips is what separates a good installation from a great one.
For planning, lighting designers and electricians at Apex Lighting suggest: "Draw a floor plan of your boat's interiors… Consider what each area will be used for. This will help you determine what kind of lights are needed where." Source: Apex Lighting, quoting lighting design team. I couldn't agree more; thoughtful planning is the foundation of any successful DIY project. They also state that "Absolutely, boat light installation is certainly something that can be undertaken by yourself, provided you pay careful attention to the instructions contained within the user manual." Source: Apex Lighting FAQ, expert team. However, they wisely add, "If you are inexperienced or uncomfortable with such tasks, it's strongly advisable to seek the help of a professional. This is primarily to circumvent potential accidents that may harm you, or unintended damage to your boat's electrical components." Source: Apex Lighting FAQ, expert team. That sentiment towards professional help when needed is something I truly respect.
Archway Marine Lighting specialists highlight the longevity and value: "By installing high-quality LED interior marine lights, you can choose the color, intensity, and operability of your interior lighting. Distributors with experience can also help demonstrate the lifetime value of choosing the best LED marine lighting." Source: Archway Marine Lighting. This aligns perfectly with my belief that investing in quality marine-grade components, like those you can find from experienced suppliers, is always the best long-term strategy.
It's evident that a successful DIY boat LED lighting project hinges on careful planning, diligent preparation, and the use of appropriate marine-grade materials. By understanding the different types of LED strips, their waterproof ratings, and the importance of reliable power connections — ideally with voltage regulation — you can create a beautiful, functional lighting system that enhances your time on the water. Remember that issues like flickering or adhesive failure are often solvable with proper troubleshooting and maintenance, ensuring your investment lasts for years to come.
For all your marine lighting and parts needs, don't forget to check out JLM Marine's factory-direct boat parts to get premium quality and expert assistance.
Hi—I’m Jim Walker
I grew up in a Florida boatyard, earning pocket money (and a few scars) by rebuilding outboard carbs before I could drive. That hands-on habit carried me through a Ph.D. in mechanical engineering, where I studied how salt water quietly murders metal.
I spent ten years designing cooling systems for high-horsepower outboards, then joined JLM Marine as CTO. We bench-test every new part in the lab, but I still bolt early prototypes onto my own 23-foot skiff for a weekend shake-down— nothing beats real wake and spray for finding weak spots.
Here on the blog I share the fixes and shortcuts I’ve learned so your engine—and your day on the water—run smooth.

For Boat Owners:
To assist you in maintaining and repairing your marine engines, we hope the following resources may be of use:
- Mercury Serial Number Guide
- Owner's Manuals from Mercury
- Official Model Number Reference Guide PDF from BRP
- Johnson Serial Number Guide
-
Boat Accessories from JLM Marine
About JLM Marine
Founded in 2002, JLM Marine has established itself as a dedicated manufacturer of high-quality marine parts, based in China. Our commitment to excellence in manufacturing has earned us the trust of top marine brands globally.
As a direct supplier, we bypass intermediaries, which allows us to offer competitive prices without compromising on quality. This approach not only supports cost-efficiency but also ensures that our customers receive the best value directly from the source.
We are excited to expand our reach through retail channels, bringing our expertise and commitment to quality directly to boat owners and enthusiasts worldwide.
Boat Accessories on Sale
- $54.00
- $54.00
- Unit price
- per
- $38.50
- $38.50
- Unit price
- per
- From $39.13
$45.50- From $39.13
- Unit price
- per
- $53.50
- $53.50
- Unit price
- per
- From $54.00
- From $54.00
- Unit price
- per

- $34.50
- $34.50
- Unit price
- per
- $45.00
- $45.00
- Unit price
- per
- $23.50
- $23.50
- Unit price
- per
-
Red
-
Blue


- $34.50
- $34.50
- Unit price
- per


- $54.00
- $54.00
- Unit price
- per

- $54.00
- $54.00
- Unit price
- per
- $32.00
- $32.00
- Unit price
- per
- $40.00
- $40.00
- Unit price
- per
- $22.80
- $22.80
- Unit price
- per
-
Red
-
Blue

- $22.80
$27.00- $22.80
- Unit price
- per

- $31.50
- $31.50
- Unit price
- per
- $22.80
- $22.80
- Unit price
- per
-
Red
-
Blue


- $54.00
- $54.00
- Unit price
- per


- $59.00
- $59.00
- Unit price
- per

- $32.00
- $32.00
- Unit price
- per