


Lower Unit Gear Oil Change: A Simple DIY Guide
- Quick Reference Guide: Lower Unit Oil Change Essentials
- Understanding Gearcase Lower Unit Oil and Its Importance
- Preparing for Your Gearcase Oil Change
- Step-by-Step Gearcase Oil Change Process
- Troubleshooting and Tips
- Where to Buy Supplies and Professional Support Options
- Community FAQs and Forum Insights
- Reader Success Stories
- About the Author
- References
Quick Reference Guide: Lower Unit Oil Change Essentials
| Category | Details |
|---|---|
| Required Tools | Lower Unit Oil Pump, Wrench/Socket Set, Drain Pan, Rags, New Gaskets, Gloves, Safety Glasses |
| Oil Type | Marine-specific Gear Oil with NMMA FC-W certification (check manual for exact type) |
| Change Interval | Annually or every 100 hours (whichever comes first) |
| Skill Level | Beginner to Intermediate |
| Time Required | 30-45 minutes |
| Typical Cost | $20-$50 (DIY) vs. $75-$150+ (Professional) |
Understanding Gearcase Lower Unit Oil and Its Importance

My first outboard motor was a classic Johnson that had seen better days. When I tackled its maintenance myself, the lower unit felt like a mechanical enigma. But after diving in, I realized the gearcase oil change, while intimidating at first, is actually one of the most critical and straightforward maintenance tasks a boat owner can perform.
What is Gearcase Lower Unit Oil and Why is it Critical for Boat Performance?
The lower unit of your outboard motor houses the reduction gears that transfer power from the engine to the propeller. These gears, along with the bearings supporting them, face immense stress and friction. The special marine gear oil within this unit lubricates these moving parts, dissipates heat generated by friction, and protects them from corrosion, especially in harsh marine environments. Without proper lubrication, these components wear down rapidly, leading to costly repairs or complete gearcase failure.
The Benefits of Regular Oil Changes: Preventing Damage and Extending Motor Life
I learned about the importance of regular oil changes the hard way during a fishing trip when my outboard started sounding "off." A later inspection revealed alarming metallic flecks in the old oil. Regular changes ensure that your gears and bearings are always protected by fresh, effective lubrication. This directly translates into a longer lifespan for your motor, fewer unexpected breakdowns, and peace of mind knowing your boat is ready when you are.
Recommended Oil Change Intervals According to Manufacturers
Most outboard manufacturers generally recommend changing your lower unit gear oil annually or every 100 hours of operation, whichever comes first. Here's what major manufacturers specifically recommend:
| Manufacturer | Standard Interval | Special Conditions |
|---|---|---|
| Yamaha | 100 hours or annually | More frequent in saltwater use |
| Mercury | 100 hours or annually | Change immediately if water contamination detected |
| Suzuki | 100 hours or annually | Every 6 months for commercial use |
| Evinrude | 100 hours or annually (up to 300 hours with HPF-XR oil) | Change immediately if contamination suspected |
According to Sean Milburn, boating instructor at Len's Cove: "You want to change gear oil in your lower unit before winter or long-term storage. Don't leave this step to spring or ignore it completely… If there's water in the lower unit, it can do a lot of damage if it freezes."
For those operating in saltwater, as I often do, consider even more frequent changes. Salt and water are the enemies here, and minimizing their presence in your gearcase is crucial.
Preparing for Your Gearcase Oil Change

Before loosening any bolts, proper preparation is key. I used to grab whatever oil was on sale, but that's a mistake I quickly learned to avoid after a conversation with a seasoned marine mechanic who emphasized the importance of using the correct oil type and having the right tools.
Essential Tools and Equipment Needed for a DIY Gearcase Oil Change
Gathering your supplies before you start is essential. I keep a dedicated "outboard maintenance kit" in my garage. For a gearcase oil change, you'll need:
- Lower Unit Oil Pump: This is crucial, specifically designed to pump oil into the lower unit from the drain port.
- Wrench or Socket Set: For removing drain and vent plugs.
- Drain Pan: A sturdy pan to catch the old oil.
- Rags or Paper Towels: For inevitable drips and spills.
- New Drain and Vent Screw Gaskets: These are critical for preventing leaks.
- Gloves: To keep your hands clean.
- Safety Glasses: To protect your eyes from splashes.
- Your Outboard's Service Manual: This specifies the exact type and quantity of oil needed.
According to Mercury Marine's service bulletin #2003-01: "Always use new sealing washers when reinstalling drain and fill screws. Tighten to manufacturer specifications (typically 60-84 inch-pounds) to prevent leaks without damaging threads."
How to Choose the Right Marine Gear Oil: NMMA FC-W Approval and Four-Stroke Motor Engines
You absolutely must use marine-specific gear oil. Automotive gear oils won't cut it. Look for oils that are NMMA FC-W certified. This certification from the National Marine Manufacturers Association means the oil has met stringent standards for corrosion protection, water separation, and lubrication properties specific to marine applications. You can learn more about the industry standards for marine gear oils from authoritative sources.
For nearly all modern four-stroke outboard engines, you'll need high-quality marine gear oil, often in an SAE 90 or 80W-90 viscosity, but always consult your engine's manual.
Differences Between Marine Gear Oil and Automotive Oil, Why Marine-Specific is Required
The biggest difference lies in their ability to cope with water. Marine gear oils are designed to remain stable when mixed with small amounts of water and ideally, to separate from it. Many high-quality synthetic marine gear oils are formulated to separate from water much faster than conventional oils, offering better protection if water gets in.
Automotive oils tend to emulsify when they encounter water, turning into a milky sludge that offers poor lubrication and accelerates wear and corrosion. Using automotive oil in your lower unit is a serious risk to your equipment.
Step-by-Step Gearcase Oil Change Process
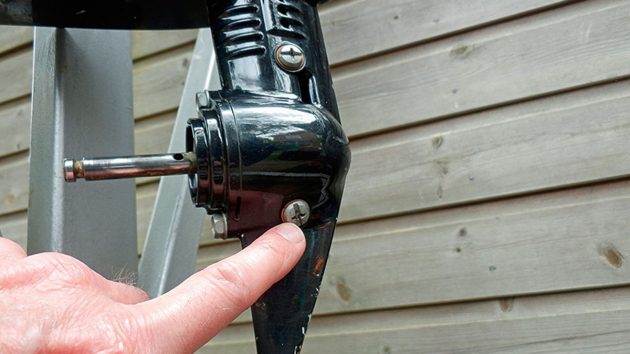
Now for the actual work. I find doing this task myself incredibly satisfying, and seeing fresh, clean oil going in always gives me confidence in my boat's reliability.
Draining Gearcase Oil Details
First, make sure your outboard is positioned with the lower unit as level as possible or adjust it so the lowest point of the gearcase is accessible for draining.
A common mistake I made was forgetting to remove the vent plug first. This creates a vacuum that hinders oil drainage. Always remove the upper vent plug (usually higher up on the gearcase) before the lower drain plug. This allows air to enter as the oil drains.
Place your catch pan beneath the drain plug. Using your wrench or screwdriver, carefully remove the lower drain plug. Let all the old oil drain completely—be patient, it might take a few minutes.
Yamaha's official service guide specifically notes: "Ensure the outboard is vertical or slightly tilted forward when draining. If tilted back, old oil may not drain completely, reducing the effectiveness of your maintenance." For detailed information, see this Yamaha service guide.
Inspecting Drained Oil for Signs of Wear, Contamination, or Seal Failure
This is perhaps the most critical part of the entire process. As the old oil flows into your pan, watch it closely for tell-tale signs of trouble:
- Milky or cloudy oil: This indicates water contamination, meaning a seal has failed and water is getting into your lower unit.
- Metal shavings: Small, fine metal particles might be normal wear after a long interval, but larger chunks or significant amounts of glittery material could indicate worn-out gears or bearings.
- Dark, burnt-smelling oil: Usually means the oil has overheated, possibly due to low levels or extreme operating conditions.
I once found water in my own lower unit after a season where I'd been running in shallow areas. The oil had a distinctive milky appearance, and upon further inspection, we found a damaged prop shaft seal, likely from fishing line that had wrapped around the propeller. Instead of just changing the oil, I had to replace the seal—a much bigger job, but one that prevented potentially catastrophic damage. Additional troubleshooting advice is available in microskiff.com's community discussion.
If you find serious contaminants, consult a marine mechanic rather than just refilling.
Refilling Gearcase Oil Details
Once the old oil has completely drained and you've inspected it:
- Replace the old gasket on the drain plug with a new one
- Reinstall the drain plug and tighten it snugly, but do not overtighten
- Attach your lower unit oil pump to the vent opening
- Pump the new marine gear oil into the lower unit
- Keep pumping until you see fresh oil start to come out of the drain opening
- Quickly install the new gasket on the vent plug and screw it in tightly
- Wipe away any excess oil around the drain and vent ports
BoatUS Technical Services advises: "Use a torque wrench if available to tighten drain and fill plugs to specification (typically 60-84 inch-pounds). Hand-tight plus a quarter turn is generally adequate if a torque wrench isn't available, but check your manual to be certain." You can also explore BoatUS expert advice on replacing gearcase lubricant.
Troubleshooting and Tips
Even with the best intentions, sometimes things don't go perfectly, or you might discover issues during the oil change.
How to Detect Failed Seals Using Pressurization and Water Immersion Tests
If you found milky oil, confirm seal integrity using a gearcase pressure testing kit. This kit attaches to the lower unit's fill port and allows you to pressurize the gearcase (typically to 5-15 PSI, check your manual for the correct pressure). Then, immerse the lower unit in water, or use a spray bottle of soapy water, and look for bubbles escaping from around the propeller shaft seals or other potential leak points. Bubbles indicate a seal failure.
Without a pressure tester, you can sometimes get a good indication by observing the oil consistency over time. If it consistently turns milky quickly, a seal issue is likely.
What Oil Discoloration or Smell Indicates About Gearcase Condition
As mentioned, milky or foamy oil almost always indicates water intrusion, often from fishing line snagging the prop shaft seals or simple wear and tear. Water acts as a lubricant briefly but quickly leads to corrosion and damage.
Dark, thick, or tar-like oil with a burnt smell indicates that the oil has overheated. This means the oil has lost its protective qualities, and your gears and bearings aren't being adequately lubricated.
Significant metal particles, especially larger flakes or filings, warn of internal gear or bearing wear. This usually requires disassembly and rebuilding or replacement of the gearcase.
Tips to Avoid Common Mistakes During Oil Changes
Common mistakes include:
- Forgetting to replace drain and vent plug gaskets
- Over-tightening the plugs (can strip threads)
- Using the wrong type or amount of oil
- Refilling through the drain hole instead of the vent hole
Mercury Marine's service bulletin warns: "Disposal of used gear oil must comply with local environmental regulations. Most marinas provide collection facilities. Never dump used oil in waterways or regular trash."
Where to Buy Supplies and Professional Support Options

While I love tackling these DIY tasks, I understand not everyone has the time, inclination, or right tools.
Recommended Suppliers for Marine Gear Oil and Oil Change Kits
For high-quality marine gear oil that meets NMMA FC-W standards, I've had great experiences ordering directly from reputable online marine parts suppliers. Companies like JLM Marine pride themselves on direct factory supply and worldwide shipping, so you can get quality parts and fluids quickly.
Other well-known marine retailers also carry a full range of oils from top brands like Mercury, Yamaha, Quicksilver, and premium synthetics like Lucas Oil or Royal Purple. They often offer convenient oil change kits that bundle the oil, pump, and necessary gaskets.
Overview of Physical and Online Stores Specializing in Outboard Motor Maintenance
Beyond specialized online suppliers, you'll find marine gear oil at most major marine dealer physical stores, tackle shops with a boating section, and even some larger auto parts stores that cater to marine customers. The convenience of talking to someone in person at a local store can be invaluable if you're unsure about the exact type of oil or tools you need.
Online, beyond dedicated parts sites, platforms like Amazon also carry a wide selection, though it's wise to verify the seller and product authenticity.
When to Seek Professional Servicing Versus DIY
You can save significant money by performing your own gearcase oil changes. A DIY change costs around $20-$50 for oil and gaskets, whereas dealer service might charge $75-$150 or more.
However, according to Yamaha's warranty guide: "Regular maintenance can be performed by the owner, but evidence of proper maintenance must be kept in case of warranty claims. Receipts for parts and your maintenance log are sufficient documentation."
There are times when professional help is better:
- If you discover significant metal debris or water contamination
- If your outboard is still under warranty requiring documented professional servicing
- If you're uncomfortable with any part of the process
Community FAQs and Forum Insights

I've spent plenty of time on boating forums, and the topic of lower unit oil changes comes up frequently.
Frequently Asked Questions About DIY Gearcase Oil Changes
How often should I change my gearcase lower unit oil?
Most manufacturers recommend an annual oil change or after every 100 hours of operation, whichever comes first. For boats used extensively in saltwater or under heavy load, inspect the oil more frequently.
What type of oil is best for my outboard motor?
Always use a marine-specific gear oil that meets your outboard manufacturer's recommendations. For most outboard motors, a NMMA FC-W certified SAE 90 or 80W-90 marine gear oil is appropriate.
Can I change gear oil without an oil pump?
It's technically possible but extremely difficult and messy. A dedicated lower unit oil pump is an inexpensive tool that makes the job infinitely easier and cleaner, and it's essential for properly filling the gearcase.
How do I know if my gearcase seal has failed?
The primary indicator is milky or cloudy gear oil when you drain it. This signifies that water has entered the gearcase, which means a seal has failed.
What tools do I need for a gearcase oil change?
You'll need a lower unit oil pump, a wrench or screwdriver for the drain and vent plugs, a drain pan, rags, new gaskets, gloves, and safety glasses.
What does milky or burnt-smelling oil indicate?
Milky oil means water contamination, usually due to a failed seal. Burnt-smelling oil indicates that the oil has overheated, losing its lubrication properties.
Common Community Advice and Tricks for Oil Changes Without Specialized Tools
According to the popular Microskiff forum discussion on lower unit maintenance, some boaters have shared methods involving modified automotive oil pumps or large syringes with custom-fitted tubing for filling when a proper pump isn't available:
"In a pinch, I've used a clean transmission fluid funnel with a long flexible spout, but it's messy and you can't fill completely. Don't skimp on the $15 for a real gear lube pump—it's worth every penny." - Forum user "Backwater"
The consensus among experienced boaters is clear: the small investment in a dedicated lower unit oil pump is worth the ease, cleanliness, and effectiveness it provides.
Reader Success Stories

We'd love to hear about your DIY gearcase maintenance experiences! Submit your story to our community section and share your tips, tricks, or lessons learned with fellow boaters. Your insights could help others save time and money while keeping their boats running smoothly.
About the Author
I've been an avid boater for over 15 years, maintaining everything from small fishing skiffs to cabin cruisers. My background includes certification in marine systems maintenance, and I've owned boats with Mercury, Yamaha, and Johnson/Evinrude outboards. I believe in empowering boat owners to handle their own maintenance when possible, saving money and building confidence in their equipment.
Performing a lower unit gear oil change is one of those maintenance tasks that truly empowers a boat owner. It's a fundamental aspect of outboard motor upkeep, directly impacting performance, longevity, and preventing potentially devastating damage. By understanding the critical role of this specialized lubricant, preparing with the right tools, and following a methodical process, you can confidently tackle this job yourself. Remember, those annual oil changes aren't just routine; they're a proactive investment in your boat's health. For more boating maintenance guides and premium marine parts, check out the JLM Marine home page.
References
[1] BoatTEST.com. "The Lowdown on Lower Unit Lubrication." https://boattest.com/view-news/3511_the-lowdown-on-lower-unit-lubrication
[2] Annapolis Inflatables. "DIY Gearcase Lower Unit Oil Change: A Complete Step-by-Step Guide." https://annapolisinflatables.net/blogs/news/diy-gearcase-lower-unit-oil-change-a-complete-step-by-step-guide
[3] Microskiff.com. "Lower Unit Oil Milky." https://www.microskiff.com/threads/lower-unit-oil-milky.61956/
[4] National Marine Manufacturers Association. "Industry Standards." https://www.nmma.org/industry/standards
[5] BoatUS. "How to Replace Your Engine's Gearcase Lubricant." https://www.boatus.com/expert-advice/expert-advice-archive/2020/november/how-to-replace-your-engines-gearcase-lubricant
[6] JLM Marine. "Marine Parts and Accessories." https://jlmmarine.com/
[7] Len's Cove Lessons in Boating (YouTube). "How to Change Lower Unit Gear Oil." https://www.youtube.com/watch?v=EmFRq1ViJkY