


Diagnosing Tilt and Trim Malfunctions on Outboards

Your tilt and trim won't move, or it's dropping under load. Before you call anyone or order parts, run through these checks. Most failures trace back to a handful of electrical or hydraulic issues you can isolate yourself.
Emergency Manual Release
If you're stuck at the ramp with the engine tilted up and nothing works, look for the manual release valve on the side of the tilt bracket. It's usually a flat-head screw. Turn it counterclockwise a few turns—don't remove it completely—and the hydraulic pressure bleeds off so you can push the engine down by hand. Tighten it back before you drive home. This gets you mobile when the system's dead.
Initial System Checks

Check your battery voltage first. Weak batteries cause every kind of weird behavior. We've diagnosed "bad motors" that turned out to be 10.8V batteries. Use a multimeter—anything under 12.4V static means you're starting behind. Verify your battery switch is on and you're pulling from the correct bank if you run multiple batteries.
Before you touch anything hydraulic, engage the trailering lock or safety leg if your engine has one. Hydraulic systems can drop the engine without warning, and 250 pounds of outboard will crush whatever's underneath.
Electrical Diagnostics: Isolating the Fault
Press the trim switch at the helm. Listen for a click from the solenoid or relay. Most systems have the solenoid mounted near the battery or on the engine bracket.
No click, no sound: Problem is upstream—bad switch, blown fuse, dead solenoid, or corroded wiring between the switch and solenoid.
Click but no motor sound: Solenoid is working, but either the motor's dead, the wiring between solenoid and motor has failed, or there's a hydraulic issue locking it up.
Motor whines but engine doesn't move: Either the coupler between motor and pump sheared, or you've got a hydraulic problem—low fluid, air in the lines, or a stuck ram.
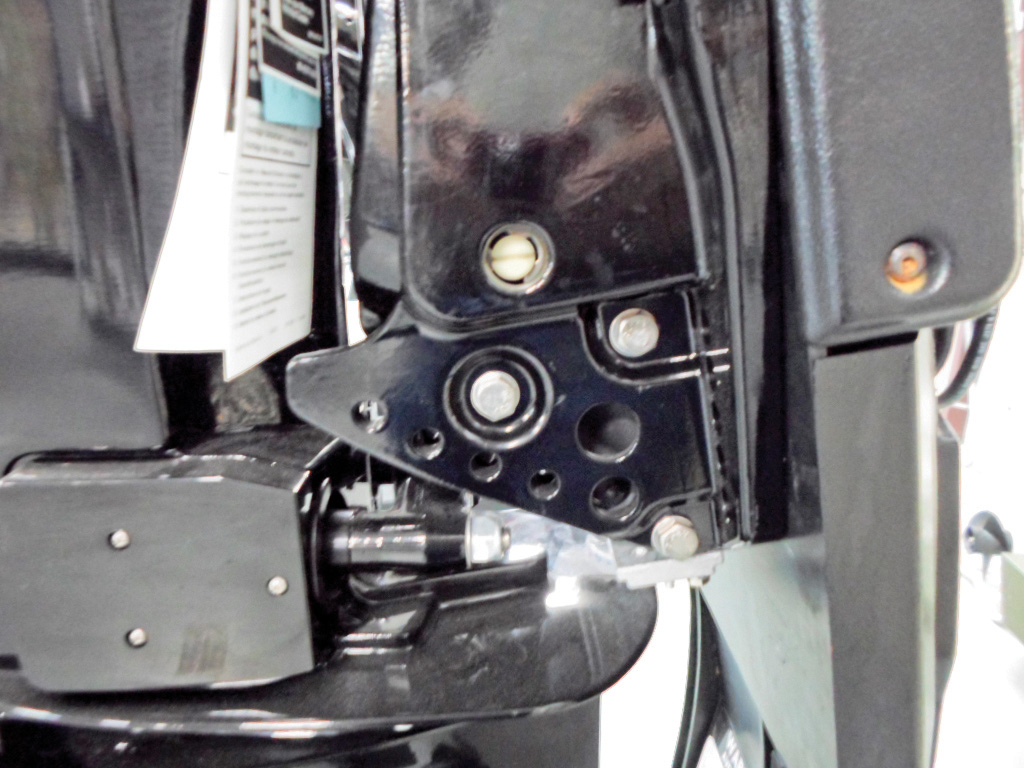
Testing the Tilt Motor Directly
Find the tilt and trim motor. It's bolted to the pump assembly, usually tucked up inside the bracket. Disconnect the wiring harness. You'll typically see a blue wire (up function), green wire (down function), and a red or heavy-gauge wire (main power from solenoid). Older three-wire systems on Johnson/Evinrude may also have a black ground.
Get a pair of 10-gauge jumper wires minimum—thinner wire will overheat under the motor's current draw. Connect your battery positive to the motor terminal that corresponds to the blue wire function, and negative to ground or the motor case. Motor should spin. Repeat for the green wire terminal to test the down function.
Motor spins on direct 12V: Motor is good. Your problem is in the power delivery—bad solenoid, failed relay, corroded plug, or broken wire between the solenoid and motor.
Motor doesn't spin on direct 12V: Motor is dead. Replace it. We've seen them fail from water intrusion, bearing seizure, or the brushes wearing down to nubs after years of use.
Helm Switch vs. Cowling Switch
Many boats have trim switches in two locations: one at the helm and one on the engine cowling. If the cowling switch works but the helm switch doesn't, the problem is the long wire run or the helm switch itself, not the motor or solenoid. Test both before you start tearing into the main harness.
Solenoid and Relay Failures
Solenoids have four posts: two small trigger terminals (from the switch) and two heavy posts (battery in, motor out). When the switch sends 12V to the trigger side, the solenoid clicks and connects the heavy posts internally.
Use your multimeter to check continuity across the heavy posts while someone presses the switch. You should read 0.0 to 0.2 ohms of resistance when it clicks. If you get a click but read high resistance or infinite ohms, the solenoid contacts are burned or corroded inside—replace the solenoid.
Newer Yamaha and Mercury engines use integrated relay packs instead of individual solenoids. These units combine multiple relays in one sealed housing. You can't service them individually. If one relay in the pack fails, you replace the whole assembly.
Trim Limit Switch
Some systems have a trim limit sensor that cuts power if the engine reaches maximum tilt angle. If your engine trims down fine but stops partway when trimming up, and the motor's good, suspect this switch. It's usually a small plunger or contact switch mounted on the tilt tube. Disconnect it to test—if the motor now trims all the way up, replace the sensor.
Corrosion and Ground Failures
Saltwater eats electrical connections. The ground wire fails first because of galvanic corrosion—the motor sits near or below the waterline, and dissimilar metals in saltwater create a battery effect that corrodes the negative path.
Pull every connector in the tilt circuit. Look for green powder (copper corrosion) on saltwater boats or red-brown rust on freshwater rigs. If you see it, disconnect, scrub with a wire brush or contact cleaner, and coat with dielectric grease before reconnecting. If a wire's insulation is cracked or the wire itself is green inside the jacket, cut that section out and splice in new marine-grade tinned copper wire—regular automotive wire will corrode through in months. ABYC E-11 standard covers marine wiring requirements.
Locating and replacing parts like the solenoid or wiring can be easier when sourcing from trusted suppliers; for a wide range of parts, visiting JLM Marine's parts hub ensures you get OEM quality and reliable components.
Fuses
Locate your fuse block or inline fuse holder for the tilt circuit. Pull the fuse and check the metal strip inside. If it's broken, replace it with the exact same amperage rating. If the new fuse blows immediately, you've got a direct short—stop and trace the wiring before you burn something.
Keep spares of every fuse rating your boat uses. A $0.50 fuse shouldn't end your day.
Hydraulic System Diagnostics
Motor spins when jumped, but the engine won't move or it drifts down slowly. You're in the hydraulics now.
Fluid Level Check
Tilt the engine all the way down—this retracts the rams and returns fluid to the reservoir. Find the fill plug on the pump assembly. Remove it and check the level. Most systems have a sight glass or a "full" mark. If it's low, you have a leak. Hydraulic fluid doesn't evaporate.
Top it off with the correct fluid. Some systems take ATF Dexron III or Type F, others need proprietary 0W-30 marine hydraulic fluid like Yamalube. Check your service manual—mixing them causes foaming and cavitation. Don't guess.
Bleeding Air from the System
After adding fluid or replacing any hydraulic component, air gets trapped in the lines. The system won't work right until you purge it.
With the fill cap open, cycle the engine up and down slowly 3 to 5 times. You'll hear gurgling as air escapes. Top off the fluid between cycles. When the sound stops and the motion is smooth, close the cap. If you skip this step, the repair will feel like it failed even though you fixed the actual problem.
Ram Seal Leaks
Inspect the hydraulic rams—the chrome shafts that extend when the engine tilts up. Look for fluid weeping around the shaft where it enters the cylinder body. Check the shaft itself for pitting, scoring, or rust. Even small scratches destroy the seals.
Ram seals fail from:
- UV exposure when stored tilted up
- Saltwater corrosion pitting the chrome
- Dried-out rubber from age
If the shaft is smooth and it's just the seals leaking, you can rebuild the ram. If the shaft is pitted or scored, replace the whole ram—new seals won't hold against a damaged surface.
Replacing Rams or Seals
Rebuilding a ram requires removing the gland nut at the top of the cylinder. This thing is torqued to 80+ ft-lbs and often seized with corrosion. You need a pin spanner wrench that fits the holes in the nut. If it won't budge, heat the cylinder body with a propane torch (not the shaft) to expand the aluminum, then hit it with the wrench and a mallet. We've broken cheap wrenches trying to skip the heat step.
Inside, you'll find the piston, O-rings, and wiper seals. Use Viton or marine-rated O-rings, not hardware store plumbing O-rings—they swell in hydraulic fluid and fail. Consult your service manual for the torque spec on reassembly. Overtightening the gland nut crushes the new seals immediately.
Replacing the entire ram is faster. Aftermarket rams from manufacturers like JLM Marine use the same specs as OEM and often include upgraded anodized coatings for better corrosion resistance. OEM rams work fine, but you're paying extra for the logo. Cheap no-name rams from random sellers often have poor chrome plating or wrong tolerances—they leak within weeks. For parts and quality ram replacements, visit trusted outboard motor parts collections at JLM Marine.
Water Contamination
Pull the fill cap and look at the fluid. If it's milky or cloudy, water got in. This happens from a failed shaft seal or condensation in the reservoir. Water doesn't compress like oil, so the pump cavitates and struggles. Worse, water causes internal rust on the pump impeller, valve seats, and cylinder bores. That rust then circulates as abrasive particles, grinding seals and surfaces.
Drain the system completely, flush it with fresh hydraulic fluid if possible, refill, and bleed. Replace the shaft seals. If the pump was run with water-contaminated fluid for a while, the internal damage might require a pump rebuild or replacement.
Pump and Valve Failures
Fluid level is good, no leaks, motor works, but the engine won't hold position or moves very slowly. The problem is inside the pump—either the check valves that hold pressure or the pump itself is worn.
Pump rebuilds require disassembly, internal inspection, and replacement of valves, springs, and seals. Most guys don't have the tools or the clean workspace to do this without contaminating the system. If you've ruled out everything external, take it to a shop. A pump rebuild usually runs half the cost of a new assembly, but if the housing is cracked or the impeller shaft is scored, you're buying new.
Cavitation Sounds
Electric motor spinning freely (broken coupler): High-pitched whine, no load sound, like a drill with no bit.
Pump cavitating (air in fluid or low fluid): Grinding, rattling, or gurgling noise from the pump, inconsistent. Fluid level fix or bleeding usually clears it.
Pump under load (stuck ram or high resistance): Motor bogs down, slower sound, may hear solenoid clicking on and off as voltage drops under load. Points to mechanical blockage or a seized ram.
Tools You'll Need
- Multimeter (voltage and resistance)
- 10-gauge or heavier jumper wires, at least 3 feet long
- Pin spanner wrench (if rebuilding rams)
- Wrenches and sockets (10mm, 12mm most common)
- Propane torch (for seized fittings)
- Marine-grade dielectric grease
- Wire brush or contact cleaner
- Hydraulic fluid (check your manual for type)
- Funnel or squeeze bottle with hose (reservoirs are usually in tight spots)
For wiring repairs or replacements, it's important to follow marine wiring standards; check the latest guidelines at ABYC and find suitable marine-grade parts in the JLM Marine boat accessories collection.
Common Roadblocks
Manual release valve seized: Hit it with penetrating oil, let it soak, then use a larger screwdriver or an impact driver. If you strip it, you're drilling and retapping.
Stripped mounting bolts on motor or pump: Outboards vibrate. Bolts strip or break. Bring a tap set and helicoil kit if you're working on an older engine.
Intermittent failure—works sometimes, not others: Usually a break in the wire insulation near the tilt hinge point. The wire flexes every time the engine moves, and eventually the copper strands fracture inside the jacket. Splice in a new section with heat-shrink connectors rated for marine use.
Safety Notes
Support the engine physically before disconnecting hydraulic lines or loosening fittings. Use the trailering lock, a wood block, or a jack stand. Hydraulic pressure can drop without warning, and the engine will fall. We've seen guys get hands crushed.
Never bypass a blown fuse with a higher-rated fuse or a piece of wire. The fuse protects the wire from overheating and catching fire. If it blows, there's a reason—find the short.
When to Call a Shop
- Internal pump or valve failures
- Extensive wiring damage you can't trace
- Cracked or leaking pump housing
- If you're uncomfortable working with 12V systems under load
Keep your tilt rams retracted when you store the boat. UV kills rubber seals faster than saltwater does. For other essential motor maintenance and repairs, be sure to explore JLM Marine's main site for quality parts and expert guides.
Hi—I’m Jim Walker
I grew up in a Florida boatyard, earning pocket money (and a few scars) by rebuilding outboard carbs before I could drive. That hands-on habit carried me through a Ph.D. in mechanical engineering, where I studied how salt water quietly murders metal.
I spent ten years designing cooling systems for high-horsepower outboards, then joined JLM Marine as CTO. We bench-test every new part in the lab, but I still bolt early prototypes onto my own 23-foot skiff for a weekend shake-down— nothing beats real wake and spray for finding weak spots.
Here on the blog I share the fixes and shortcuts I’ve learned so your engine—and your day on the water—run smooth.

Для владельцев лодок:
Мы надеемся, что следующие ресурсы окажутся полезными для вас в обслуживании и ремонте ваших судовых двигателей:
- Руководство по серийным номерам Mercury
- Руководства пользователя от Mercury
- Официальное руководство по номерам моделей в формате PDF от BRP
- Руководство по серийным номерам Johnson
-
Аксессуары для лодок от JLM Marine
О компании JLM Marine
Основанная в 2002 году, компания JLM Marine зарекомендовала себя как специализированный производитель высококачественных морских деталей, базирующийся в Китае. Наша приверженность совершенству в производстве заслужила нам доверие ведущих мировых морских брендов.
Как прямой поставщик, мы обходим посредников, что позволяет нам предлагать конкурентоспособные цены без ущерба качеству. Такой подход не только поддерживает экономическую эффективность, но и гарантирует, что наши клиенты получают наилучшую ценность напрямую от источника.
Мы рады расширить свое присутствие через розничные каналы, предлагая наш опыт и приверженность качеству непосредственно владельцам и любителям лодок по всему миру.
Распродажа лодочных аксессуаров
- $54.00
- $54.00
- Unit price
- per
- $38.50
- $38.50
- Unit price
- per
- From $39.13
$45.50- From $39.13
- Unit price
- per


- $53.50
- $53.50
- Unit price
- per
- From $54.00
- From $54.00
- Unit price
- per
- $45.00
- $45.00
- Unit price
- per

- $34.50
- $34.50
- Unit price
- per
- $23.50
- $23.50
- Unit price
- per
-
Red
-
Blue


- $34.50
- $34.50
- Unit price
- per


- $54.00
- $54.00
- Unit price
- per


- $54.00
- $54.00
- Unit price
- per

- $40.00
- $40.00
- Unit price
- per
- $32.00
- $32.00
- Unit price
- per
- $22.80
- $22.80
- Unit price
- per
-
Red
-
Blue
- $22.80
- $22.80
- Unit price
- per
-
Red
-
Blue

- $22.80
$27.00- $22.80
- Unit price
- per

- $31.50
- $31.50
- Unit price
- per


- $54.00
- $54.00
- Unit price
- per


- $59.00
- $59.00
- Unit price
- per

- $22.80
$28.50- $22.80
- Unit price
- per