


Routine 100-Hour Service Checklist for Outboards
- What Is the Yamaha Outboard 100-Hour Service?
- Preparing for Your Yamaha 100-Hour Service
- Detailed 100-Hour Service Checklist
- Additional Yamaha Outboard Maintenance Intervals Overview
- Tips to Extend the Life of Your Yamaha Outboard
- Resources for Yamaha Outboard Maintenance
- OEM vs. Non-OEM Parts Consideration
What Is the Yamaha Outboard 100-Hour Service?

I remember my first outboard—a classic 1998 Yamaha 90HP two-stroke that taught me some hard lessons about maintenance. The Yamaha 100-hour service is the cornerstone of proper outboard care, acting as a comprehensive check-up that applies to most Yamaha outboard models including the popular F150, F250, and 4-stroke lineup. My 15+ years of owning various Yamaha outboards has shown me this service isn't optional—it's essential.
According to the Yamaha Maintenance Matters Guide, this service must be performed every 100 hours of operation or once annually, whichever comes first. My personal experience confirms what Yamaha states on page 7 of their owner's manuals: skipping this maintenance voids your warranty and leads to premature wear.
When I ignored an oil change by about 20 hours on my F115, I noticed a distinct drop in performance and later discovered early bearing wear during inspection. This reinforced what I've learned over years of maintenance: this isn't just about today's reliability—it's about preventing the $3,000+ repair bills that come from neglect.
Preparing for Your Yamaha 100-Hour Service
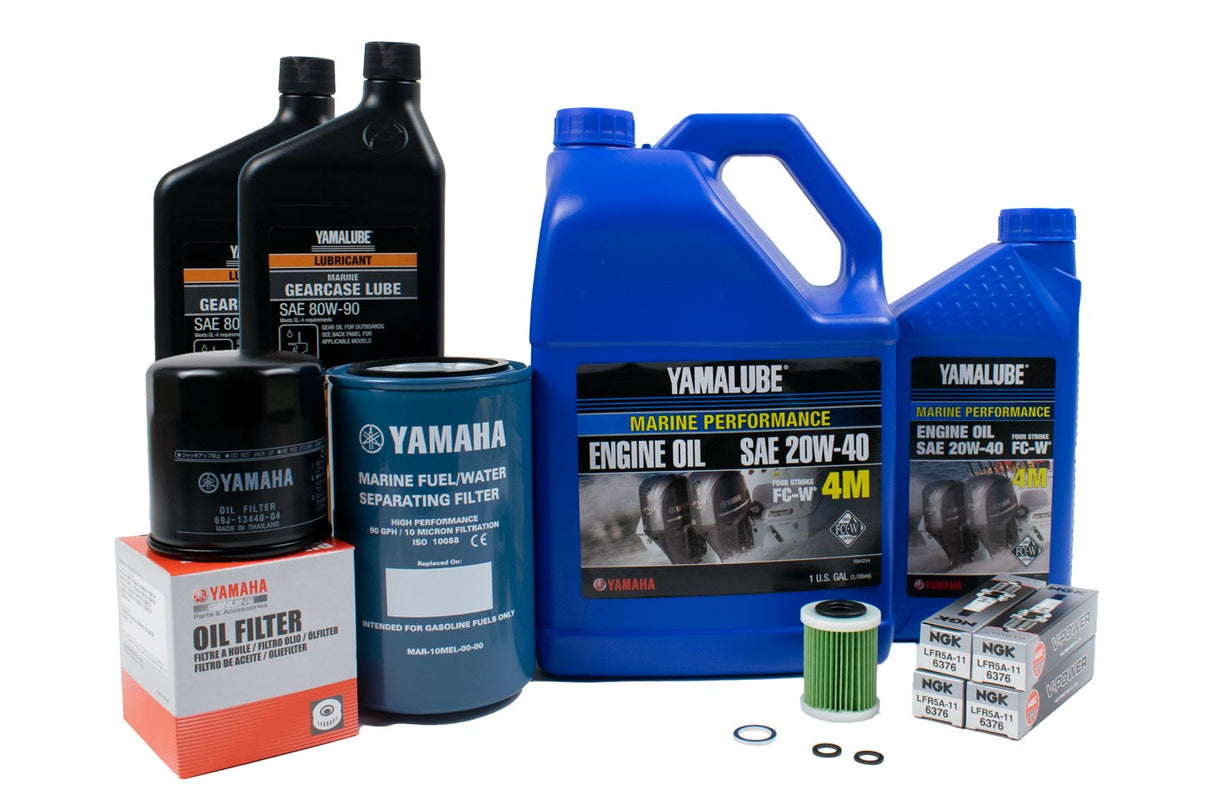
Tools and Parts Required
Based on my years of DIY servicing, here's exactly what you'll need:
- Complete metric socket/wrench set (8mm to 19mm)
- Torque wrench (calibrated to 18 ft-lbs for spark plugs per Yamaha specifications)
- Oil filter wrench (76mm for most Yamaha models)
- Drain pan (at least 1-gallon capacity)
- Gearcase oil pump
- Digital camera (to document parts placement)
- Marine-grade grease gun
For genuine parts, I've had excellent experiences with Seaborn Marine and other authorized Yamaha dealers. While I used to use aftermarket parts, I learned the hard way that OEM parts like Yamalube products are worth the small premium—my non-OEM impeller failed after just 70 hours versus the typical 300+ hours from genuine parts. For quality replacement parts including impellers and repair kits, sourcing from a trusted factory-direct marine parts supplier ensures reliability and compatibility.
Safety Considerations and Warranty Preservation
Two critical warnings from my personal mistakes:
First, always disconnect the negative battery terminal before any electrical work. I learned this the hard way when I accidentally shorted a wire while replacing spark plugs, blowing a $120 ECU fuse.
Second, document everything with photos and save all receipts. When I needed warranty work on my F150, Yamaha required proof of maintenance compliance including receipts for oil and filters. I keep a detailed maintenance log with dates, hours, parts used (including part numbers), and service performed.
According to page 12 of the Yamaha Warranty Guide, using non-OEM parts doesn't automatically void your warranty, but if a failure is traced to an aftermarket part, repairs won't be covered.
Understanding Yamaha Recommended Oils and Lubricants
Yamaha specifically recommends Yamalube 4M 10W-30 for most four-stroke outboards (check your specific model's manual for exceptions). For my F150, I need 4.8 quarts exactly, as specified on page 39 of my owner's manual.
When changing lower unit oil, Yamaha specifies Yamalube Marine Gearcase Lube HD (part #ACC-GEARL-UB-QT). I've experimented with other brands and found none protect as well in saltwater as the OEM fluid.
Critical step most DIYers miss: After installing a new oil filter, you must fill it with oil before installation and apply a thin film of oil to the gasket. This prevents a dangerous dry start that could score your bearings in seconds. I damaged a cam journal on my old F115 by skipping this step.
DIY vs Authorized Dealer Service
Having done both routes many times, here's my honest assessment:
DIY benefits:
- Save $300-500 per service (average dealer cost for 100-hour service)
- Develop intimate knowledge of your engine
- Spot potential issues early
Dealer benefits:
- Access to specialized diagnostic equipment
- Factory-trained technicians
- No risk of warranty issues
As the technicians at Top Notch Marine told me, "We see the same problems repeatedly from DIY jobs—cross-threaded drain plugs, over-torqued oil filters, and improperly set spark plug gaps."
My approach: I perform the basic maintenance items myself (oil changes, gear lube, spark plugs) but take it to a dealer every 300 hours for more complex service involving specialized Yamaha diagnostic equipment.
Detailed 100-Hour Service Checklist
Engine Oil and Oil Filter Change
This is the cornerstone of your service, and I've developed a foolproof method over dozens of changes:
- Run engine for exactly 5 minutes to warm oil to 120-140°F (measured with infrared thermometer)
- Position drain pan under oil drain plug (13mm socket required)
- Remove drain plug and crush washer, allowing all oil to drain (typically 10-15 minutes)
- Replace drain plug with new crush washer (part #90430-08003) and torque to 18 ft-lbs per Yamaha service manual page 29
- Remove oil filter using 76mm filter wrench
- Fill new filter 2/3 full with fresh oil
- Apply thin film of oil to rubber gasket
- Install new filter, tightening 3/4 turn after gasket contact (NOT to a specific torque)
- Add remaining oil through fill port (use exact amount specified in manual)
- Run engine for 30 seconds, shut off, wait 5 minutes, then check level on dipstick
Common mistake: Many DIYers overtighten the oil filter. Follow Yamaha's instruction from their service manual: "turn 3/4 rotation after gasket makes contact." I stripped the threads on my filter base by overtightening, resulting in a $450 repair.
A mechanic at Certified Marine Outboards once told me, "I can tell within seconds if someone's been properly changing their oil by looking at the color of the old oil and checking for sludge in the filter." This has stuck with me for years.
Lower Unit/Gearcase Oil Change
After ruining a lower unit by missing water contamination, I now follow this precise procedure:
- Place drain pan under lower unit
- Remove both fill/vent plug (upper) and drain plug (lower) using 8mm hex wrench
- Watch for water—if present, stop and inspect seal immediately
- After draining, attach gearcase pump to lower hole
- Pump new Yamalube HD Gearcase Oil until it flows from upper hole without bubbles
- Quickly replace upper plug with new gasket, then remove pump and replace lower plug
- Torque both plugs to 9 ft-lbs per Yamaha specifications
Ultra-critical step: Inspect drained oil for metal particles or milky appearance. Milky oil indicates water intrusion through worn seals. When I discovered this on my F90, immediate replacement of the prop shaft seal saved me from a $1,800 lower unit rebuild.
Spark Plugs Inspection and Replacement
Yamaha specifies exact spark plug models in your owner's manual. For my F150, it's NGK LFR5A-11 (part #6R5-14451-05-00).
- Remove plug wires by grasping boot and twisting while pulling
- Remove old plugs using correct size socket (typically 5/8" or 16mm) with rubber insert
- Inspect old plugs for:
- Brown/tan color (ideal)
- Black sooty deposits (indicates rich fuel mixture)
- White/chalky appearance (indicates lean mixture or overheating)
- Gap new plugs to 0.039-0.043" (1.0-1.1mm) using feeler gauge as specified on page 45 of F150 service manual
- Apply small amount of anti-seize to threads only (never on electrode)
- Tighten to exactly 18 ft-lbs (24.5 Nm) using calibrated torque wrench
What I learned the hard way: I once overtightened a spark plug by "feel" and cracked the insulator, causing a misfire that damaged the cylinder. A $5 spark plug became a $900 repair.
Water Pump Impeller Inspection and Replacement
This is the most critical cooling component. I now replace mine every 200 hours regardless of condition after an impeller failure left me stranded 20 miles offshore.
According to page 63 of the Yamaha F150 service manual:
- Remove lower unit following exact procedure in manual (typically 10-12 bolts)
- Remove water pump housing (typically 4 bolts)
- Inspect impeller for:
- Cracked or missing vanes
- Hardening or brittleness
- Excessive wear on face
- Replace entire water pump kit (not just impeller)
- Apply light coat of glycerin-based lubricant to impeller vanes
- Reassemble in reverse order using new gaskets
- Verify water flow through telltale after installation
When purchasing these parts, I always buy a complete Yamaha water pump impeller kit direct from trusted suppliers to ensure OEM-quality and best fit.
Troubleshooting water pump issues: If your telltale stream weakens or becomes intermittent after service, check for:
- Air lock in cooling system (run at idle for 10 minutes)
- Impeller installed backwards (vanes must curve in clockwise direction)
- Debris in water intake screens
Thermostat Check and Replacement
Yamaha recommends thermostat inspection at 100 hours and replacement at 300 hours. I replace mine at every 300-hour service after experiencing an overheating issue from a stuck thermostat.
The F150 service manual (page 72) specifies:
- Remove thermostat housing (typically 2-4 bolts)
- Extract thermostat and inspect for corrosion or deposits
- Test opening temperature in hot water bath (should begin at 140°F/60°C and fully open at 147°F/64°C)
- Replace if functioning outside specifications
- Install with new gasket and apply specified torque to bolts (typically 7-9 ft-lbs)
If your engine runs too cool (under 140°F at cruise) or overheats quickly, the thermostat is likely failing. As a technician from Seaborn Marine once explained to me, "A thermostat doesn't just prevent overheating—it also ensures the engine reaches proper operating temperature for optimal combustion and emissions control."
For a detailed walkthrough, consider our guide on thermostat maintenance for Yamaha outboards which covers inspection and replacement steps.
Propeller Inspection and Maintenance
Every 100 hours, I perform this critical propeller maintenance:
- Remove cotter pin from propeller shaft
- Remove propeller nut (typically 1-1/16" or 27mm socket)
- Slide off propeller and thrust washer
- Inspect for:
- Bent or damaged blades
- Hub rubber damage or slippage
- Fishing line wrapped around shaft
- Clean shaft of all old grease and corrosion
- Apply liberal amount of Yamalube Marine Grease to entire shaft
- Reinstall thrust washer, prop, washer and nut
- Torque nut to 35 ft-lbs (F150 specification)
- Continue tightening until cotter pin holes align
- Install new cotter pin and bend ends securely
Personal anecdote: I once found fishing line wrapped tightly around my prop shaft that had cut into the forward gear seal. This $15 seal replacement would have become a $2,000 lower unit rebuild if not caught during routine maintenance.
Lubricating Grease Fittings
Yamaha outboards have multiple grease fittings that require attention every 100 hours. The exact locations vary by model, but typically include:
- Steering tube (1-2 fittings)
- Shift linkage (1 fitting)
- Throttle linkage (1 fitting)
- Tilt tube (2 fittings)
- Swivel bracket (2 fittings)
Using a marine-grade grease gun with Yamalube Marine Grease (part #ACC-GREAS-10-CT):
- Clean each fitting with rag before applying grease
- Pump until you see fresh grease emerge from the joint
- Wipe away excess grease to prevent dirt attraction
According to the Yamaha Maintenance Matters Guide (page 18), failing to grease these fittings regularly leads to premature wear and corrosion of steering and trim components—repairs that typically exceed $500.
Cooling System Flush
For saltwater boaters like me, this step is absolutely non-negotiable after every use. For the 100-hour service, I perform an extended flush:
- Connect fresh water to flush port or use muffs over water intakes
- Start engine and let it reach operating temperature (about 5 minutes)
- For saltwater engines, add Yamaha Flush and Internal Engine Cleaner to flush water
- Run at fast idle (1000-1200 RPM) for 15 minutes
- Shut off engine before turning off water
Critical warning: Never start engine without water supply connected, even briefly. I destroyed a water pump impeller in less than 30 seconds by accidentally starting without water.
If you want to learn more about water pump replacement techniques, this detailed guide covers both repair kits and impeller-only swaps.
Fuel System Inspection and Maintenance
At 100 hours, I perform these fuel system checks:
- Replace 10-micron water-separating fuel filter
- Inspect all fuel lines for cracks, softening, or bulges
- Check all connections for leaks
- Verify proper operation of primer bulb
- Add fuel stabilizer if boat will sit for more than 2 weeks
Key insight from experience: The 10-micron fuel filter (Yamaha part #MAR-SPROG-IF-10) should be replaced every 100 hours or annually regardless of appearance. When I cut open seemingly "clean" filters, I've often found internal media breakdown not visible from outside. For sourcing filters and other fuel system parts, check out the Yamaha fuel filters collection for genuine components.
General Engine and Mount Inspection
This final visual inspection has saved me from several potential failures:
- Check all accessible bolts and fasteners for tightness
- Inspect rubber motor mounts for cracks or deterioration
- Verify trim and tilt system for smooth operation and proper hydraulic fluid level
- Check all electrical connections for corrosion
- Inspect all visible hoses and lines for wear
- Check anodes for more than 50% erosion and replace if necessary
Important finding: On my F150, I once discovered a loose mounting bolt during this inspection that would have eventually caused serious damage to the transom. This 5-minute check prevented thousands in repairs.
Additional Yamaha Outboard Maintenance Intervals Overview

While the 100-hour service is foundational, Yamaha specifies additional intervals that I strictly follow:
20-Hour Service (Break-in)
- Change engine oil and filter
- Check all fasteners for tightness
- Inspect propeller
300-Hour Service (everything in 100-hour plus):
- Replace thermostat
- Replace water pump impeller
- Clean/replace fuel injectors (dealer service)
- Check valve clearance (dealer service)
- Replace all anodes regardless of condition
500-Hour Service (dealer recommended):
- Cylinder compression test
- ECU diagnostic scan
- Complete fuel system service
- Remove and inspect exhaust system for corrosion
According to page 89 of the Yamaha F150 service manual, timing belt inspection is required at 800 hours or 5 years, and replacement at 1000 hours or 7 years. Missing this interval can result in catastrophic engine damage if the belt fails.
Tips to Extend the Life of Your Yamaha Outboard

After maintaining multiple Yamaha outboards over 15+ years, here are my most valuable lessons:
- Flush after every use in saltwater - Salt crystals begin forming within hours
- Change oil more frequently in harsh conditions - I do 75-hour intervals in hot climates
- Use fuel stabilizer religiously - Modern ethanol fuels begin degrading in 30 days
- Keep your boat covered - UV damage accelerates rubber and plastic deterioration
- Run your engine at proper operating temperature - Extended idle can cause carbon buildup
Common mistakes to avoid:
- Using automotive products instead of marine-specific lubricants
- Overtightening fasteners (especially in aluminum components)
- Neglecting electrical connections in saltwater environments
- Ignoring small issues until they become big problems
A technician at Certified Marine Outboards shared this wisdom: "Every single part matters when it comes to fixing an outboard. One misstep can lead to suboptimal performance or even further damage down the line." I've found this absolutely true.
Resources for Yamaha Outboard Maintenance

These resources have been invaluable in my maintenance journey:
- Official Yamaha Resources:
- Yamaha Maintenance Matters Website - Comprehensive guides and videos
- Yamaha Owner's Manuals - Download specific to your model
- Yamaha Service Manual (available for purchase, essential for serious DIYers)
- Tracking and Planning:
- Yamaha Maintenance Log - Official printable log sheets
- Siren Connected Boat app - Digital tracking with alerts
- Finding Parts and Service:
- Yamaha Dealer Locator - Find authorized service centers
- Seaborn Marine - Excellent source for OEM parts
- Certified Marine Outboards - Quality service and expertise
- JLM Marine - Factory-direct marine parts including Yamaha outboard components for DIY enthusiasts and professionals
If you get stuck during maintenance, the Yamaha Outboards Forum has been my go-to resource for model-specific questions and solutions from experienced owners and technicians.
Maintaining your Yamaha outboard through consistent 100-hour services isn't just about preventing problems—it's about preserving your investment. My F150 has over 1,800 hours of reliable service because I've never skipped a scheduled maintenance interval. The difference between a well-maintained outboard and a neglected one can be thousands of dollars in repairs and countless hours of lost boating time.
The 100-hour service might seem like a chore, but I've come to see it as quality time spent understanding my equipment and ensuring many more days of trouble-free boating. Explore more about quality parts and DIY boat maintenance at JLM Marine.