


Mercury 4-Stroke Oil Change Tutorial
- What Is Mercury FourStroke 100-Hour Maintenance?
- Tools and Materials Needed for Oil and Filter Change
- Step-by-Step Oil Change Process
- Gear Oil Maintenance and Inspection
- Fuel Filter and Water Separator Service
- Additional 100-Hour and One-Year Maintenance Tasks
- Tips for Winterization and Preventive Care
- When to Seek Professional Service
- Conclusion
What Is Mercury FourStroke 100-Hour Maintenance?

As a boater, I know the feeling of dread mixed with satisfaction when it's time for routine maintenance. It's a necessary evil, a way to keep that powerful Mercury FourStroke humming along smoothly. The good news is that understanding and performing the 100-hour, or annual, service on your outboard isn't as daunting as it might seem at first glance. In fact, I've come to see it as a crucial part of simply enjoying my time on the water, rather than worrying about my engine. This comprehensive service interval is Mercury Marine's recommended check-up, designed to ensure your engine remains reliable, efficient, and protected against premature wear.
The core of this maintenance is typically performed every 100 engine hours or annually, whichever comes first, as clearly specified in Mercury's official service documentation. This regular attention is absolutely vital for several reasons. Firstly, it's the key to maximizing your engine's longevity. Fresh oil lubricates better, clean filters prevent restriction, and proper gear oil ensures smooth operation. Secondly, sticking to this schedule is often a requirement for maintaining warranty compliance. According to Mercury's warranty terms, "Failure to perform scheduled maintenance as described in the Operation and Maintenance Manual can result in warranty coverage denial" Mercury Marine Warranty Manual. Skipping this can leave you footing the bill for repairs that might otherwise be covered. Finally, and perhaps most importantly for any boater, it drastically improves reliability. Nothing spoils a day on the water faster than an unexpected mechanical issue, and proactive maintenance like this is your best defense. To explore more about maintaining your marine equipment and parts, you can visit our JLM Marine hub.
Tools and Materials Needed for Oil and Filter Change

Before you dive in, let's make sure you're equipped. I've found that having all your supplies ready beforehand makes the entire process go so much smoother. Trust me, the last thing you want is to be halfway through and realize you're missing a crucial tool or the right type of oil.
For a standard Mercury FourStroke oil and filter change, you'll generally need:
- Oil Filter Wrench: Mercury outboards often use specific-sized filters. A good quality oil filter wrench that fits snugly is essential for removal and proper installation.
- Drain Pan: You'll need a pan large enough to hold all the old oil from your engine. Make sure it's sturdy and won't tip over easily.
- Rags and Paper Towels: Plenty of these will be your best friend for cleaning up spills, wiping down components, and ensuring a clean work area.
- Socket Wrench and Socket: For the oil drain plug. The size can vary, but a 5/8-inch socket is common for many Mercury models https://www.youtube.com/watch?v=NUbKCffB2lU.
- New Oil Filter: Always use a Mercury Precision Parts filter or a high-quality aftermarket equivalent specifically designed for your outboard model. Using the right filter is non-negotiable for engine health.
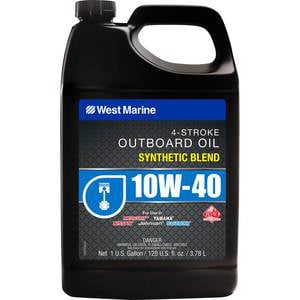
- Mercury FourStroke Engine Oil: This is where consulting your owner's manual is paramount. Mercury recommends specific viscosities and types like 10W-30, 25W-40, or 25W-50, depending on your engine and operating climate https://www.mercurymarine.com/us/en/lifestyle/dockline/guide-to-precision-oils-and-lubricants. I personally find using the Mercury-branded oil provides peace of mind, knowing it's formulated for their engines.
- Gloves: Nitrile or latex gloves will protect your hands from oil and grime.
- Optional: Siphon Pump or Extractor: Some boaters prefer using a pump to extract oil from the dipstick tube rather than using the drain plug. I find the drain plug method more thorough for a full oil change, but a good siphon can be handy for messy situations or if the drain plug is difficult to access.
When it comes to safety, always work in a well-ventilated area. If your boat is on a trailer, ensure it's on stable ground. If it's in the water, make sure the boat is securely moored. Personal protective equipment, like gloves and eye protection, is always a good idea.
Step-by-Step Oil Change Process
Alright, let's get down to business. I find a methodical approach is best. Warming up the engine first, as the manual often suggests, helps the oil flow more easily, making for a cleaner drain.
Preparing the Engine
First things first, I like to run the engine for about 5-10 minutes to bring the oil up to a slightly warmer temperature. This makes it much less viscous and helps any contaminants stay suspended so they drain out with the old oil. Then, I'll tilt the engine up slightly, let it sit for a minute to let the oil collect towards the drain, and then lower it back to a vertical position. This ensures you're draining from the lowest point. If your boat is on a trailer, making sure it's on a level surface is key.
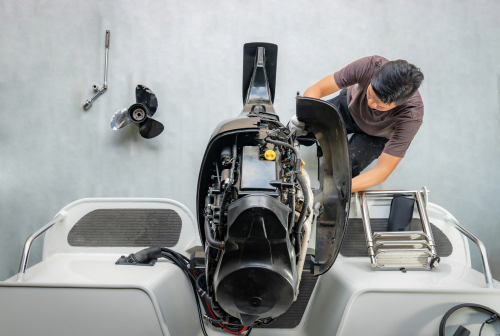
Removing the Cowling and Loosening Latches
Most Mercury FourStroke outboards require removing the main engine cover (the cowling) to access the oil fill cap and dipstick. These usually have a simple latch or clip system. I always check that the latches are securely fastened after reinstallation.
Draining Oil Using Drain Screw or Vacuum Extractor
I personally prefer the drain screw. It's the most direct way to get all the old oil out. I place my drain pan directly underneath the oil drain plug – usually located at the very bottom of the engine's engine oil pan. Using the correct socket wrench (often a 5/8-inch), I carefully loosen and remove the plug. Be ready, as the oil will start to flow out immediately! Let it drain completely; patience here pays off for a thorough job. I always inspect the drain plug and its gasket. It's usually wise to replace the drain plug gasket with a new one to ensure a good seal and prevent leaks. Some sources even recommend slightly lubricating the threads of the drain plug before reinstallation.
Now, about the vacuum extractor for those who prefer it: it's a cleaner method as it avoids removing the drain plug potentially, but it can sometimes leave a bit of residual oil in the sump. The key is to get the extractor tube down the dipstick hole as far as it will go.
Removing and Replacing the Oil Filter
Once the oil is mostly drained, you'll tackle the filter. It's usually located either on the side of the engine block or on the bottom. Place some rags underneath it, as there will still be some oil trapped inside the filter and the connection point. Use your oil filter wrench to loosen the old filter. Once it's loose, unscrew it by hand.
Before installing the new filter, I always take a clean rag and wipe down the filter mounting surface on the engine block, ensuring no old gasket material is stuck there. This is crucial for a good seal. Then, I take my new Mercury Precision Parts oil filter and, here's a pro tip: dip my finger into some fresh oil and lubricate the rubber gasket on the new filter. This helps it seal properly and makes future removal easier. I then screw the new filter on by hand until the gasket makes contact with the engine block. From there, Mercury generally recommends tightening it an additional 3/4 to one full turn. Avoid overtightening, as this can damage the gasket and make removal a nightmare next time.
I always like to label the new filter with the date and the engine hours when I installed it. It's a small step, but it helps me keep track of when the next change is due without having to dig through my service logs.
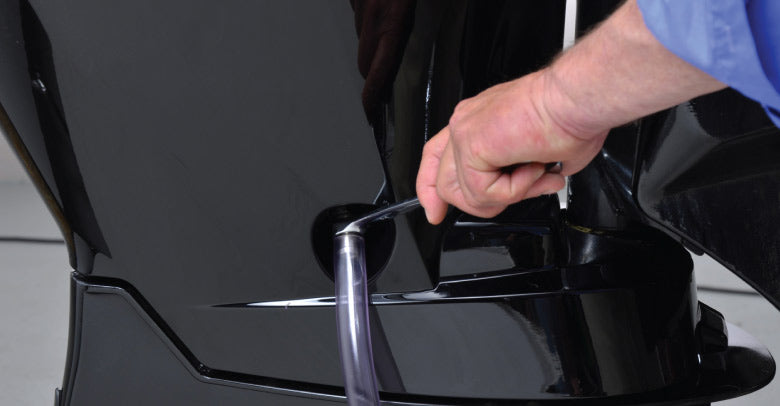
Refilling with Correct Oil Quantity and Checking Level
Now for the fresh stuff! With the drain plug securely reinstalled (and its new gasket in place) and the new filter hand-tightened, it's time to fill. Carefully place a funnel in the oil fill port. Consult your owner's manual for the exact oil capacity for your specific Mercury FourStroke model. For instance, larger models like a Mercury 150hp might require around six quarts of oil https://www.youtube.com/watch?v=NUbKCffB2lU. Using the wrong amount can harm your engine, so always verify. I like to add about half a quart less than the total capacity, let it settle for a minute, and then begin carefully checking the oil level with the dipstick. Add small amounts of oil at a time, rechecking the dipstick frequently until you reach the 'full' mark on the dipstick. Never overfill.
Proper Disposal of Used Oil and Filters
This is something I take very seriously. Used motor oil is a hazardous waste. According to the EPA, "Used oil from one oil change can contaminate one million gallons of fresh water" https://www.epa.gov/recycle/managing-reusing-and-recycling-used-oil. Never pour it down a drain or into the ground. I personally take my used oil and old filters to my local auto parts store or a designated recycling center. Check with your local authorities for proper disposal guidelines in your area; many municipalities have specific collection points. It's our responsibility to keep our waterways clean, and this is a simple way to do it.
Additional Tips for Oil Change
It's always wise to be aware of what your used oil is telling you. If you notice a milky appearance, it could indicate water contamination, which is a serious issue. A strong gasoline smell might suggest fuel is getting into your oil, possibly due to worn piston rings or injector problems. In such cases, I'd highly recommend using an oil analysis kit, like those from Blackstone Labs, to get a professional opinion on your engine's health.
When it comes to preventing spills, lay down some absorbent pads or old towels before you start. If you do make a mess, clean it up immediately, especially any oil that might have splashed onto the exterior of the engine, as it can attract dirt and grime.
Gear Oil Maintenance and Inspection

Beyond the engine oil, I never overlook the gear oil in the lower unit. The gearcase is like the transmission of your outboard, and its lubricant is critical for smooth operation and protection.
The importance of gear oil cannot be overstated. It lubricates the gears, bearings, and other moving parts within the lower unit, allowing them to withstand immense forces and operate efficiently. Without proper lubrication, you're looking at rapid wear, potential gear damage, and catastrophic failure.
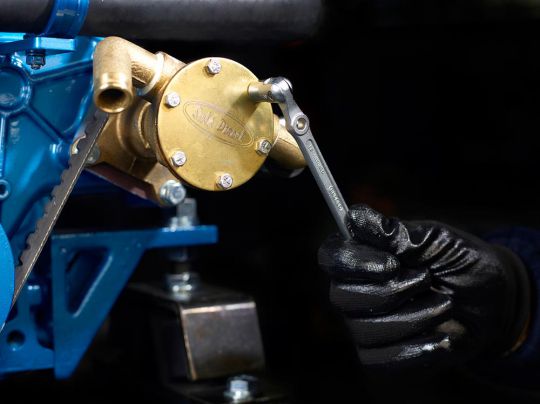
The procedure to drain and refill gear oil is generally straightforward. First, you'll need to locate the drain and vent screws on the lower unit. The drain screw is typically at the very bottom, while the vent screw is higher up, often near the anti-ventilation plate. Place your drain pan underneath the drain screw. Remove both the vent screw and the drain screw. Mercury typically uses a proprietary gear lube, and you'll want to use the specific type recommended in your owner's manual.
Using a specialized gear lube pump, you'll insert the pump nozzle into the bottom drain hole and pump the fresh gear oil upwards until it starts to flow steadily out of the vent hole. This indicates the gearcase is full. Once you see oil coming out of the vent, quickly replace the vent screw, then remove the pump and immediately replace the drain screw. This method ensures that the oil fills from the bottom up, pushing any old, contaminated oil out the vent and preventing air pockets.
Identifying water contamination or metal shavings in the old gear oil is your primary goal here. If the old oil looks milky or has a foamy appearance, water has entered the gearcase. Check the drain and vent screws themselves; they often have screens or magnets designed to catch metal particles. A few tiny metal shavings might not be a cause for alarm, as they can be normal wear. However, if you find significant amounts of metal shavings, or especially larger chunks, it's a strong indicator of internal gear damage and signals a need for professional service immediately.
Mercury generally recommends a gear oil change interval at the same time as the engine oil change, so every 100 hours or annually. However, if you detect contamination sooner, you should drain and refill the gear oil immediately. For more on water pump care and related maintenance, check our detailed guide on How to Replace a Mercury Outboard Water Pump Impeller—如何更换水星舷外机的水泵叶轮.
Fuel Filter and Water Separator Service

Given how crucial fuel delivery is, I always make sure to address the fuel system components during my 100-hour service. This usually involves servicing the fuel filter and, more importantly, the water separator.
The fuel/water separator filter is designed to trap any moisture or sediment that might be present in your fuel supply before it reaches the engine's sensitive fuel injection system. This is vital for preventing corrosion and ensuring smooth engine operation.
The step-by-step fuel filter replacement instructions will vary slightly depending on your engine model. Usually, you'll find the fuel filter housing located somewhere accessible, often near the engine or on the boat's fuel line. Before you start, it's wise to relieve fuel pressure if your system has it. Then, place a shop rag or small pan underneath the filter to catch any residual fuel. Unscrew the old filter, making sure to catch any drips. Clean the mounting surface, apply a little bit of oil to the gasket of the new filter, and screw it on hand-tight, followed by a quarter-turn. Crucially, after replacing the filter, you'll need to pump the primer bulb (if your system has one) until it feels firm, or cycle the ignition if it's an electronic fuel system, to repressurize the fuel lines and purge any air.
For Verado models, the fuel system is pressurized, and it's often recommended that the fuel filter and water separator maintenance be handled by a dealer. According to Mercury Marine Technical Service Bulletin #2003-13, "Verado fuel systems operate under higher pressure than standard outboards and require specialized tools and training for proper service." This is due to the higher pressures involved and specific procedures required to ensure proper sealing and system integrity. Always check your owner's manual or consult a certified Mercury technician for Verado-specific fuel system service.
I also find that using fairly regular fuel additives can help keep the fuel system clean and prevent issues, especially if you have fuel that sits for extended periods. For high-quality fuel filters and water separators, consider browsing our Fuel Filter collection for genuine parts.
Additional 100-Hour and One-Year Maintenance Tasks
While the oil and filters are often the star of the show, the 100-hour service is the perfect time to tackle a range of other vital checks that will keep your Mercury FourStroke running like the day it was built. I've learned over the years that these smaller tasks collectively make a huge difference in overall engine health and reliability.
Here's what else I typically look at:
- Water Pump and Impeller Inspection/Replacement Recommendations: The impeller is a critical component of your outboard's cooling system. It's essentially a rubber fan that pumps water through the engine to keep it from overheating. Mercury generally recommends inspecting the impeller every 100 hours or two years, and replacing it every 100 hours or three years, or sooner if you notice reduced water flow. According to Mercury Marine Service Bulletin #2005-8, "Impeller failure is one of the most common causes of engine overheating and can lead to serious powerhead damage." A worn impeller can lead to severe engine damage from overheating. It's a job I don't shy away from, and the peace of mind is immense. To learn more, see our in-depth Water Pump Repair Kit vs. Impeller Only: What Does Your Outboard Need? article.
- Spark Plug Inspection and Replacement Criteria: Over time, spark plugs can wear out, affecting combustion efficiency and engine performance. During the 100-hour service, I pull the spark plugs to inspect them. I look for signs of wear on the electrodes, oil fouling, or carbon buildup. If they look worn or fouled, I replace them. Even if they look decent, it's often inexpensive insurance to replace them at this interval. You can learn a lot about your engine's internal health by looking at the spark plugs.
- Cleaning and Lubricating Seals and Latches: I always take a moment to thoroughly clean and lubricate all exterior seals, hinges, and latches on the cowling and any other access points. A light coat of marine-grade lubricant prevents them from sticking or corroding, making future access much easier.
- Battery Terminal Maintenance and Corrosion Prevention: A strong battery is the heart of your boat's electrical system. I always check the battery terminals for any signs of corrosion. If I see any white or bluish powder, I clean it off thoroughly with a wire brush and apply a dielectric grease or a terminal protector. Ensuring clean, tight connections is vital for reliable starting and powering all your onboard electronics.
- Inspecting Power Trim and Tilt Systems: I'll cycle the power trim and tilt system several times, listening for any unusual noises and checking that the fluid level is adequate if there's a visible reservoir. I also inspect the hydraulic lines for leaks.
- Cooling System Outflow Inspection: It's essential to check the tell-tale water stream when the engine is running. A strong, consistent stream indicates that the cooling system is working correctly. If the stream is weak or intermittent, it could signal a blockage or a problem with the water pump.
- Fuel Storage and Quality Best Practices: Beyond the filter, it's good to think about fuel quality. If the boat is going to sit for an extended period, using a fuel stabilizer is a must. Keeping the fuel tank as full as possible also helps reduce condensation.
Tips for Winterization and Preventive Care
As the boating season winds down, proper winterization is absolutely key to protecting your Mercury FourStroke engine from the damaging effects of cold weather and inactivity. I consider winterization not just about protecting the engine, but about ensuring a smooth start to the next season.
The importance of a winter oil change is significant. By changing the oil before storage, you remove any corrosive acids and contaminants that have built up throughout the season. If left in the engine, these can eat away at internal metal components during the cold months. So, performing the oil change as part of your fall maintenance routine is highly recommended.
To avoid moisture buildup and corrosion during storage, it's vital to fog the cylinders with a marine fogging oil. This displaces any residual moisture inside the cylinders and coats the internal surfaces with a protective lubricant. You'll typically spray this into the spark plug holes while the engine is running at a higher idle until it starts to sputter, then shut it off immediately.
Other crucial steps include ensuring the fuel system is treated with a stabilizer and the tank is filled, which, as I mentioned, minimizes condensation. Also, thoroughly flushing the cooling system with fresh water to remove any salt or sediment, and draining all water from the cooling passages, is critical. If your engine has external water pickups, ensure they are clear.
The mention of seal lubrication and battery care for off-season is also something I pay attention to. Greasing exterior seals and hinges on the cowling and checking battery terminals for corrosion and ensuring the battery is charged (or stored in a cool, dry place and periodically charged) will prevent a lot of headaches come spring.
When to Seek Professional Service
While I'm a big proponent of DIY maintenance, I also firmly believe in knowing your limits and when to call in the experts. There are certain tasks that, due to complexity, specialized tools, or safety concerns, are best left to Mercury dealership-trained technicians.
Tasks best handled by a dealer or certified technician often include major component repairs, stern drive lower unit service, critical engine diagnostics that require proprietary software, or any situation where you feel unsure or lack the proper tools or expertise. For instance, if you suspect a serious internal engine issue like low compression or a damaged powerhead, that's definitely a job for the pros.
Mercury dealerships offer a range of services, including computer diagnostics that can read fault codes and provide detailed performance data from the engine's ECM (Engine Control Module). According to Mercury's service manual, "The Computer Diagnostic System (CDS) requires specific software and hardware that is only available to authorized Mercury dealers." They also have the equipment to perform accurate compression tests and other specialized checks that give a deep insight into the engine's health.
The benefits of professional service alongside your DIY tasks are significant. You can confidently handle the routine oil changes, filter replacements, and simpler checks yourself, saving money and gaining valuable knowledge. However, knowing when to hand over the reins for more complex diagnostics or repairs ensures that these critical tasks are performed correctly and safely, ultimately protecting your investment and ensuring the longevity of your Mercury FourStroke outboard. It's a partnership between your own hands-on care and the specialized expertise of Mercury professionals.
Conclusion
Throughout this guide, we've meticulously walked through the essential steps for changing the oil and performing the critical 100-hour maintenance on your Mercury FourStroke outboard. We've emphasized the importance of this service for ensuring your engine's longevity, maintaining its performance, and complying with warranty requirements. From gathering the correct tools and genuine Mercury parts to the detailed procedures for oil changes, gear oil service, fuel filter replacement, and other vital checks like the water pump impeller and spark plugs, the goal is clear: empower you with the knowledge to tackle this key maintenance with confidence. We also touched upon the importance of proper winterization and recognized those situations where seeking professional assistance from a certified Mercury technician is the wisest course of action.
My final takeaway from years of working on my own boat engines is that meticulous maintenance isn't just a chore; it's an investment in uninterrupted enjoyment on the water. By committing to these regular service intervals, you're not just changing oil; you're fostering a relationship with your engine, ensuring it's reliable, efficient, and ready for whatever the waves throw at you. It's about building trust in your equipment so you can focus on what truly matters: the experience of being out on the water.
I remember one particular instance when I had skipped checking my lower unit gear oil for too long. When I finally did check, I found it had that telltale milky appearance indicating water contamination. The seals had failed, and I was just hours of operation away from potentially catastrophic gear damage. The close call taught me that regular inspection truly is prevention, and I've never missed a maintenance interval since.
So, roll up your sleeves, gather your supplies, and get ready to keep your Mercury FourStroke running at its peak. Trust me, the pride and peace of mind you'll gain from performing this yourself are worth every bit of effort. Happy boating, and happy maintaining!
Frequently Asked Questions about Mercury FourStroke Oil Changes and 100-Hour Maintenance
Have questions about maintaining your Mercury FourStroke outboard? You're not alone! Here are answers to some of the most common queries I hear from fellow boaters:
How often should I change the oil in my Mercury FourStroke outboard?
Mercury Marine generally recommends changing the engine oil in your FourStroke outboard every 100 engine hours or annually, whichever comes first https://www.wholesalemarine.com/blog/mercury-marine-oil-capacity-guide/. However, if you frequently operate your engine in severe conditions, such as prolonged trolling, heavy loads, or extreme temperatures, you might consider changing the oil more frequently to maximize engine lifespan. It's always best to consult your specific owner's manual for the most accurate interval for your engine model and typical operating conditions.
What type and grade of oil is best for Mercury FourStroke engines?
Mercury recommends using their proprietary Mercury FourStroke oils, which are specifically formulated for their engines. The specific grade will depend on your engine model and the operating climate. Common recommendations include 10W-30, 25W-40, or 25W-50 https://www.mercurymarine.com/us/en/lifestyle/dockline/guide-to-precision-oils-and-lubricants. For example, many popular FourStroke outboards utilize 10W-30. It's crucial to check your owner's manual for the EXACT type and quantity of oil required for your specific engine to avoid underfilling or overfilling, which can lead to performance issues and potential damage.
Can I perform the 100-hour service myself, or should I hire a dealer?
For many recreational boat owners, performing the 100-hour service yourself is entirely feasible and rewarding. Basic tasks like changing the engine oil, the oil filter, the fuel filter/water separator (though Verado models may require dealer service due to fuel pressure), and inspecting the gear oil are well within the capabilities of a moderately handy individual with the right tools and guidance. However, Mercury also offers advanced diagnostics, computer checks, and specialized repairs that require proprietary tools and factory-trained technicians. If you're uncomfortable with any part of the procedure, or if your engine is under warranty and requires specific dealer services, it's always best to consult a Mercury dealership. Many boaters find a good balance by performing routine maintenance themselves and taking it to a dealer for more complex annual checks or diagnostics.
How do I know if my gear oil is contaminated?
You'll know your gear oil is likely contaminated when you drain it. If the oil appears milky, cloudy, or foamy, it's a strong indicator that water has entered the gearcase. This is often due to a failed seal or worn drain/vent screw gaskets. Another key sign is the presence of metal shavings on the magnetic drain plug or in the drained oil. While a few tiny shavings are normal wear, a significant amount, or larger shavings, points to internal gear damage. If you see either water contamination or excessive metal particles, you should drain and refill the gear oil immediately, and consider having the gearcase inspected by a professional.
What are the symptoms of a failing fuel/water separator?
A failing fuel/water separator can manifest in several ways, all related to its primary function of providing clean, water-free fuel to your engine. Symptoms typically include hesitation or sputtering under acceleration, unstable idling, and a general loss of power, especially when the engine is under load. In more severe cases, your engine might stall completely. These issues occur because the failing separator is allowing water or debris into the fuel system, disrupting the combustion process. It's important to replace the fuel filter and water separator as part of your regular maintenance to prevent these problems.
How should I prepare my Mercury outboard for winter storage?
Preparing your Mercury outboard for winter storage involves several critical steps to protect it from the elements and prevent damage. Firstly, perform an engine oil and filter change to remove corrosive contaminants. Secondly, thoroughly flush the cooling system with fresh water and ensure all water is drained from the passages. It's also recommended to fog the cylinders with marine fogging oil to protect internal engine components from corrosion. Treat the fuel system with a fuel stabilizer and fill the tank to minimize condensation. Finally, disconnect and properly store the battery, or keep it on a trickle charger, and lubricate any exterior hinges, seals, and latches.