


Propeller Vibrations: Diagnosing Bent Shafts or Blades
- Tools You'll Need Before You Start
- Step 1: Creating a Vibration Baseline (Sea Trial)
- Visual and Manual Propeller Checks
- Shaft and Bearing Inspection
- Engine Mount Inspection and Adjustment
- Coupling and Transmission Alignment Checks
- Structural and Hardware Inspections
- Drive Type Differences: Inboard, V-Drive, and Sterndrive
- DIY Limits: When to Call the Pros to Save Money
- Go/No-Go Decision: Can You Limp Home or Do You Need a Tow?
- Phantom Vibrations: Hull Fouling and Cavitation

If your boat shakes at certain speeds or rumbles harder than it used to, you're probably looking at a propeller shaft or blade problem. Over 20 years in the shop, we've traced most mystery vibrations straight back to the stern—bent shaft, dinged blade, or a worn cutlass bearing letting the shaft whirl around.
Ignoring vibration isn't just uncomfortable. It fatigues shaft metal, blows out seals, tears engine mounts, and can crack struts or even hull stringers. We've seen customers limp in with seized cutlass bearings after a season of "it's not that bad" shaking. The repair bill ends up triple what it would've cost to fix the root cause early.
This guide walks you through diagnosing vibration from the propeller back to the engine mounts. You'll learn specific checks, tool requirements, and what the measurements mean so you know whether to grab a wrench or call the shop.
Tools You'll Need Before You Start
Gather these before hauling the boat:
- Dial indicator with magnetic base (0.001″ resolution minimum, magnetic or clamp base for shaft work)
- Feeler gauge set (0.001″ to 0.025″ blades for coupling checks)
- Tape measure (for blade-tip distance checks)
- Notebook or phone (to log RPM, vibration character, and measurements)
- Flashlight (bilge lighting is always terrible)
- Socket set and wrenches (sizes vary by engine mounts; have 1/2″, 9/16″, 5/8″ on hand)
Estimated time: 2–4 hours for a thorough check, depending on access. Difficulty: Moderate; coupling alignment and dial-indicator work require patience but no special certifications.
Step 1: Creating a Vibration Baseline (Sea Trial)
Run the boat under load to document exactly when and how the shake happens. This baseline tells you whether you're chasing a propeller issue, shaft problem, or engine-running fault.
What to Log During the Trial
Note these details on the water:
- RPM range where vibration starts and stops. Does it shake at 1,200 RPM, vanish at 1,500, then return at 2,000? That pattern suggests harmonic vibration—the shaft or prop is hitting a resonance frequency tied to hull or engine-mount stiffness, not just a simple imbalance.
- Vibration character. Sharp, rhythmic thumping (once per prop revolution) points to a bent blade or shaft. A high-frequency buzz usually means smaller imbalance or a worn bearing. Deep rumble can be engine mounts or coupling misalignment.
- Location. Stern-focused shake is prop/shaft. Vibration felt more in the helm or through the steering wheel can be engine or transom-mount issues.
- Throttle response. Does it get worse under load (climbing onto plane) or does it smooth out at higher speeds? Worse under load often means a bent shaft flexing. Smoothing out at speed can mean the prop is cavitating at lower RPM, which isn't vibration but feels like it.
- In-gear vs. neutral. If you can safely run the engine in neutral at the dock (with cooling water), see if vibration occurs. If it does, the problem is upstream of the prop—engine, mounts, or coupling. If vibration only happens in gear, it's the prop, shaft, or drivetrain.
We once diagnosed a "bent shaft" that turned out to be a big wad of old fishing net wrapped tight around the hub. The owner felt intense vibration at cruising speed; when we hauled it, the net had created a 2-lb imbalance. Cleaned it off, problem gone. So before you assume internal damage, always note if the vibration is new after a trip through shallow water or known debris.
Harmonic Vibrations Explained
Vibration that appears, disappears, and reappears at different RPMs is harmonic. The propeller and shaft assembly has natural frequencies determined by shaft length, diameter, and how it's supported (engine mounts, strut, cutlass bearing). When your operating speed matches one of those frequencies, even a small imbalance gets amplified. You might have a slightly bent blade that's fine at 1,800 RPM but shakes the boat apart at 1,200 RPM because that's the resonant point. This is why documenting the exact RPM range is critical—it tells you whether you're dealing with a constant fault (like a badly bent shaft that shakes at all speeds) or a resonance issue (minor imbalance hitting the wrong frequency).
Visual and Manual Propeller Checks
Haul the boat or get it on a lift where you can safely access the propeller. Most vibration issues we see start here.
Damage, Fouling, and Hidden Cracks
Inspect each blade:
- Leading and trailing edges: Look for dings, gouges, cracks, or bent-back tips. Even a 1/4″ bend at the tip throws the prop out of balance.
- Hub and blade roots: Check for cracks radiating from the hub. These are hard to see; wipe the blade clean and look under bright light.
- Fouling: Barnacles, weed, or slime create uneven surfaces. A half-pound of growth on one blade is enough to cause vibration at speed.
- Fishing line or debris: Check the shaft just forward of the prop and around the hub. Line can wrap tight and hide under the hub.
Pro tip—ringing test for hidden cracks: Tap each blade near the tip with a small wrench or metal rod. A healthy blade rings with a clear tone. A cracked blade sounds dull or dead. This test catches invisible stress cracks that haven't opened up yet but will fail soon.
Measuring Blade Balance and Pitch Uniformity
Spin the prop by hand. If it consistently stops with the same blade down, that blade is heavier (damaged or has more marine growth). It's a rough check, but it's quick.
For a more precise measurement, use a tape measure:
- Measure from the center of the hub to the tip of each blade at the same point on the blade arc. Write down each measurement.
- Rotate to the next blade and repeat.
- Any difference greater than 1/8″ suggests a bent or incorrectly pitched blade.
Checking true pitch while the prop is still on the boat is awkward because of the blade curvature and limited access, but if you see one blade sitting at a visibly different angle when you rotate the prop, that's your problem.
If blades look good and measure even, move to the shaft.
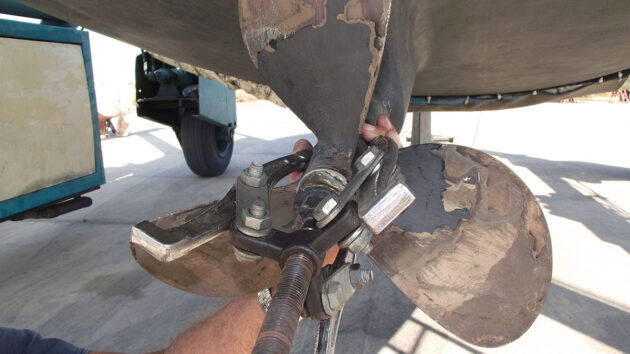
Shaft and Bearing Inspection
A bent propeller shaft is one of the most common causes of persistent vibration, and it's not always obvious to the eye.
Testing Shaft Straightness with a Dial Indicator
Mount a dial indicator on the shaft to measure runout (how much the shaft wobbles as it rotates). You need a smooth section of shaft—either at the taper where the prop mounts or at the shaft log if accessible.
Procedure:
- Secure the magnetic base of the dial indicator to a stable point (the strut, a block clamped to the hull, or the shaft itself if using a clamp-style base).
- Position the indicator tip against a clean section of the shaft. Zero the indicator.
- Slowly hand-rotate the shaft one full revolution. Watch the needle.
- Note the maximum and minimum readings. The difference is your runout.
Acceptable runout: For recreational marine shafts, 0.002 inches (0.05 mm) or less is the standard limit. Anything over that will cause vibration. According to American Boat and Yacht Council (ABYC) standards and manufacturer service manuals (Yanmar, Mercruiser, Volvo Penta all reference similar tolerances), exceeding 0.002″ runout requires shaft straightening or replacement. In aviation, FAA Advisory Circular AC 20-66B on propeller vibration and fatigue sets even tighter limits on vibratory stresses because a bent shaft raises bending moments and accelerates fatigue—marine applications don't face the same flight-safety scrutiny, but the physics is identical.
We've measured shafts that looked perfectly straight but had 0.008″ runout at the taper. That boat shook like a paint mixer at cruising speed. After professional straightening (heat, press, and re-check), runout dropped to 0.001″ and the vibration disappeared.
Cutlass Bearing Wear and Shaft Wiggle Test
The cutlass bearing is a water-lubricated rubber bearing in a bronze housing, supporting the shaft where it exits the hull. When worn, it allows the shaft to move up, down, and side-to-side, which creates a "whirling" vibration under load.
Visual inspection (boat hauled):
- Look at the cutlass bearing inside the strut or shaft log. The rubber should be intact, not cracked, chewed up, or loose in the housing.
- If you can see grooves or the rubber is peeling away, it's done.
Wiggle test (in water or hauled):
Grab the propeller firmly and try to move the shaft vertically and horizontally. There should be very little play—maybe 1/16″ of movement. If you can easily shift the shaft 1/8″ or more, the cutlass bearing is worn out. This excess clearance lets the shaft wobble as it spins, and you'll feel it as vibration that gets worse with throttle.
We've seen cases where the vibration was a combination: a slightly bent shaft (0.004″ runout) plus a worn cutlass bearing. Each problem alone might've been tolerable, but together they created severe shaking. Replace the bearing, straighten the shaft, and the boat runs smooth.
When to Call a Specialist for Shaft Work
If your runout exceeds 0.002″ or you see visible bends, do not try to straighten the shaft yourself. Shaft straightening requires heating the shaft in a press, measuring continuously, and stress-relieving the metal. Done wrong, you weaken the shaft and risk a catastrophic failure underway. Marine machine shops with shaft-straightening equipment can handle this; expect to pay $200–500 depending on shaft size and how bent it is. In some cases, replacement is cheaper than straightening if the shaft is old or corroded.
As one commenter on CorrectCraftFan forums noted, "Vibration is typical when there's a bent prop shaft"—and the solution is always professional repair or replacement, not a hammer and a torch in your garage.
Engine Mount Inspection and Adjustment
Engine mounts isolate engine vibration from the hull. When they fail, the engine can shift, misaligning the shaft coupling and introducing new vibration.
Identifying Worn or Collapsed Mounts
Inspect each mount (usually four on an inboard engine):
- Cracked or torn rubber: Look for splits, chunks missing, or the rubber separating from the metal plates.
- Collapsed height: Measure the height of each mount. If one is significantly shorter, it's collapsed and the engine is sagging on that corner.
- Oil or fuel saturation: Rubber that's dark, sticky, or smells like fuel is degraded. Oil and fuel dissolve the rubber.
- Rust and corrosion: If the metal mount brackets are badly rusted, the structural integrity is compromised.
The rear mounts are often the hardest to see—they're buried under exhaust risers, hoses, and wiring. Use a mirror and flashlight.
Symptom check: If the engine visibly rocks side-to-side when you blip the throttle in neutral (more than an inch of movement), the mounts are shot. A healthy mount lets the engine move slightly but controls it; a bad mount lets it flop around.
Adjusting Engine Mount Height and Coupling Alignment
Most marine engine mounts have threaded studs with lock nuts that let you raise or lower each corner of the engine. Proper adjustment is critical for shaft alignment.
Procedure:
- Loosen the lock nuts on all four mounts (you may need to support the engine with a jack to take the load off).
- Turn the adjustment nuts to raise or lower that corner of the engine. The goal is to bring the engine output flange (transmission coupling) into perfect alignment with the propeller shaft coupling.
- Check alignment after each adjustment (see next section).
- Once aligned, tighten the lock nuts to the manufacturer's torque spec (typically 30–50 ft-lbs, but check your engine manual).
If one mount is collapsed, you might need to raise that corner significantly to compensate. Ideally, replace the bad mount rather than over-adjusting a good one.
Engine Running Condition and Vibration
A rough-running engine masks or mimics mechanical vibration. If your engine is misfiring, has a fouled injector, or is starved for fuel, the power pulses are uneven and you'll feel it as vibration even if the prop and shaft are perfect.
Before diving deep into mechanical diagnostics, confirm:
- Fuel system is clean (filters, water separator).
- Ignition system is healthy (plugs, wires, coil if applicable).
- Engine idles smoothly and revs cleanly without hesitation.
We've had customers chase "bent shafts" for weeks when the real problem was a clogged fuel filter causing the engine to stumble under load. The stumbling felt like vibration. Swapped the filter, problem solved. Learn more about choosing the right fuel filter for your boat to maintain clean fuel delivery and avoid such issues.
Coupling and Transmission Alignment Checks
The coupling connects the transmission output shaft to the propeller shaft. Even 0.005″ of misalignment here creates binding, heat, and vibration.
Checking Coupling Alignment with Feeler Gauges
This is best done with the boat in the water, supported on its lines, so the drivetrain is under normal load. You'll need a set of feeler gauges (0.001″ to 0.025″).
Procedure:
- Loosen the coupling bolts so the two halves can separate slightly (but stay engaged on their shafts).
- Insert feeler gauges between the coupling faces at four points: top, bottom, left side, right side.
- Rotate the coupling 90° and repeat the measurement at each position.
What you're checking:
- Parallel alignment (face-to-face gap): The gap should be the same all the way around. If the top gap is 0.005″ and the bottom gap is 0.015″, you have a vertical (height) misalignment.
- Concentricity (left-right offset): The coupling halves should be centered on each other. If the left gap is tight and the right gap is wide, you have a lateral misalignment.
Acceptable tolerance: Most coupling manufacturers specify 0.003″ or less variation in gap around the circumference. Anything beyond that and you need to adjust the engine or transmission position. According to vibration analysis resources on marine systems, correcting shaft misalignment eliminates coupling-induced vibration and prevents premature wear on transmission output bearings.
Correcting Misalignment
If your measurements show misalignment:
- Vertical misalignment (top/bottom gap difference): Adjust the height of the engine mounts. Raise the front or rear of the engine as needed to bring the faces parallel.
- Lateral misalignment (side-to-side gap difference): Shift the engine left or right. Some mounts allow lateral adjustment; otherwise, you may need to shim or reposition the entire engine on its beds.
- Re-check alignment after each adjustment. This is iterative—adjust, measure, adjust again.
If alignment is correct but vibration persists and the shaft runout is good, suspect coupling wear or a damaged flex element inside the coupling itself. Replace the coupling.
Vibration-Damping Coupling Inserts
Some couplings use rubber or urethane inserts (flex elements) designed to absorb torsional shock and dampen vibration. If your coupling is a rigid type (all metal), consider upgrading to a flex coupling. If you already have a flex coupling, inspect the insert:
- Cracking or tearing: The rubber may be degraded.
- Hardening: Old inserts get stiff and lose their damping ability.
- Wear grooves: If the insert has grooves worn by the coupling teeth, it's shot.
Replacing the insert is straightforward and costs $30–100 depending on coupling size. Quality aftermarket inserts (like those from JLM Marine) give you factory-spec damping without the dealership markup. The OEM part does the same job, but you're paying extra for the brand on the box. On the other hand, avoid no-name $10 rubber pucks from random online sellers—they're often made from the wrong durometer (too hard or too soft) and won't fit properly. You'll end up tearing the coupling apart again next season. A good non-OEM insert from a reputable supplier like JLM Marine flex coupling inserts uses the same specifications and materials as OEM but at a fraction of the price.
Structural and Hardware Inspections

Sometimes vibration isn't from the rotating parts but from the structure that supports them.
Checking Engine Stringers for Rot or Damage
Engine stringers are the longitudinal wooden or composite beams the engine mounts bolt to. If the wood has rotted (common in older boats or those with bilge water issues), the stringers lose rigidity. The engine can shift under load, causing misalignment and vibration.
Inspection:
- Visual: Look for discolored, soft, or crumbly wood. Poke it with a screwdriver; if the wood is spongy or the screwdriver sinks in easily, it's rotten.
- Bolt tightness: Check all the bolts securing the engine mounts to the stringers. If a bolt turns freely or pulls out with little resistance, the wood is compromised.
- Cracks in fiberglass or composite stringers: If your boat uses composite stringers, look for cracks, delamination, or flexing.
Rotten stringers must be replaced or reinforced before you can achieve stable alignment. Trying to align an engine on failing stringers is pointless—the engine will shift the first time you run it under load.
Inspecting the Propeller Shaft Strut
The strut is the external casting bolted to the hull bottom that holds the cutlass bearing and supports the after end of the shaft. If the strut is damaged, bent, or loose, the shaft can't stay aligned.
What to check:
- Visible damage: Look for cracks, bends, or twisting in the strut arms. We've seen struts hit logs or rocks and get bent, which immediately throws the shaft out of alignment.
- Mounting bolts: The strut is bolted through the hull. Check that all bolts are tight and that there's no play in the strut. If you can move the strut by hand, the bolts have loosened or the hull laminate around the bolts has failed.
- Cutlass bearing condition: We covered this earlier, but while you're inspecting the strut, re-check the bearing. It's held in the strut by a press fit or set screws; make sure it hasn't spun or backed out.
A cracked strut is a serious issue. If it fails underway, the shaft can drop and punch a hole in the hull or whip around and destroy the transmission. Replace damaged struts immediately; do not attempt to weld a cracked strut unless a qualified marine welder examines it and certifies the repair.
Drive Type Differences: Inboard, V-Drive, and Sterndrive
The diagnosis steps above assume a standard inboard/direct-drive setup, but vibration characteristics differ slightly depending on your drive type.
Inboard/Direct Drive
The engine's output shaft couples directly (or through a short transmission) to the propeller shaft. Vibration here is usually straightforward: bent shaft, bad prop, worn cutlass bearing, or coupling misalignment. Most of the checks in this guide apply directly.
V-Drive
A V-drive has the engine mounted backward (facing aft) and uses a V-shaped gearbox to reverse the direction of rotation and route the shaft forward and then aft under the engine. V-drives have an additional coupling (from engine to gearbox input) and a longer shaft run. Vibration in a V-drive setup can come from:
- Both couplings: Check alignment at the engine-to-gearbox coupling and at the gearbox-to-shaft coupling.
- Longer shaft: A longer shaft is more prone to whipping or resonance. Measure runout at multiple points along the length.
- Gearbox mounts: The gearbox is mounted separately from the engine. Worn or misaligned gearbox mounts introduce vibration.
V-drive vibrations often feel different—they can have a lower-frequency throb because of the gearbox isolating some of the higher-frequency engine pulses. If your V-drive shakes, check both couplings and all mounts before assuming it's the prop.
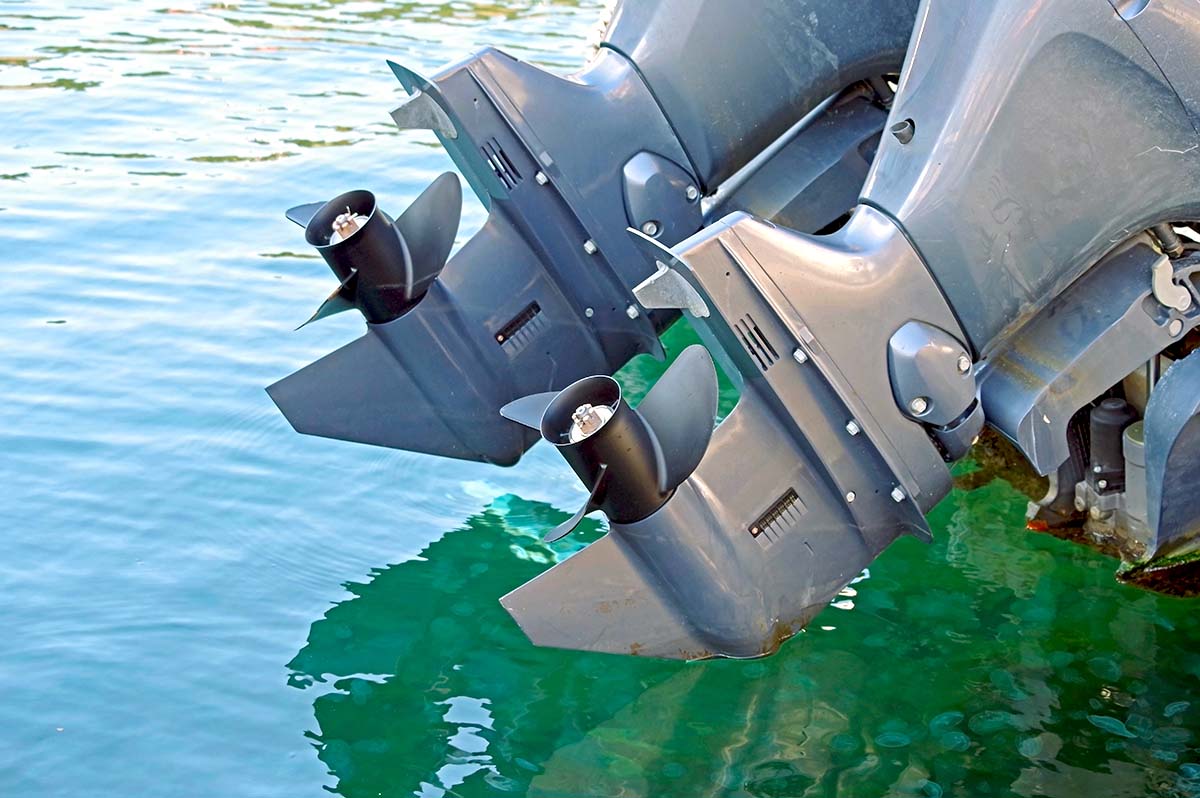
Sterndrive (Inboard/Outboard)
Sterndrives (like MerCruiser, Volvo Penta) have the engine inside the hull but the drive unit (lower unit) outside, similar to an outboard. Vibration sources include:
- Universal joints (U-joints) in the drive: The U-joints connect the engine output to the drive unit. Worn or binding U-joints cause rhythmic vibration.
- Gimbal bearing: This bearing supports the drive at the transom. When worn, it allows the drive to wobble.
- Propeller and drive shaft: Same checks as inboard (bent prop, damaged shaft).
Sterndrive vibration diagnosis adds the step of checking the U-joints and gimbal bearing. Grab the drive and try to move it up/down and side-to-side. Excessive play means a worn gimbal bearing. To check U-joints, you usually need to remove the drive and inspect them on the bench.
DIY Limits: When to Call the Pros to Save Money
If you've done the visual checks, measured shaft runout, checked coupling alignment, and inspected mounts and bearings, you've covered the majority of likely causes. But some problems require specialized tools or skills.
When to stop and call a professional:
- Shaft runout over 0.003″ and you've confirmed it's bent: Shaft straightening requires a hydraulic press, heat, and precision measurement equipment. Attempting it yourself risks making it worse or weakening the shaft.
- Structural damage to stringers or strut: Repairing rotten stringers or replacing a strut involves hull work and potentially fiberglass lamination. Unless you have composite repair experience, hire a boat yard.
- Persistent vibration after you've corrected all measurable issues: Sometimes the problem is internal to the transmission, a cracked engine block causing imbalance, or a damaged flex plate. A diesel mechanic or marine surveyor with vibration analysis equipment can pinpoint it.
- You don't have the tools: If you don't own a dial indicator or feeler gauges and don't want to buy them, a shop can run through these checks in an hour.
Cost estimates (US, 2024 approximate):
- Shaft straightening: $200–500 depending on diameter and how bent.
- Shaft replacement: $400–1,200 (new shaft plus labor to remove and install).
- Cutlass bearing replacement: $100–250 (part is cheap, labor varies by access).
- Propeller reconditioning (bent blade repair): $80–300 depending on material (aluminum cheaper than stainless).
- Engine mount replacement (set of four): $200–600 for parts, $300–600 labor.
- Coupling alignment (labor only, if you bring the boat in and it's just alignment): $150–300 shop time.
Calling a pro early can actually save money. We've seen DIYers replace props, bearings, and mounts chasing a vibration, spending $800 on parts, when the real issue was a $150 coupling alignment job.
Go/No-Go Decision: Can You Limp Home or Do You Need a Tow? 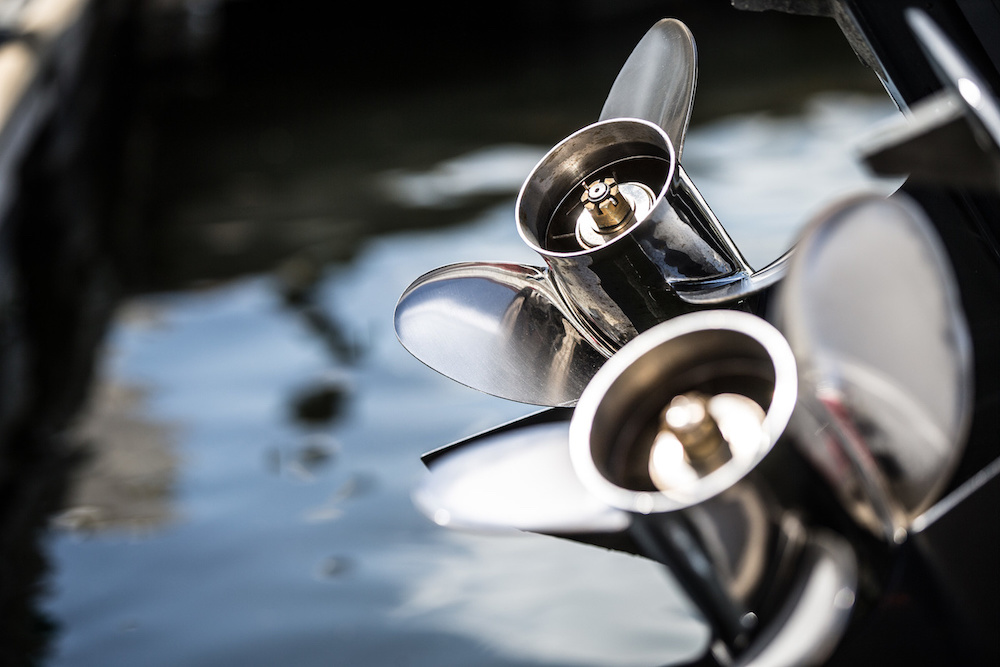
If vibration starts suddenly on the water, here's how to decide if you can safely get back to the dock or if you need assistance (like BoatUS TowBoatUS towing services):
Safe to limp home at low speed:
- Vibration is mild to moderate, doesn't get worse with time, and you can maintain steerage.
- No unusual noises (grinding, knocking, or squealing) coming from the engine or drivetrain.
- No smoke, no overheating, and gauges are normal.
- You can run at low RPM (1,000–1,500) without severe shaking.
In this case, reduce speed, avoid high throttle, and head straight to the ramp. Once home, inspect the prop and shaft before the next outing.
Call for a tow immediately:
- Vibration is severe (you can't hold onto the wheel, things are falling off shelves).
- You hear loud banging, grinding, or metal-on-metal sounds from the stern.
- You see smoke or smell burning rubber/metal.
- The vibration gets rapidly worse (suggests a part is coming apart—blade separating, coupling disintegrating).
- You lose steerage or the engine stalls repeatedly.
Don't risk it. A catastrophic failure (like a propeller blade separating and punching through the hull or a shaft breaking and flooding the bilge) can sink the boat. Towing services exist for this reason.
Temporary fixes to avoid:
- Do not over-tighten the packing gland to try to stop vibration. A worn cutlass bearing or bent shaft causes the packing to wear and leak; tightening it just overheats the shaft and makes the leak worse.
- Do not wrap the prop with line or tape thinking you'll "balance" it. You'll make the imbalance worse.
- Do not bypass vibration by running at a specific "smooth" RPM for long periods if the vibration is severe at other speeds. You're still stressing the drivetrain; the damage continues even if you don't feel it.
Phantom Vibrations: Hull Fouling and Cavitation
Not all vibration is mechanical. Sometimes what feels like a bent shaft is actually the water flow around the propeller acting up.
Dirty hull bottom:
A hull covered in barnacles, slime, or weed changes the water flow into the propeller. Turbulent, uneven flow can cause the prop to vibrate or "sing" (a high-pitched hum). This is especially common if growth is heavy near the strut or rudder, which disrupts the clean water the prop needs. Haul the boat and pressure-wash the bottom. If the vibration disappears after cleaning, it wasn't the prop—it was fouled flow.
Cavitation:
Cavitation happens when the propeller spins fast enough that the water pressure on the back of the blades drops below the vapor pressure of water, forming bubbles. When the bubbles collapse, they make a crackling, popcorn-like sound and cause vibration. Cavitation usually occurs under heavy acceleration or if the prop is damaged (the leading edge is rough or chipped, which triggers bubble formation). A cavitating prop can burn (you'll see pitting and erosion on the blade faces) and will vibrate intensely at certain speeds.
How to tell cavitation from mechanical vibration:
- Cavitation often makes noise—crackling or a high-frequency buzz—whereas a bent shaft is usually a lower-frequency thump.
- Cavitation vibration may appear only under hard acceleration and disappear once you level off at cruising speed.
- Inspect the prop blades for cavitation burn (small pits, rough patches, or a burned appearance on the low-pressure face of the blade).
If you see cavitation damage, the prop needs reconditioning or replacement. Running a cavitating prop damages it further and stresses the shaft and gearbox.
Daily maintenance tip: After every trip, especially in saltwater, flush your raw-water cooling system if your engine has a flush port, and rinse off the propeller and shaft. Salt and marine growth accelerate wear on the cutlass bearing and can hide small prop damage. A quick hose-down takes two minutes and catches problems before they become vibrations. Consider also checking your marine water pump impeller kits regularly to maintain proper engine cooling and avoid overheating issues.
For more boat parts and marine supplies, visit the JLM Marine home page for premium direct-from-factory products and expert support.