


Outboard Goes Into Gear But Won’t Move? Troubleshooting Tips
- The Mechanics of Propulsion: How Power Reaches the Prop
- Diagnosing a Moving Shift Cable but No Prop Thrust
- Diagnosing a Non-Moving Shift Cable
- Step 1: Check the Shift Cable Movement
- Step 2: Inspecting the Propeller and Hub
- Step 3: Testing Lower Unit Engagement Manually
- Internal Lower Unit Damage
- Common Causes and Fixes: Summary
- Shear Pins (Smaller Outboards)
- Tiller Handle vs. Remote Control Outboards
- When to Call a Professional Marine Mechanic
- Preventing Future Problems

Your outboard starts, idles fine, you shift into gear, and nothing happens. The prop won't turn or you get no thrust. This usually comes down to three things: a spun propeller hub, a shift cable problem, or internal lower unit damage. We're going to walk through the diagnostic steps to isolate the problem, starting with the easiest checks.
WARNING: Always disconnect the battery and pull the spark plug wires before touching the propeller to prevent accidental starting.
The Mechanics of Propulsion: How Power Reaches the Prop
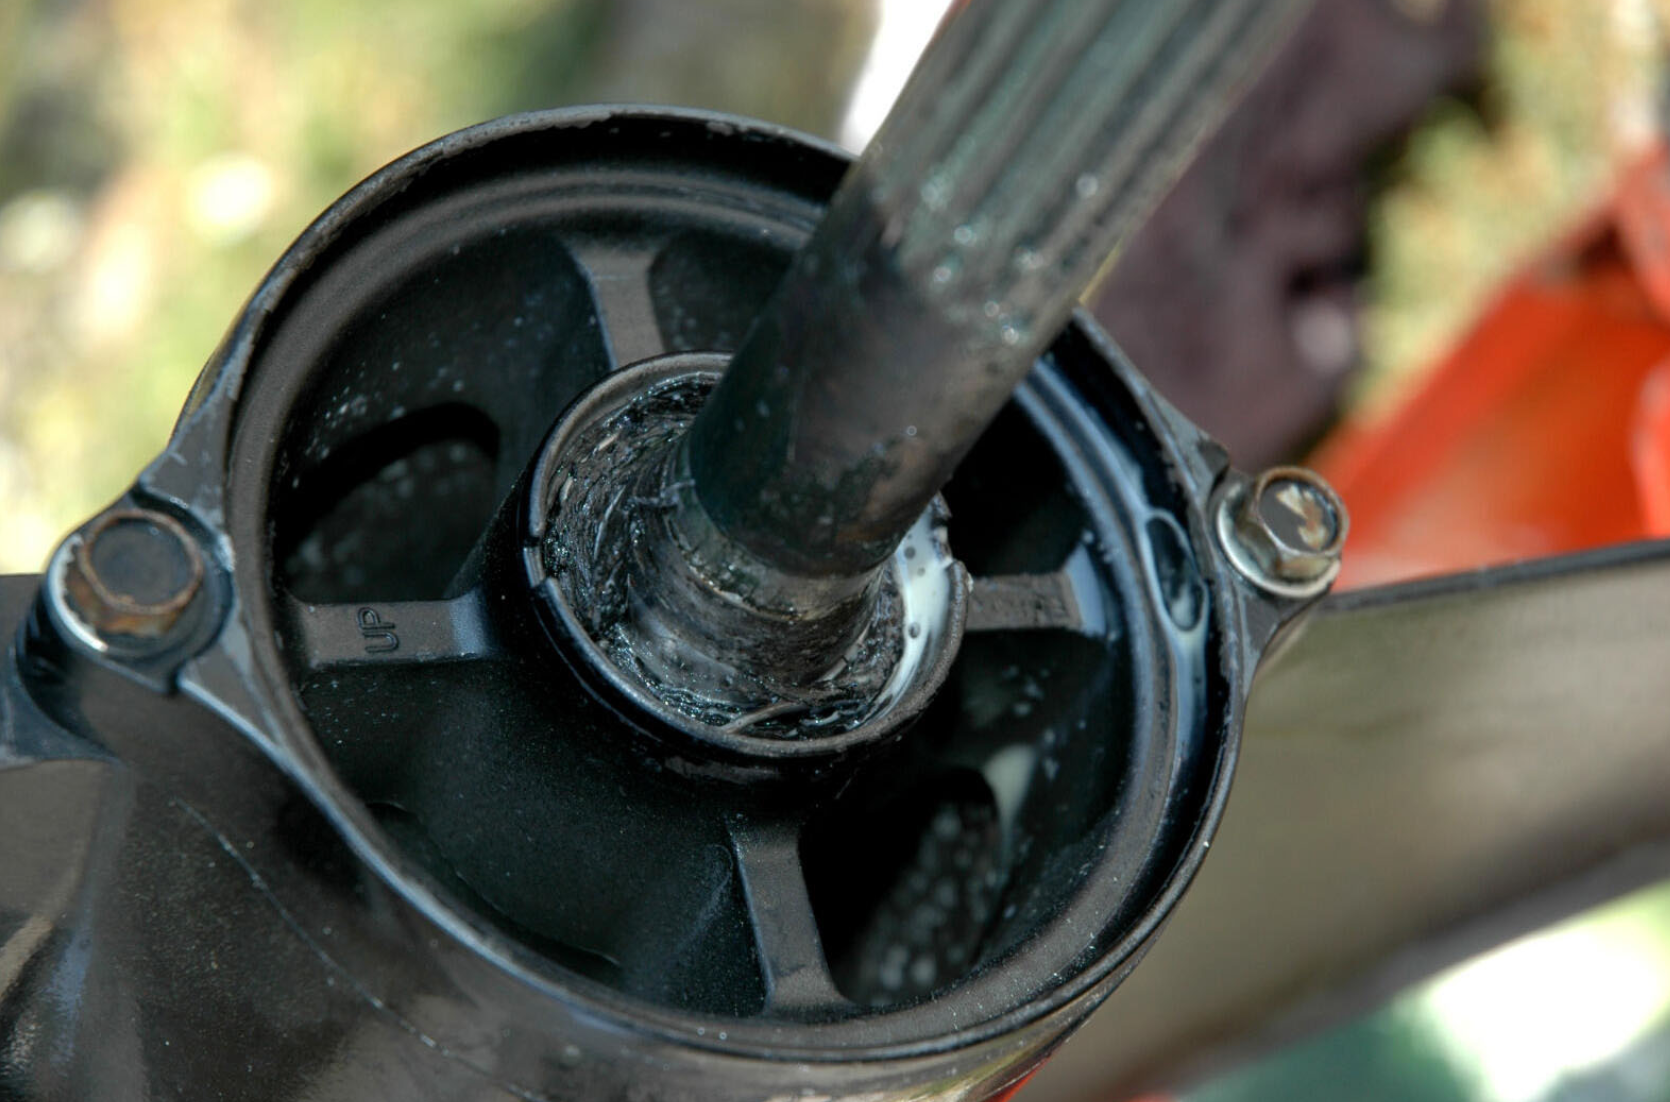
Your outboard transfers engine power down the driveshaft to the propeller through the lower unit's gears and clutch dog. When you shift into gear, the clutch dog slides onto the forward or reverse gear, locking it to the propeller shaft. If that power transfer breaks down anywhere—hub, clutch, gears—you get engine noise but zero movement.
The most common failure point is the propeller hub. The rubber or plastic bushing inside the prop is designed to fail before expensive lower unit gears get destroyed. When the hub spins, the driveshaft turns but the prop blades don't. It's a sacrificial part, and manufacturers like Mercury and Yamaha design it that way deliberately.
Diagnosing a Moving Shift Cable but No Prop Thrust
If you feel the shifter engage and hear the engine note change slightly, but the boat sits still, the problem is almost always at the propeller or inside the lower unit—not the shift cable.
Spun Propeller Hub
A spun hub is the most common cause. The symptom is distinct: RPMs spike suddenly under throttle, as if the motor shifted into neutral mid-acceleration. At idle or low RPM, the prop might still turn weakly, but under load it slips completely.
To confirm, mark a line across the prop nut and the prop body with a grease pencil or permanent marker. Run the boat briefly. If the lines no longer align, the hub has spun inside the prop.
Another test: engine off, in gear, try to spin the prop by hand while someone holds the flywheel or driveshaft. If the prop rotates freely with significant slip at the hub, it's done.
Replace the entire propeller or the hub kit. Some guys try drilling through the hub and pinning it to the prop. Don't. This creates severe vibration that bends the prop shaft over time, turning a $60 fix into a $400 shaft replacement. A new hub kit or propeller is the correct repair.
Debris or Physical Damage
Fishing line, weeds, or plastic bags wrapped around the prop shaft kill thrust even if the prop spins. Pull the prop off completely—don't just yank visible debris. Line often hides behind the thrust washer and destroys the prop shaft seal, leading to water intrusion into the lower unit.
Bent blades or missing chunks of a blade also cause this. Inspect carefully. Replace damaged props.
Diagnosing a Non-Moving Shift Cable
If you move the shifter at the helm and the shift cable doesn't move at the engine, or if the shifter feels loose or springy, the problem is upstream—either the cable itself or the control box.
Testing Cable Movement
Engine off, shifter in forward. Remove the engine cover. Watch the shift cable where it attaches to the motor's shift linkage (usually a rod with a clevis pin or clip). Have someone move the shifter slowly through forward, neutral, and reverse. You should see clear movement of the cable's inner core.
If the cable moves smoothly through its full range but you still have no thrust, the command is reaching the motor. The problem is internal—lower unit gears, clutch dog, or the hub.
If the cable is stiff, doesn't move, or feels disconnected, disconnect it from the shift linkage at the motor. Try to pull the inner core cable out and push it back in by hand. If it moves smoothly when disconnected, the motor's internal shift mechanism is binding. If the cable is stiff or frozen even when disconnected, the cable itself is bad.
Cable Stretch and Adjustment
Cables don't just snap—they stretch over time. If your barrel adjuster (the threaded fitting where the cable attaches to the control box or motor) has run out of adjustment room, the cable has stretched beyond spec and needs replacement. A stretched cable won't fully engage the clutch dog even though it feels like it's in gear at the helm.
Corrosion inside the cable liner makes the cable stiff. This isn't fixable with lubricant. Internal rust swells the liner, binding the core. Replace the cable.
Faulty Shifter Mechanism
Sometimes the control box itself is the problem. Internal wear in the shifter handle or a broken detent can make the shifter feel engaged when it isn't actually moving the cable. Disconnect the cable from the motor and manually actuate the shifter. If the cable end moves freely, the control box is fine. If not, the box needs repair or replacement.
A related issue: if the shift cable is badly misadjusted, the neutral safety switch might prevent the engine from cranking at all, a symptom often confused with electrical failure.
Step 1: Check the Shift Cable Movement
Engine off. Shifter in forward.
- Remove the engine cover to access the shift linkage.
- Have someone at the helm move the shifter slowly through forward, neutral, reverse.
- Observe the shift cable where it attaches to the motor's shift rod. The inner core should move in and out clearly.
- If the cable moves: problem is at the prop or lower unit.
- If the cable doesn't move: disconnect it from the motor (usually a cotter pin or clip). Pull and push the inner core by hand. Smooth movement = bad shift mechanism inside motor. Stiff or frozen = bad cable.
Check the barrel adjuster on the cable end. If the threads are fully extended and you still can't get solid engagement, the cable has stretched. Replace it.
Step 2: Inspecting the Propeller and Hub
Pull the prop. You'll need a block of wood to stop it from spinning, a socket or box wrench for the prop nut, and a torque wrench for reinstallation.
Visual Inspection
- Clear all debris from the prop and shaft. Remove the prop completely to check behind the thrust washer for hidden fishing line.
- Inspect the blades for bends, cracks, or missing chunks. Even small damage reduces thrust significantly.
- Look at the hub. If you're running a modular hub system (like Flo-Torq on Mercurys), pull the insert. Check for melted, sheared, or cracked rubber or plastic around the splines.
Manual Spin Test
Reinstall the prop loosely. Engine off, in gear. Try to spin the prop by hand while holding the driveshaft or having someone hold the flywheel. A good hub locks solid. A spun hub lets the prop rotate with little resistance.
Water Test vs. Trailer Test
A prop might spin fine on the trailer (no load) but fail under thrust in the water. If you suspect a marginal hub, the real test is a brief on-water run. Mark the prop nut and body as described earlier, run it, and check alignment.
Step 3: Testing Lower Unit Engagement Manually

If the cable moves correctly and the prop/hub check out, the problem is internal to the lower unit.
With the prop off, engine off, and in forward gear, try to turn the propeller shaft by hand. It should lock or turn with significant resistance. Shift to neutral—it should spin freely. Shift to reverse—it should lock again.
If the shaft spins freely in forward or reverse, the clutch dog isn't engaging the gear. This points to worn clutch dog teeth, stripped gears, or a misaligned shift rod inside the lower unit.
Drain the lower unit gear oil. Look for:
- Fine metallic fuzz: normal wear, not a crisis.
- Chunks or flakes of metal: catastrophic gear failure. Stop immediately.
- Milky or grey oil: water intrusion through a bad seal. Fix it before you destroy the bearings.
Gear oil that smells burnt indicates overheating from a slipping clutch or running the lower unit dry.
Internal Lower Unit Damage
Worn clutch dog teeth, stripped gears, or a broken propeller shaft require lower unit disassembly. This is professional-level work. You need specialized tools, shift-rod alignment procedures, and torque specs.
Causes of internal damage:
- Running with a severely spun hub. The engine revs hard but the prop barely turns, overheating the clutch and gears.
- Forcing shifts. Slamming from forward to reverse at high RPM hammers the clutch dog and rounds off the teeth.
- Water intrusion. A failed seal lets water into the gear case, washing out lubricant and corroding gears.
If you find metal in the gear oil or the manual engagement test shows the clutch won't lock, budget for a lower unit rebuild or replacement. DIY lower unit work is possible, but reassembling it incorrectly causes water intrusion and total failure. For most people, a certified tech is the smarter call.
Common Causes and Fixes: Summary

Spun Propeller Hub
Symptoms: RPMs spike under throttle, weak or zero thrust, prop spins freely by hand when in gear.
Fix: Replace the propeller or hub kit. Match your spline count and shaft diameter. Don't drill and pin the hub—it causes vibration and bends the shaft.
Debris or Physical Damage
Symptoms: Reduced thrust, visible weeds or line, bent blades.
Fix: Remove the prop. Clear all debris from the shaft and behind the thrust washer. Replace damaged props.
Shift Cable Misadjustment or Failure
Symptoms: Loose or stiff shifter, cable doesn't move at motor, springy feel at helm.
Fix: Adjust the barrel adjuster or cable ends at both the helm and motor. If the cable is stiff when disconnected from the motor, replace it. Overtightening cable ends causes binding—snug them, don't crank them.
Internal Lower Unit Damage
Symptoms: Clutch won't engage manually, metal in gear oil, grinding noises.
Fix: Professional rebuild or lower unit replacement. If you attempt it yourself, mark the shift rod position with a permanent marker or count exposed threads before disassembly to ensure correct reassembly.
Shear Pins (Smaller Outboards)
Outboards under 20HP often use a metal shear pin instead of a rubber hub. The pin is designed to snap on impact, protecting the gears. If your small motor won't move and you've hit something recently, check for a broken shear pin where the prop mounts to the shaft.
Replace the pin with the OEM-spec part. Using a harder pin (like a bolt) to "toughen it up" transfers impact shock to your lower unit gears, causing expensive damage.
Tiller Handle vs. Remote Control Outboards
Tiller-steer motors often use a shift rod or direct linkage instead of a cable. The diagnostic is similar: check if the shift lever at the motor moves the internal linkage. On tiller models, the problem is more often a loose or bent shift rod than a cable issue.
Remote-control setups (steering wheel boats) use a shift cable running from the control box to the motor. These cables stretch, corrode, and bind more often because of their length and exposure. For replacing parts like cables or shift linkages, browse outboard motor parts to find OEM components suited for your model.
When to Call a Professional Marine Mechanic
Stop and call a pro if:
- You find metal chunks in the gear oil.
- The clutch dog won't engage manually even though the shift cable moves correctly.
- You hear grinding or clunking noises from the lower unit.
- You've replaced the prop and checked the cable, but the problem persists.
- You're uncomfortable working around propellers or lower unit internals.
When you call, tell the mechanic exactly what you observed:
- Did the prop spin by hand?
- Did the shift cable move?
- Did you see metal in the oil?
- Did you feel engagement at the lower unit when shifting manually?
The more detail you provide, the faster and cheaper the diagnosis.
Preventing Future Problems
Flush your outboard with fresh water after every saltwater use. Saltwater corrodes shift cables and internal seals, leading to binding and water intrusion. For more information on saltwater care, see our guide on Saltwater Use and Overheating: Prevention Tips.
Avoid sudden impacts. Hitting a log or sandbar at speed is the #1 cause of spun hubs and lower unit damage.
Shift quickly into gear once the engine drops to idle. Hesitating "on the cusp" between neutral and gear wears the clutch dog prematurely. Let the RPMs fall, then shift decisively.
After any water pump or lower unit service, verify smooth shifting and solid prop engagement on the trailer before heading out. Misaligned shift rods after reassembly are a common cause of no-engagement problems. For maintaining your cooling system, including water pumps, consider checking our Water Pump Repair Kit vs. Impeller Only blog.
Pull the prop periodically to clear hidden fishing line from the shaft. Line wrapped behind the thrust washer destroys seals and lets water into the lower unit.
Pro tip: After every saltwater run, flush your motor with fresh water for five minutes. This keeps shift cables from corroding and seizing, which saves you from a $200 cable replacement and a frustrating day at the ramp.
For a wide range of boat accessories and marine parts to help keep your outboard running smoothly, shop at JLM Marine for OEM-quality components with free worldwide shipping.
For more expert advice and marine parts, visit the main JLM Marine hub.
Hi—I’m Jim Walker
I grew up in a Florida boatyard, earning pocket money (and a few scars) by rebuilding outboard carbs before I could drive. That hands-on habit carried me through a Ph.D. in mechanical engineering, where I studied how salt water quietly murders metal.
I spent ten years designing cooling systems for high-horsepower outboards, then joined JLM Marine as CTO. We bench-test every new part in the lab, but I still bolt early prototypes onto my own 23-foot skiff for a weekend shake-down— nothing beats real wake and spray for finding weak spots.
Here on the blog I share the fixes and shortcuts I’ve learned so your engine—and your day on the water—run smooth.

For Boat Owners:
To assist you in maintaining and repairing your marine engines, we hope the following resources may be of use:
- Mercury Serial Number Guide
- Owner's Manuals from Mercury
- Official Model Number Reference Guide PDF from BRP
- Johnson Serial Number Guide
-
Boat Accessories from JLM Marine
About JLM Marine
Founded in 2002, JLM Marine has established itself as a dedicated manufacturer of high-quality marine parts, based in China. Our commitment to excellence in manufacturing has earned us the trust of top marine brands globally.
As a direct supplier, we bypass intermediaries, which allows us to offer competitive prices without compromising on quality. This approach not only supports cost-efficiency but also ensures that our customers receive the best value directly from the source.
We are excited to expand our reach through retail channels, bringing our expertise and commitment to quality directly to boat owners and enthusiasts worldwide.
Boat Accessories on Sale
- $54.00
- $54.00
- Unit price
- per
- $38.50
- $38.50
- Unit price
- per
- From $39.13
$45.50- From $39.13
- Unit price
- per


- $53.50
- $53.50
- Unit price
- per
- From $54.00
- From $54.00
- Unit price
- per

- $34.50
- $34.50
- Unit price
- per
- $23.50
- $23.50
- Unit price
- per
-
Red
-
Blue
- $45.00
- $45.00
- Unit price
- per


- $34.50
- $34.50
- Unit price
- per


- $54.00
- $54.00
- Unit price
- per


- $54.00
- $54.00
- Unit price
- per
- $40.00
- $40.00
- Unit price
- per
- $32.00
- $32.00
- Unit price
- per
- $22.80
- $22.80
- Unit price
- per
-
Red
-
Blue
- $22.80
- $22.80
- Unit price
- per
-
Red
-
Blue

- $22.80
$27.00- $22.80
- Unit price
- per

- $31.50
- $31.50
- Unit price
- per

- $54.00
- $54.00
- Unit price
- per


- $59.00
- $59.00
- Unit price
- per

- $22.80
$28.50- $22.80
- Unit price
- per