


How to Winterize Your Boat Engine: Step-by-Step Guide

Table of Contents
Introduction
As the boating season draws to a close and temperatures begin to drop, proper winterization becomes a critical task for boat owners. Winterizing your boat engine isn't just about preventing freeze damage—it's a comprehensive process that protects your valuable investment during months of inactivity and ensures a smooth start to the next boating season.
Many boat owners underestimate the importance of proper winterization, viewing it as an optional or simplified procedure. However, skipping this essential maintenance or cutting corners can lead to significant and costly problems when spring arrives. From cracked engine blocks and corroded components to fuel system issues and starter failures, the consequences of improper winterization can quickly turn your anticipated spring launch into an expensive repair project.
This comprehensive guide will walk you through the step-by-step process of winterizing outboard, sterndrive, and inboard engines. We'll cover everything from gathering the necessary supplies to executing each critical step with precision. Whether you're a seasoned boat owner or preparing for your first off-season, this guide will provide you with the knowledge to protect your engine through the winter months.
By following these detailed instructions, you'll not only prevent freeze damage but also address issues like corrosion, fuel degradation, and internal component protection that are equally important aspects of proper winterization. The time and effort you invest now will pay dividends when boating season returns, allowing you to get back on the water quickly without unexpected repairs or delays.
Let's dive into the essential process of winterizing your boat engine, ensuring it remains in optimal condition during its seasonal hibernation and is ready for action when warmer weather returns.
Why Winterizing Your Boat Engine Is Essential
Before diving into the specific winterization procedures, it's important to understand exactly why this process is so critical for your boat's longevity and performance. Proper winterization protects against multiple threats that can damage your engine during the off-season.
Protection Against Freeze Damage
The most obvious and catastrophic risk of skipping winterization is freeze damage. Water expands approximately 9% when it freezes, creating enormous pressure inside your engine's cooling system, block, and other components.
- Engine block cracks: When water freezes in your engine block or cylinder head, the expansion can crack these expensive components, often requiring complete engine replacement
- Heat exchanger damage: Frozen water can split heat exchangers and cooling system components
- Water pump damage: Impellers and water pumps can be damaged by ice formation
- Plumbing ruptures: Water lines, hoses, and fittings throughout the cooling system can crack or burst

A cracked engine block resulting from freeze damage—one of the most expensive consequences of improper winterization.
Prevention of Fuel System Problems
Modern ethanol-blended fuels create significant challenges during storage periods. Without proper treatment, these issues can develop:
- Phase separation: Ethanol absorbs moisture and can separate from gasoline, creating a corrosive layer at the bottom of your tank
- Fuel degradation: Gasoline begins to break down within 30 days, forming gummy deposits and varnish
- Carburetor/injector clogging: Stale fuel leaves deposits that clog precision fuel delivery components
- Corrosion: Ethanol and water mixtures can corrode metal components in the fuel system
- Starting difficulties: Degraded fuel leads to hard starting or no-start conditions in spring
Protect your fuel system with our premium marine fuel stabilizers specifically formulated for long-term storage.
Corrosion Prevention
Corrosion accelerates during storage periods, particularly in marine environments:
- Internal engine corrosion: Moisture and condensation can cause corrosion on cylinder walls, bearings, and other internal components
- Electrical system corrosion: Battery connections, wiring, and electronic components are vulnerable to corrosive damage
- External corrosion: Exposed metal parts can develop rust and corrosion during storage
- Galvanic corrosion: Different metals in contact with each other can accelerate corrosion through galvanic action
Lubrication Protection
Proper lubrication during storage is essential for preventing damage when the engine is restarted:
- Cylinder wall protection: Fogging oil creates a protective coating on cylinder walls to prevent rust
- Bearing preservation: Ensuring components remain lubricated prevents dry starts in spring
- Gear case protection: Fresh gear oil prevents corrosion in lower units and transmissions
- Seal conditioning: Proper lubrication helps maintain seal flexibility and prevents drying out

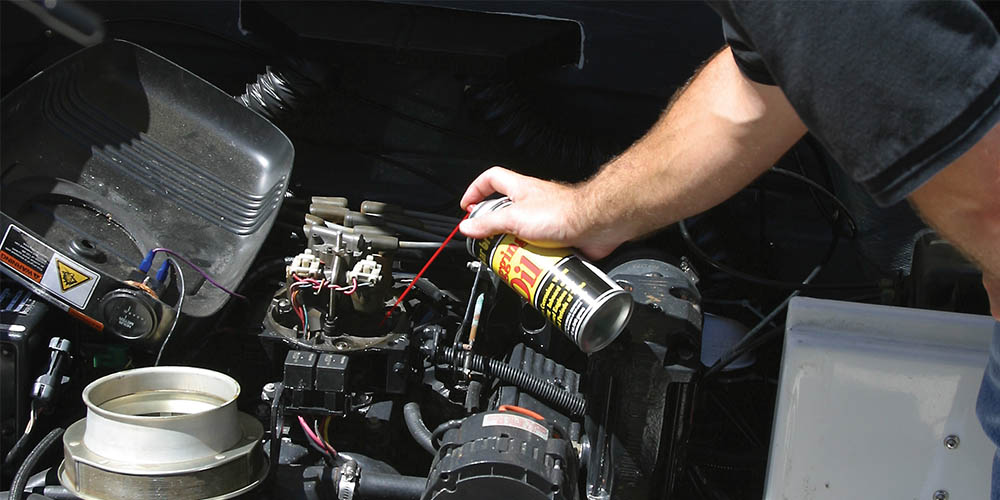
Fogging an engine's cylinders creates a protective coating that prevents internal corrosion during storage.
Prevention of Pest Damage
Inactive boats can become attractive homes for various pests:
- Rodent damage: Mice and other rodents can chew through wiring, hoses, and insulation
- Insect nests: Wasps, bees, and other insects may build nests in exhaust outlets or other openings
- Mold and mildew: Can develop in damp areas, causing odors and deterioration
Financial Benefits of Proper Winterization
The cost-benefit analysis of winterization is compelling:
- Repair cost avoidance: Preventing a cracked block can save thousands of dollars
- Extended engine life: Proper winterization contributes to longer overall engine lifespan
- Maintained resale value: Documented winterization history increases boat value
- Reduced spring commissioning costs: Properly winterized boats require less work to recommission
- More reliable operation: Fewer breakdowns and issues during the boating season
Insurance Considerations:
Many insurance policies have specific requirements for winterization. Failure to properly winterize your boat could potentially void coverage for certain types of damage. Check your policy details and keep records of your winterization process.
Now that we understand why winterization is so critical, let's examine when to perform this important maintenance and what supplies you'll need.
When to Winterize Your Boat
Timing is an important factor in effective winterization. Winterizing too early might cut your boating season short unnecessarily, while waiting too long could expose your boat to damaging conditions. Here's guidance on determining the optimal timing for winterization.
Temperature-Based Timing
The primary concern for winterization timing is the risk of freezing temperatures:
- Freezing threshold: Winterization should be completed before temperatures drop to freezing (32°F/0°C) in your area
- Safety margin: Aim to complete winterization at least 2-3 weeks before the first expected freeze in your region
- Unexpected cold snaps: Early season cold fronts can bring freezing temperatures sooner than expected
- Microclimate considerations: Local conditions may differ from regional forecasts
Recommended winterization timing varies by region, with northern areas typically requiring earlier preparation.
Regional Guidelines
Winterization timing varies significantly by geographic location:
- Northern regions: Complete winterization by mid-October to early November
- Mid-Atlantic/Midwest: Aim for late October to mid-November
- Southern regions: Late November to December may be sufficient
- Coastal vs. inland: Coastal areas often have milder temperatures but may require additional corrosion protection
Extended Season Boating:
If you plan to boat during mild winter days, consider a partial winterization that protects critical systems but allows for occasional use. This requires vigilant weather monitoring and may not be practical in all regions.
Usage-Based Considerations
Your boating habits should also influence winterization timing:
- End of personal boating season: If you know you won't use the boat again until spring, winterize even if temperatures remain mild
- Storage location changes: If moving to winter storage, coordinate winterization with the move
- Maintenance scheduling: Consider technician availability if using professional services
- Travel plans: If you'll be away during the early winter period, winterize before departing
Other Timing Factors
Additional considerations that may influence your winterization schedule:
- Fuel considerations: Ideally, use up most fuel before winterization or fill the tank completely
- Maintenance coordination: Schedule winterization to coincide with other end-of-season maintenance
- Storage facility requirements: Some facilities have specific deadlines for winterization
- Service provider availability: Marine service centers get very busy during peak winterization season
Plan ahead with our complete winterization kits that include all the supplies you need for proper storage preparation.
With the timing considerations in mind, let's look at the supplies and tools you'll need to properly winterize your boat engine.
Supplies and Tools Needed
Proper winterization requires specific supplies and tools. Having everything ready before you begin will make the process more efficient and ensure you don't have to pause mid-procedure. The exact items needed will vary somewhat based on your engine type, but here's a comprehensive list to prepare you for winterizing outboard, sterndrive, or inboard engines.
Essential Supplies for All Engine Types
These items are necessary regardless of what type of engine you're winterizing:
- Fuel stabilizer: Marine-specific formula designed for ethanol-blended fuels and long-term storage
- Fogging oil: Protective oil that coats internal engine components during storage
- Engine oil and filter: Fresh oil appropriate for your specific engine
- Lower unit/gear case oil: Manufacturer-recommended gear lubricant
- Antifreeze: Non-toxic propylene glycol marine/RV antifreeze (usually pink)
- Corrosion inhibitor: Spray for external engine components
- Grease: Marine-grade waterproof grease for fittings and components
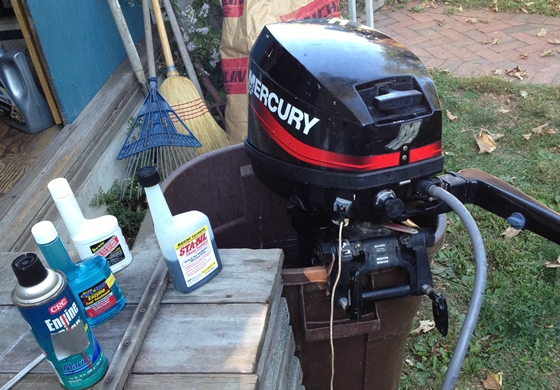
Essential supplies for a complete engine winterization include fuel stabilizer, fogging oil, fresh lubricants, and antifreeze.
Engine-Specific Supplies
Different engine types require some specialized supplies:
Outboard Engine Supplies
- Gear oil pump: For changing lower unit oil
- Flush muffs: For connecting water supply to lower unit
- Spark plug wrench: For removing and replacing plugs
- Remote oil tank supplies: For oil-injected two-stroke engines
Sterndrive Engine Supplies
- Sterndrive service kit: Includes gaskets and O-rings
- Gimbal bearing grease: Special grease for the gimbal bearing
- Universal joint grease: For U-joint lubrication
- Drive oil monitoring fluid: For checking drive oil condition
Inboard Engine Supplies
- Transmission fluid: For transmission service
- Water pump impeller kit: Often replaced during winterization
- Shaft packing material: If servicing the stuffing box
- Cooling system flush chemical: For cleaning the cooling system
Find engine-specific winterization supplies in our specialized winterization kits for Yamaha, Mercury, Volvo Penta, and other major brands.
Essential Tools
These tools will help you complete the winterization process efficiently:
- Oil filter wrench: For removing the oil filter
- Socket set and wrenches: Various sizes for different fasteners
- Screwdrivers: Phillips and flathead in various sizes
- Pliers: Regular and needle-nose
- Funnel: For adding fluids without spills
- Oil drain pan: For collecting used oil and fluids
- Fuel line disconnect tools: For fuel system work
- Garden hose and nozzle: For flushing and cleaning
Safety Equipment
Protect yourself during the winterization process:
- Safety glasses: Protect eyes from fluids and chemicals
- Nitrile gloves: Protect hands from oils and chemicals
- Shop rags or paper towels: For cleanup
- Proper disposal containers: For used oil and fluids
- Fire extinguisher: Safety precaution when working with fuel
Environmentally Responsible Disposal:
Plan ahead for proper disposal of used oil, antifreeze, and other fluids. Many marine supply stores, auto parts stores, and recycling centers accept these materials. Never dump used fluids in drains, on the ground, or in water.
Documentation Materials
Keep records of your winterization process:
- Service manual: Specific to your engine model
- Winterization checklist: To track completed steps
- Notebook and pen: For recording maintenance details
- Camera/smartphone: For documenting the process and component positions
- Labels and tape: For marking disconnected components
A detailed winterization checklist helps ensure no steps are missed and provides documentation for warranty and insurance purposes.
Optional but Helpful Items
These additional items can make the winterization process easier:
- Battery maintainer/tender: For keeping batteries charged during storage
- Fuel siphon pump: If you need to remove fuel from the tank
- Moisture absorber packets: To reduce humidity in engine spaces
- Engine cover or shrink wrap supplies: For external protection
- Pressure washer: For thorough cleaning before storage
- Dehumidifier: For use in enclosed storage areas
With all necessary supplies and tools gathered, you're ready to begin the winterization process. We'll start with outboard engines, then cover sterndrive and inboard engines in the following sections.
Outboard Engine Winterization
Outboard engines require specific winterization procedures to protect them during the off-season. The process varies slightly between two-stroke and four-stroke engines, but the fundamental steps remain similar. Follow this comprehensive guide to properly winterize your outboard engine.
Preliminary Steps
Before beginning the actual winterization process, complete these preparatory steps:
- Run the engine: Take the boat for a final short run to bring the engine to operating temperature, which helps with fluid changes
- Clean the exterior: Thoroughly wash the engine exterior with fresh water and mild soap to remove salt, dirt, and grime
- Inspect for damage: Check for any visible damage, loose parts, or leaks that should be addressed before storage
- Gather all supplies: Ensure you have all necessary supplies and tools ready
- Disconnect battery: Remove the negative battery cable for safety during maintenance
Thoroughly cleaning your outboard engine before winterization helps identify any issues and prevents corrosion during storage.
Fuel System Treatment
Properly treating the fuel system is critical for preventing issues caused by fuel degradation:
- Add fuel stabilizer: Add a marine-grade fuel stabilizer to the tank according to product instructions (typically 1 oz. per 10 gallons)
- Fill the tank: Fill the fuel tank to 95% capacity to prevent condensation while leaving room for expansion
- Run the engine: Start the engine with flush muffs attached and run for 10-15 minutes to ensure treated fuel circulates through the entire fuel system
- Portable tank option: For smaller outboards with portable tanks, you may prefer to run the engine until the fuel system is dry, then store the empty tank
Fuel System Considerations:
Modern ethanol-blended fuels can cause significant problems during storage. If possible, use ethanol-free fuel for the last fill before winterization. If using ethanol-blended fuel, a high-quality marine fuel stabilizer specifically designed for ethanol fuels is essential.
Lower Unit Service
The lower unit (also called the gearcase) requires attention during winterization:
- Position a drain pan: Place a container under the lower unit to catch old oil
- Remove drain/fill screws: Remove both the lower drain screw and upper vent screw
- Drain old oil: Allow all old oil to drain completely
- Inspect old oil: Check for water contamination (milky appearance) or metal particles that might indicate problems
- Refill with fresh oil: Using a gear oil pump, fill from the bottom hole until oil appears at the upper hole
- Replace screws: Install new gaskets or seals on the screws and reinstall them
- Check for leaks: Wipe the area clean and check for any leakage
Ensure proper lower unit protection with our premium marine gear oils specifically formulated for outboard lower units.
Engine Oil Change (Four-Stroke Engines)
For four-stroke outboards, changing the oil and filter is an essential winterization step:
- Warm the engine: If not already warm from running, warm up the engine to ensure oil flows freely
- Position drain pan: Place a container under the oil drain location
- Remove drain plug: Remove the oil drain plug or use an oil extraction pump through the dipstick tube
- Remove oil filter: Once oil is drained, remove and discard the old oil filter
- Install new filter: Apply a light coating of oil to the new filter gasket and install hand-tight plus 1/4 turn
- Add fresh oil: Refill with manufacturer-recommended oil to the proper level
- Run briefly: Start the engine briefly (with water supply connected) to circulate new oil, then recheck the level

Changing the oil in a four-stroke outboard is a critical winterization step that removes contaminants and acids that could damage the engine during storage.
Cylinder Fogging
Fogging the cylinders protects internal engine components from corrosion:
- Remove engine cover: Take off the cowling/cover to access the engine
- Locate spark plugs: Identify all spark plug locations
- Remove spark plugs: Carefully remove all spark plugs
- Spray fogging oil: Spray fogging oil into each cylinder through the spark plug holes
- Turn engine over: With all plugs removed, turn the engine over briefly to distribute the oil (pull starter rope or use starter with ignition disabled)
- Replace spark plugs: Install new spark plugs or reinstall existing ones if they're in good condition
Alternative Fogging Method:
Some outboards can be fogged by spraying fogging oil into the carburetor or air intake while the engine is running. The engine will smoke heavily and then stall as the cylinders become coated. Consult your engine manual for the recommended fogging procedure.
Cooling System Protection
Ensuring all water is removed from the cooling system is critical for freeze protection:
- Disconnect water supply: Remove flush muffs if still attached
- Drain cooling passages: Locate and open all water drain points on the engine
- Tilt the engine: Fully tilt the engine up and down several times to ensure all water drains out
- Check telltale passage: Ensure the water indicator (telltale) passage is clear
- Final position: Leave the engine in a slightly tilted down position to ensure any remaining water can drain out
For complete protection, consider our cooling system winterization kits with everything needed to prevent freeze damage.
Final Protection Steps
Complete these final steps to ensure comprehensive protection:
- Lubricate control cables: Apply lubricant to shift and throttle cables
- Grease fittings: Apply marine grease to all grease fittings
- Spray external components: Apply corrosion inhibitor spray to external engine components
- Check anodes/zincs: Inspect and replace sacrificial anodes if more than 50% corroded
- Lubricate propeller shaft: Remove propeller, apply grease to the shaft, and reinstall
- Replace cowling: Reinstall the engine cover/cowling
- Cover the engine: Use a manufacturer's cover or high-quality aftermarket cover

Applying corrosion protection spray to external components helps prevent oxidation and deterioration during storage.
Storage Position
The proper storage position for your outboard is important:
- Vertical storage: Ideally, store the engine in its normal vertical position
- Tilt position: If on the boat, the engine should be in a slightly tilted down position to allow any water to drain
- Never store on side: Storing an outboard on its side can cause oil to enter the cylinders or water to enter areas it shouldn't
- Support if removed: If removed from the boat, use a proper engine stand or secure mounting
Theft Prevention:
Outboard theft is unfortunately common during the off-season. Consider using a specialized outboard lock, removing the engine if practical, or ensuring your storage location has adequate security measures.
With your outboard properly winterized, it will be protected during the off-season and ready for quick commissioning when spring arrives. Next, we'll cover the winterization process for sterndrive engines.
Sterndrive Engine Winterization
Sterndrive engines (also called inboard/outboard or I/O) combine elements of both inboard and outboard systems, requiring specific winterization procedures. The following comprehensive guide covers the steps needed to properly winterize popular sterndrive systems like MerCruiser, Volvo Penta, and others.
Preliminary Steps
Before beginning the actual winterization process, complete these preparatory steps:
- Run the engine: Take the boat for a final short run to bring the engine to operating temperature
- Clean the boat and drive: Thoroughly wash the hull and sterndrive to remove growth, salt, and debris
- Inspect for damage: Check for any visible damage, loose parts, or leaks that should be addressed
- Gather all supplies: Ensure you have all necessary supplies and tools ready
- Disconnect battery: Remove the negative battery cable for safety during maintenance
Thoroughly cleaning the sterndrive removes marine growth and allows for proper inspection before winterization.
Engine Oil and Filter Change
Changing the engine oil and filter is essential for sterndrive winterization:
- Warm the engine: If not already warm from running, warm up the engine to ensure oil flows freely
- Position drain pan: Place a container under the oil drain location
- Remove drain plug: Remove the oil drain plug or use an oil extraction pump
- Remove oil filter: Once oil is drained, remove and discard the old oil filter
- Install new filter: Apply a light coating of oil to the new filter gasket and install hand-tight plus 1/4 turn
- Add fresh oil: Refill with manufacturer-recommended oil to the proper level
- Run briefly: Start the engine briefly to circulate new oil, then recheck the level
Ensure optimal protection with our marine-specific engine oils formulated for the unique demands of sterndrive engines.
Fuel System Treatment
Properly treating the fuel system prevents issues caused by fuel degradation:
- Add fuel stabilizer: Add a marine-grade fuel stabilizer to the tank according to product instructions
- Fill the tank: Fill the fuel tank to 95% capacity to prevent condensation while leaving room for expansion
- Run the engine: Start the engine and run for 10-15 minutes to ensure treated fuel circulates through the entire fuel system
- Change fuel filters: Replace the fuel filter(s) with new ones
Fuel System Considerations:
Some sterndrive owners prefer to drain water separating fuel filters after adding stabilizer and running the engine. This removes any water that might have accumulated in the filter before storage.
Drive Oil Change
The sterndrive lower unit requires fresh oil for winter storage:
- Position a drain pan: Place a container under the drive unit
- Remove drain/fill screws: Remove both the lower drain screw and upper vent screw
- Drain old oil: Allow all old oil to drain completely
- Inspect old oil: Check for water contamination (milky appearance) or metal particles
- Refill with fresh oil: Using a gear oil pump, fill from the bottom hole until oil appears at the upper hole
- Replace screws: Install new gaskets or seals on the screws and reinstall them
- Check for leaks: Wipe the area clean and check for any leakage

Changing the drive oil is critical for preventing internal corrosion in the sterndrive unit during storage.
Engine Cooling System Protection
Protecting the engine's cooling system from freeze damage is critical:
For Raw Water Cooled Engines
- Close seacock: If equipped, close the raw water intake seacock
- Disconnect intake hose: Remove the hose from the raw water pump intake
- Prepare antifreeze: Place the intake hose in a bucket with 5-6 gallons of propylene glycol antifreeze
- Run engine: Start the engine and run at idle until pink antifreeze appears at the exhaust
- Shut down engine: Once antifreeze is visible at the exhaust, shut off the engine
- Reconnect hose: Reattach the intake hose and secure with a clamp
For Closed Cooling Systems (Fresh Water Cooled)
- Check coolant: Verify the antifreeze protection level in the closed cooling system
- Add antifreeze: If needed, add appropriate antifreeze to ensure protection to at least -20°F (-29°C)
- Protect raw water side: Follow the raw water cooling steps above for the raw water portion of the system
Protect your cooling system with our marine-grade propylene glycol antifreeze specifically formulated for winterization.
Cylinder Fogging
Fogging the cylinders protects internal engine components from corrosion:
- Access spark plugs: Remove the flame arrestor and locate spark plugs
- Remove spark plugs: Carefully remove all spark plugs
- Spray fogging oil: Spray fogging oil into each cylinder through the spark plug holes
- Turn engine over: With all plugs removed, turn the engine over briefly to distribute the oil
- Replace spark plugs: Install new spark plugs or reinstall existing ones if they're in good condition
- Reinstall components: Replace the flame arrestor and any other components removed
Alternative Fogging Method:
Some engines can be fogged by spraying fogging oil into the carburetor or throttle body while the engine is running. The engine will smoke heavily and then stall as the cylinders become coated. Consult your engine manual for the recommended procedure.
Drive and Gimbal Maintenance
The sterndrive unit requires specific attention for proper winterization:
- Inspect bellows: Check all bellows (shift, exhaust, and drive) for cracks or damage
- Grease U-joints: Apply marine grease to universal joints if accessible
- Grease gimbal bearing: Apply the manufacturer-recommended grease to the gimbal bearing
- Check drive alignment: Verify proper drive alignment if indicated in your manual
- Inspect anodes/zincs: Check and replace sacrificial anodes if more than 50% corroded
- Apply corrosion protection: Spray corrosion inhibitor on external drive components
- Lubricate steering: Grease all steering system fittings

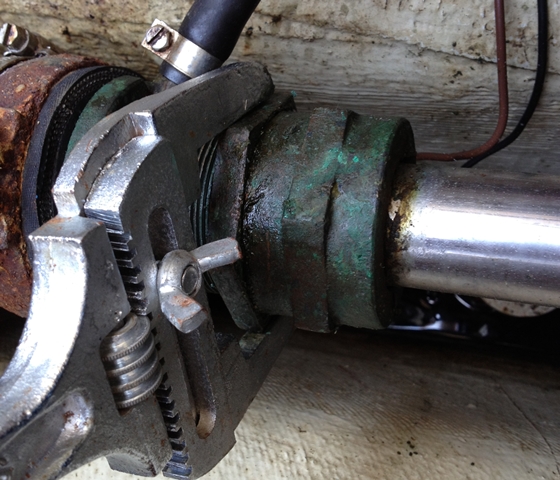
Careful inspection of sterndrive bellows is critical during winterization, as failures can lead to water intrusion and serious damage.
Final Protection Steps
Complete these final steps to ensure comprehensive protection:
- Lubricate control cables: Apply lubricant to shift and throttle cables
- Remove propeller: Take off the propeller, inspect for fishing line, and grease the shaft
- Drain any water: Ensure all water is drained from the engine compartment
- Clean bilge: Clean and dry the bilge area
- Position drive: Leave the drive in the down/lowered position for storage
- Cover the boat: Use a proper cover that protects but allows ventilation
Drive Position:
Always store sterndrive units in the fully lowered position to prevent bellows from being stretched and to allow any water to drain. Storing with the drive tilted up can lead to bellows damage and water intrusion.
With your sterndrive properly winterized, it will be protected during the off-season and ready for quick commissioning when spring arrives. Next, we'll cover the winterization process for inboard engines.
Inboard Engine Winterization
Inboard engines present unique winterization challenges due to their enclosed installation and more complex systems. The following comprehensive guide covers the steps needed to properly winterize inboard gasoline and diesel engines.
Preliminary Steps
Before beginning the actual winterization process, complete these preparatory steps:
- Run the engine: Take the boat for a final short run to bring the engine to operating temperature
- Clean the boat: Thoroughly clean the hull, bilge, and engine compartment
- Inspect for issues: Check for any visible damage, loose parts, or leaks that should be addressed
- Gather all supplies: Ensure you have all necessary supplies and tools ready
- Disconnect battery: Remove the negative battery cable for safety during maintenance
Thoroughly cleaning the engine compartment before winterization allows for proper inspection and prevents debris from causing issues during storage.
Engine Oil and Filter Change
Changing the engine oil and filter is essential for inboard winterization:
- Warm the engine: If not already warm from running, warm up the engine to ensure oil flows freely
- Position drain pan: Place a container under the oil drain location
- Remove drain plug: Remove the oil drain plug or use an oil extraction pump
- Remove oil filter: Once oil is drained, remove and discard the old oil filter
- Install new filter: Apply a light coating of oil to the new filter gasket and install hand-tight plus 1/4 turn
- Add fresh oil: Refill with manufacturer-recommended oil to the proper level
- Run briefly: Start the engine briefly to circulate new oil, then recheck the level
Ensure optimal protection with our premium inboard engine oils specifically formulated for marine applications.
Fuel System Treatment
Properly treating the fuel system prevents issues caused by fuel degradation:
- Add fuel stabilizer: Add a marine-grade fuel stabilizer to the tank according to product instructions
- Fill the tank: Fill the fuel tank to 95% capacity to prevent condensation while leaving room for expansion
- Run the engine: Start the engine and run for 10-15 minutes to ensure treated fuel circulates through the entire fuel system
- Change fuel filters: Replace the primary and secondary fuel filters with new ones
- Drain water separators: Empty any water from fuel/water separators
Diesel Engine Considerations:
Diesel engines require special attention to prevent algae growth in the fuel. Use a biocide treatment in addition to fuel stabilizer, and consider having the tank polished if it's been several years since the last cleaning.
Cooling System Protection
Protecting the engine's cooling system from freeze damage is critical:
For Raw Water Cooled Engines
- Close seacock: Close the raw water intake seacock
- Disconnect intake hose: Remove the hose from the raw water pump intake
- Prepare antifreeze: Place the intake hose in a bucket with 5-6 gallons of propylene glycol antifreeze
- Run engine: Start the engine and run at idle until pink antifreeze appears at the exhaust
- Shut down engine: Once antifreeze is visible at the exhaust, shut off the engine
- Reconnect hose: Reattach the intake hose and secure with a clamp
For Closed Cooling Systems (Fresh Water Cooled)
- Check coolant: Verify the antifreeze protection level in the closed cooling system
- Add antifreeze: If needed, add appropriate antifreeze to ensure protection to at least -20°F (-29°C)
- Protect raw water side: Follow the raw water cooling steps above for the raw water portion of the system
- Check heat exchangers: Ensure antifreeze flows through all heat exchangers

Running antifreeze through the raw water cooling system is essential for preventing freeze damage in inboard engines.
Cylinder Fogging
Fogging the cylinders protects internal engine components from corrosion:
- Access spark plugs: Remove the flame arrestor and locate spark plugs
- Remove spark plugs: Carefully remove all spark plugs
- Spray fogging oil: Spray fogging oil into each cylinder through the spark plug holes
- Turn engine over: With all plugs removed, turn the engine over briefly to distribute the oil
- Replace spark plugs: Install new spark plugs or reinstall existing ones if they're in good condition
- Reinstall components: Replace the flame arrestor and any other components removed
Diesel Engine Fogging:
Diesel engines typically don't require cylinder fogging in the same way as gasoline engines. Instead, changing the oil and ensuring the engine is run with treated fuel before shutdown is usually sufficient. Consult your engine manual for specific recommendations.
Transmission Service
The transmission requires attention during winterization:
- Check fluid level: Verify the transmission fluid level
- Change fluid if needed: If due for service, change the transmission fluid
- Check for leaks: Inspect for any signs of leakage around seals and gaskets
- Check linkage: Ensure shift linkage is properly adjusted and lubricated
Maintain your transmission with our marine transmission fluids designed for optimal protection during storage and operation.
Shaft and Stuffing Box Service
The propeller shaft and stuffing box require specific attention:
- Remove propeller: Take off the propeller, inspect for fishing line, and grease the shaft
- Check stuffing box: Inspect the stuffing box or shaft seal for leaks
- Adjust packing: If using traditional packing, adjust if necessary
- Lubricate if required: Some stuffing boxes require lubrication before storage
- Check cutlass bearing: Inspect the cutlass bearing for excessive wear
Inspecting and servicing the stuffing box during winterization helps prevent leaks and ensures proper lubrication during storage.
Additional Systems
Inboard boats often have additional systems requiring winterization:
Freshwater System
- Drain water tank: Empty the freshwater tank
- Drain water heater: If equipped, drain the water heater
- Add antifreeze: Run non-toxic antifreeze through all faucets, shower, and toilet
- Drain pumps: Ensure water pumps are drained
Sanitation System
- Empty holding tank: Pump out the holding tank at an approved facility
- Add antifreeze: Pour antifreeze into the toilet and pump through the system
- Lubricate seals: Apply lubricant to toilet seals to prevent drying
Air Conditioning
- Flush with antifreeze: Run antifreeze through the raw water cooling system
- Clean strainer: Remove and clean the seawater strainer
- Clean filters: Remove and clean or replace air filters
System Documentation:
Create a diagram or take photos of all systems before winterization, especially if you're new to the boat. This will help you remember the proper configuration when recommissioning in spring.
Final Protection Steps
Complete these final steps to ensure comprehensive protection:
- Lubricate control cables: Apply lubricant to shift and throttle cables
- Check anodes/zincs: Inspect and replace sacrificial anodes if more than 50% corroded
- Drain any water: Ensure all water is drained from the engine compartment and bilge
- Clean bilge: Clean and dry the bilge area
- Apply corrosion protection: Spray corrosion inhibitor on external engine components
- Place moisture absorbers: Position moisture-absorbing products in the engine compartment
- Cover the boat: Use a proper cover that protects but allows ventilation
With your inboard engine properly winterized, it will be protected during the off-season and ready for quick commissioning when spring arrives. Next, we'll cover common winterization mistakes to avoid.
Common Winterization Mistakes to Avoid
Even experienced boat owners can make mistakes during the winterization process. Being aware of these common errors can help you avoid costly problems and ensure your boat is properly protected during the off-season.
Fuel System Mistakes
The fuel system is particularly vulnerable to winterization errors:
- Leaving the tank partially empty: This creates space for condensation to form, leading to water in the fuel and potential phase separation with ethanol fuels
- Using automotive fuel stabilizer: Marine engines require marine-specific fuel stabilizers designed for the unique challenges of boat storage
- Adding stabilizer without running the engine: Stabilizer must circulate through the entire fuel system to be effective
- Underdosing stabilizer: Using too little stabilizer won't provide adequate protection
- Neglecting to change fuel filters: Old, contaminated filters can harbor moisture and contaminants

Phase separation in ethanol-blended fuel can cause serious engine damage. Proper fuel treatment is essential for winterization.
Cooling System Errors
Cooling system mistakes can lead to freeze damage and expensive repairs:
- Using automotive antifreeze: Never use ethylene glycol (toxic) antifreeze in marine engines; use only propylene glycol marine/RV antifreeze
- Insufficient antifreeze: Not running enough antifreeze through the system to displace all water
- Missing hidden water pockets: Failing to identify and drain all areas where water can collect
- Forgetting to winterize the freshwater system: Sinks, showers, toilets, and water heaters can freeze and crack
- Neglecting to protect sea strainers: These often hold water and can crack if frozen
Antifreeze Selection:
Use only non-toxic propylene glycol antifreeze rated for the lowest expected temperatures in your area. Standard "RV antifreeze" typically protects to -50°F (-46°C) when used at full strength, but can be diluted by residual water in the system.
Engine Protection Oversights
These engine-related mistakes can lead to starting problems and internal damage:
- Skipping oil changes: Old oil contains acids and moisture that can damage engine internals during storage
- Neglecting cylinder fogging: Unprotected cylinder walls can rust during storage
- Improper spark plug handling: Leaving old, worn plugs installed or failing to gap new plugs properly
- Forgetting to disconnect the battery: Connected batteries can drain and freeze, or cause electrical issues
- Improper engine position: Storing outboards tilted up or sterndrives in the raised position can cause problems
Ensure complete engine protection with our premium engine fogging oil that creates a long-lasting protective coating on internal components.
Drive System Mistakes
Lower units and drive systems require specific attention:
- Not changing gear oil: Old gear oil can contain water and acids that cause corrosion during storage
- Ignoring bellows condition: Cracked or damaged bellows can allow water intrusion during storage
- Forgetting to grease fittings: Unlubricated components can seize or corrode
- Leaving the propeller installed: This prevents inspection for fishing line and proper shaft lubrication
- Neglecting anodes/zincs: Corroded sacrificial anodes won't provide protection during storage
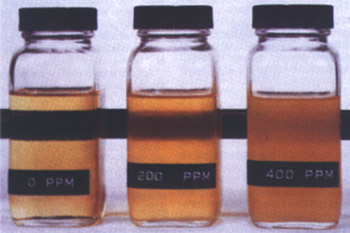
Water-contaminated gear oil (left) compared to fresh oil (right). Contaminated oil must be changed before winter storage.
Storage Environment Issues
The storage environment can create additional problems:
- Improper covering: Using non-breathable covers that trap moisture and promote mold/mildew
- Inadequate ventilation: Sealing the boat too tightly prevents air circulation
- Neglecting pest prevention: Failing to protect against rodents and insects
- Improper support: Incorrect blocking or trailer support can stress the hull
- Ignoring battery maintenance: Failing to use a battery maintainer during long-term storage
Cover Selection:
Choose a cover that's waterproof yet breathable. Completely sealed covers can trap moisture, leading to mold and mildew problems. Consider installing vents or using moisture absorbers under the cover.
Documentation and Planning Errors
Organizational mistakes can create problems during storage and spring commissioning:
- No winterization checklist: Relying on memory alone often leads to missed steps
- Poor record keeping: Not documenting what was done makes spring commissioning more difficult
- Inadequate labeling: Disconnected components should be clearly labeled for reassembly
- Rushing the process: Winterization requires time and attention to detail
- Waiting until freezing weather: Procrastinating until cold weather arrives creates risk and rushed work
Using a detailed winterization checklist helps ensure no critical steps are missed during the process.
Professional Service Considerations
If using professional services, avoid these mistakes:
- Choosing based solely on price: The cheapest winterization service may cut corners
- Not specifying services: Be clear about exactly what should be included
- Assuming completeness: Verify what was done rather than assuming all steps were completed
- No follow-up checks: Periodically check on your boat during storage, even if professionally winterized
- Late scheduling: Waiting too long to schedule service may result in rushed work
DIY or Professional?
If you're unsure about performing winterization yourself, consider having a professional handle critical systems like the engine while you manage simpler tasks like cleaning and covering. This hybrid approach can save money while ensuring proper protection.
By avoiding these common winterization mistakes, you'll significantly reduce the risk of problems during storage and ensure a smoother start to the next boating season. Next, we'll cover tips for spring recommissioning.
Spring Recommissioning Tips
While winterization protects your boat during storage, proper spring recommissioning is equally important for ensuring a trouble-free boating season. Planning your recommissioning process now, as part of your winterization, can make spring startup much smoother. Here are essential tips for bringing your boat out of winter storage.
Pre-Launch Planning
Before diving into the physical recommissioning process:
- Review winterization records: Consult your notes about what was done during winterization
- Create a recommissioning checklist: Develop a systematic approach to unwinterizing your boat
- Gather supplies: Collect necessary fluids, filters, and parts before beginning
- Check manufacturer recommendations: Review your engine and boat manuals for specific guidance
- Schedule adequate time: Allow sufficient time for thorough recommissioning without rushing

Proper planning and organization make spring recommissioning more efficient and thorough.
Initial Inspection
Begin with a thorough inspection before any systems are activated:
- Check for winter damage: Look for signs of rodent damage, water intrusion, or freeze damage
- Inspect the hull: Check for blisters, cracks, or other issues that may have developed
- Examine all hoses and clamps: Look for cracks, loose connections, or deterioration
- Check belts: Inspect for proper tension and signs of wear
- Look for fluid leaks: Check for signs of oil, coolant, or fuel leakage
- Inspect electrical connections: Look for corrosion or loose connections
Documentation:
Take photos of any issues you find during inspection. These can be valuable for insurance claims, service discussions, or tracking the progression of conditions over time.
Battery Recommissioning
Proper battery preparation is essential for reliable starting:
- Clean terminals: Remove any corrosion from battery terminals and connections
- Check charge level: Test the battery with a multimeter or battery tester
- Recharge if necessary: Use a marine battery charger to bring batteries to full charge
- Check electrolyte levels: For serviceable batteries, check and top up cells if needed
- Secure connections: Ensure all battery cables are tight and protected from corrosion
- Reinstall batteries: If removed for storage, reinstall in their proper location
Ensure reliable starting with our premium marine batteries designed for the demands of boating applications.
Fuel System Preparation
The fuel system requires specific attention after winter storage:
- Check for fuel odors: Investigate any fuel smells before proceeding
- Inspect fuel lines: Check for cracks, softness, or deterioration
- Examine fuel filters: If not changed during winterization, replace them now
- Verify fuel quality: If in doubt about fuel condition, consider having the tank pumped out
- Check for leaks: Inspect all fuel system components for signs of leakage
- Prime the system: For diesel engines, prime the fuel system if required
Replacing fuel filters during spring recommissioning helps ensure reliable engine operation.
Engine Preparation
Properly preparing the engine is critical for trouble-free operation:
For Outboard Engines
- Reconnect fuel lines: Ensure proper connection and no leaks
- Check gear case oil: Verify proper level and no water contamination
- Reinstall spark plugs: If removed during fogging, reinstall or replace
- Attach water supply: Connect flush muffs or place in water
- Check cooling water flow: After starting, verify water is flowing from the telltale
For Sterndrive Engines
- Check all fluid levels: Engine oil, drive oil, power steering, coolant
- Inspect bellows: Check for cracks or damage before launching
- Reinstall drain plugs: Replace any drain plugs removed for winterization
- Check exhaust system: Ensure all components are properly connected
- Verify cooling water flow: After starting, check for proper water circulation
For Inboard Engines
- Check all fluid levels: Engine oil, transmission fluid, coolant
- Open seacocks: Ensure all seacocks are open before starting
- Reinstall drain plugs: Replace any drain plugs removed for winterization
- Check belt tension: Verify proper tension on all belts
- Inspect exhaust system: Check for proper connections and no blockages
First Start Procedure:
When first starting the engine after storage, be prepared to shut it down quickly if any issues arise. Have someone watch for water flow from the exhaust while you monitor gauges and listen for unusual noises.
Systems Recommissioning
Other boat systems require specific attention:
Freshwater System
- Flush antifreeze: Run fresh water through the entire system until clear
- Sanitize water tank: Consider sanitizing with a marine water system cleaner
- Check for leaks: Inspect all connections and fixtures
- Test water heater: If equipped, verify proper operation
Sanitation System
- Flush antifreeze: Run fresh water through the system
- Check for leaks: Inspect all hoses and connections
- Test operation: Verify pumps and valves function properly
- Add tank treatment: Use appropriate holding tank treatment
Electrical Systems
- Test all lights: Verify navigation lights, cabin lights, and accessories
- Check electronics: Test GPS, depth finder, radio, and other electronics
- Inspect shore power: Check cords, connections, and GFCI operation
- Test bilge pumps: Verify automatic and manual operation
Ensure all systems are ready with our comprehensive spring commissioning kits that include essential supplies for all boat systems.
Final Pre-Launch Checks
Before launching, complete these final checks:
- Install drain plug: The most commonly forgotten item!
- Check steering system: Verify full range of motion and no binding
- Test throttle and shift: Ensure smooth operation through full range
- Inspect safety equipment: Verify life jackets, fire extinguishers, flares, etc.
- Check trailer: If trailering, inspect lights, tires, and bearings
- Verify registration: Ensure current registration is displayed

A thorough pre-launch inspection helps prevent problems and ensures a safe, enjoyable first outing.
Post-Launch Procedures
After launching, complete these important steps:
- Check for leaks: Immediately inspect the boat for water intrusion
- Monitor engine temperature: Watch gauges closely during initial operation
- Verify cooling water flow: Ensure proper water circulation through the cooling system
- Test operation at various RPMs: Gradually increase engine speed while monitoring performance
- Check transmission operation: Test forward, neutral, and reverse
- Listen for unusual noises: Be alert for sounds that might indicate problems
First Outing:
Keep your first trip of the season short and close to your home port or launch ramp. This allows you to address any issues that might arise without being far from assistance.
By planning your spring recommissioning process now and following these guidelines when the time comes, you'll ensure a smooth transition from winter storage to an enjoyable boating season. Proper winterization and recommissioning are complementary processes that protect your investment and maximize your time on the water.
Conclusion
Proper winterization is one of the most important maintenance procedures you can perform to protect your boat engine and ensure its longevity. The time, effort, and relatively modest expense involved in winterization can prevent thousands of dollars in repair costs and save you from the disappointment of delayed spring launching due to winter damage.
Throughout this guide, we've covered comprehensive winterization procedures for outboard, sterndrive, and inboard engines. We've explained not just the how, but the why behind each step, helping you understand the importance of protecting your engine from freezing temperatures, corrosion, fuel degradation, and other threats during the off-season.
Key takeaways from this guide include:
- Winterization is about more than just freeze protection—it's a comprehensive process that addresses multiple aspects of engine preservation
- Timing is important—complete winterization before the first freeze but not so early that you unnecessarily shorten your boating season
- Different engine types require specific winterization procedures, but all share common principles of protection
- Proper fuel system treatment is critical, especially with modern ethanol-blended fuels
- Changing fluids before storage removes contaminants that could damage components during the off-season
- Internal engine protection through fogging prevents corrosion on critical components
- Documentation and record-keeping simplify both the winterization process and spring recommissioning
Remember that winterization is not just about what you do in the fall—it's part of a year-round maintenance cycle that includes spring recommissioning. By planning ahead for both processes, you'll maximize your enjoyment of the boating season and minimize downtime and expenses.
Whether you choose to perform winterization yourself or entrust it to professionals, understanding the process helps you make informed decisions about your boat's care. DIY winterization can save money and provide the satisfaction of knowing exactly what was done, while professional service may offer convenience and expertise for more complex systems.
At JLM Marine, we're committed to helping boat owners maintain their vessels with high-quality parts and comprehensive guidance. Our extensive selection of winterization supplies, engine oils, fuel treatments, and maintenance products provides everything you need to properly protect your investment during the off-season.
By following the detailed procedures in this guide and avoiding common mistakes, you'll ensure your boat engine remains in excellent condition throughout the winter months and is ready for quick, trouble-free startup when the next boating season arrives. Here's to proper winterization and many more years of enjoyable, reliable boating!